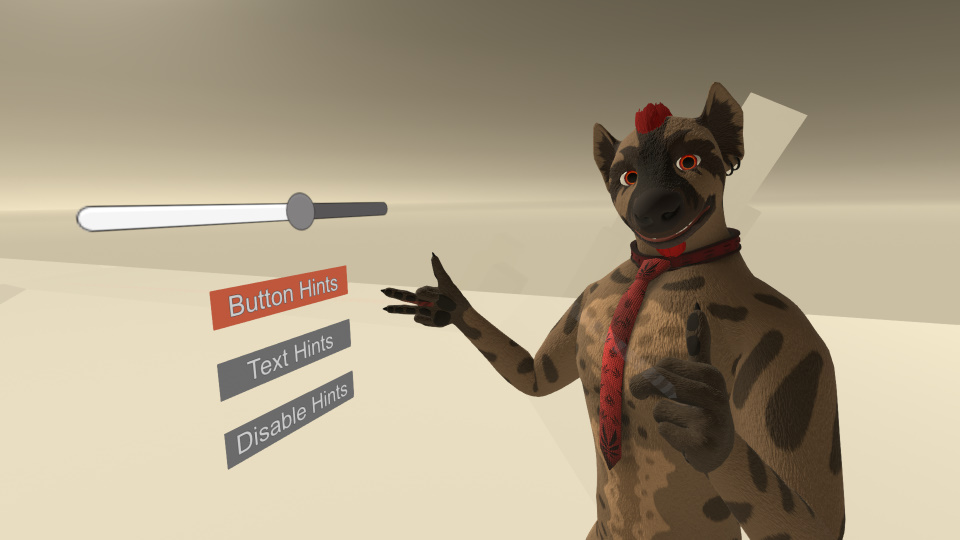
You can use the Somnium Space UI interaction system by configuring your UI correctly. In this tutorial you will learn how to setup and use simple buttons and sliders !
In short
From an UI created in unity, you need to do some changes for it to be used by Somnium Space interaction system:
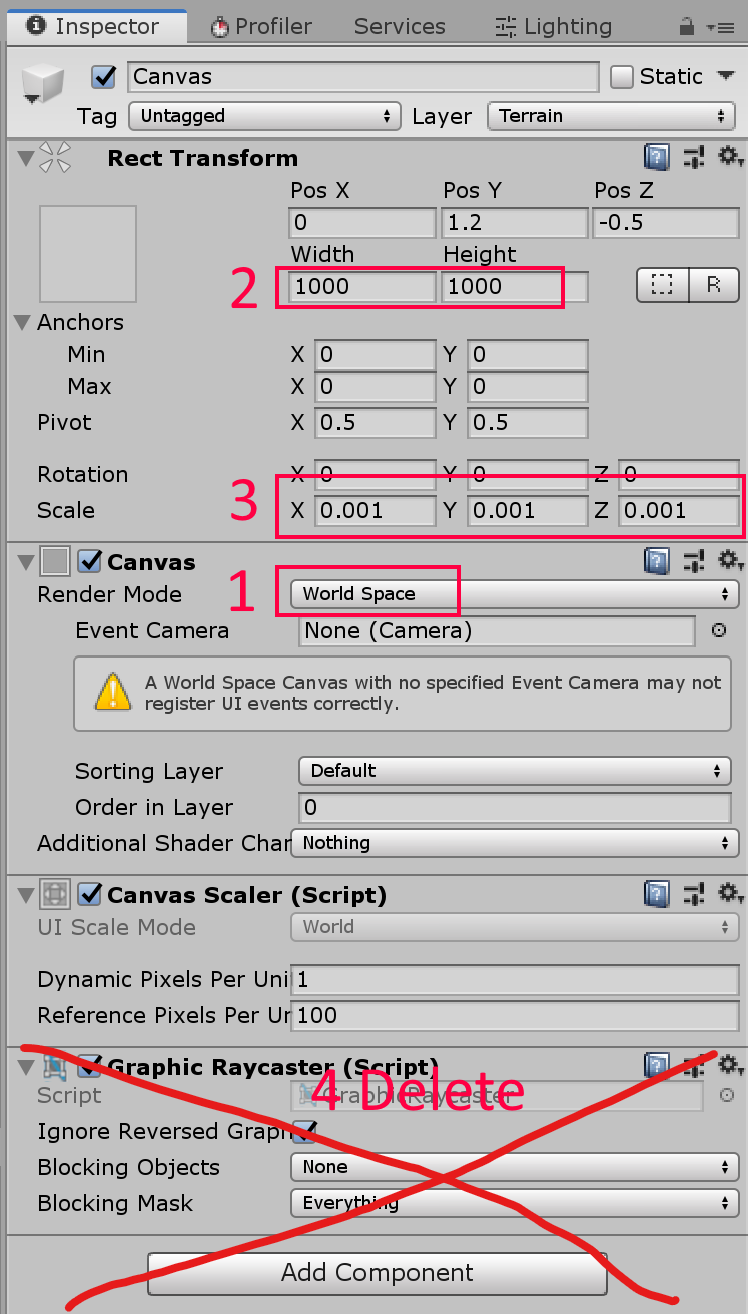
Set the UI Canvas to “World Space”.
Remove the “Graphic Raycaster” component of the “Canvas”.
Add a collider to each intractable component (button, slider, etc) and set the layer of the collider to “UI”. The collider don’t need to be tick, but you should match the size of the button/slider.
Complete tutorial
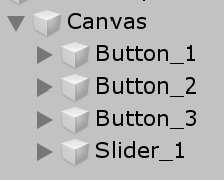
Hierarchy
First gameobject need to be a canvas then you simply put the UI component inside.
Canvas
When you create a new canvas from the quick menu (right click) you need to make some changes. First, consider that you will work in “pixel” from now not in meters. (steps are in the wrong order in the picture do 3 first)
Change the Render Mode to World Space. Then the canvas become 3D.
Set the width so 1000 pixels width and height (this is just a starting value)
Set the scale to 0.001 (1/1000) so we will have 1000 pixel per meter for resolution. This is just an easy standard that could be use.
Delete the Graphic Raycaster component (right click on the component name for this), Somnium use something a little different on his side.
Delete Th Event System
In the top hierarchy of the scene, a GameObject named “EventSystem” have been automatically added. If you leave it there it will interfere with Somnium Space “EventSystem”.
Delete the “EventSystem” GameObject by right clicking on it.
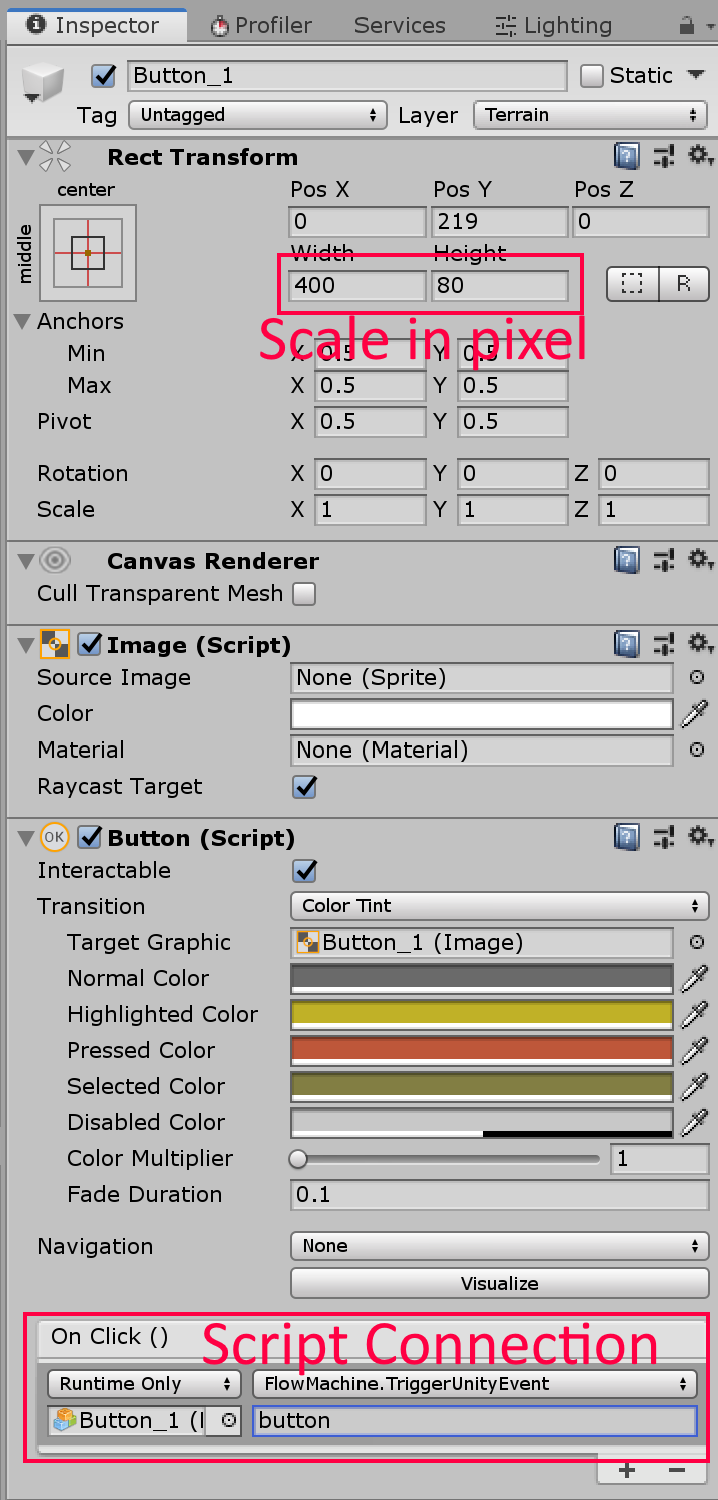
Setup UI Button
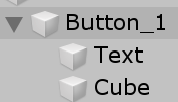
Buttons are made of 3 gameobject: – the button – the text – a collider
Gameobject 1: Button
Right click on the Canvas then select -> UI/Button. This button will be almost usable. You just need to correct the size in pixel (remember 1000 pixel is 1 meter)
To link a button to a script, go on the “On Click()” section and add an item. Then drag-and-drop then drag-and-drop the gameobject of the script you want to call. From the right list i selected “FlowMachine.TriggerunityEvent”.
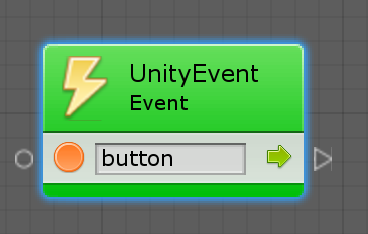
To receive the event on your script, create an unity event node and set same name you put on the button “On Click()” (here we used “button”)
Gameobject 2: Text
There is nothing special to do with the text, it should be already there, you can change it for textmesh-pro (make sure to use TextMesh-Pro 2.0.1).
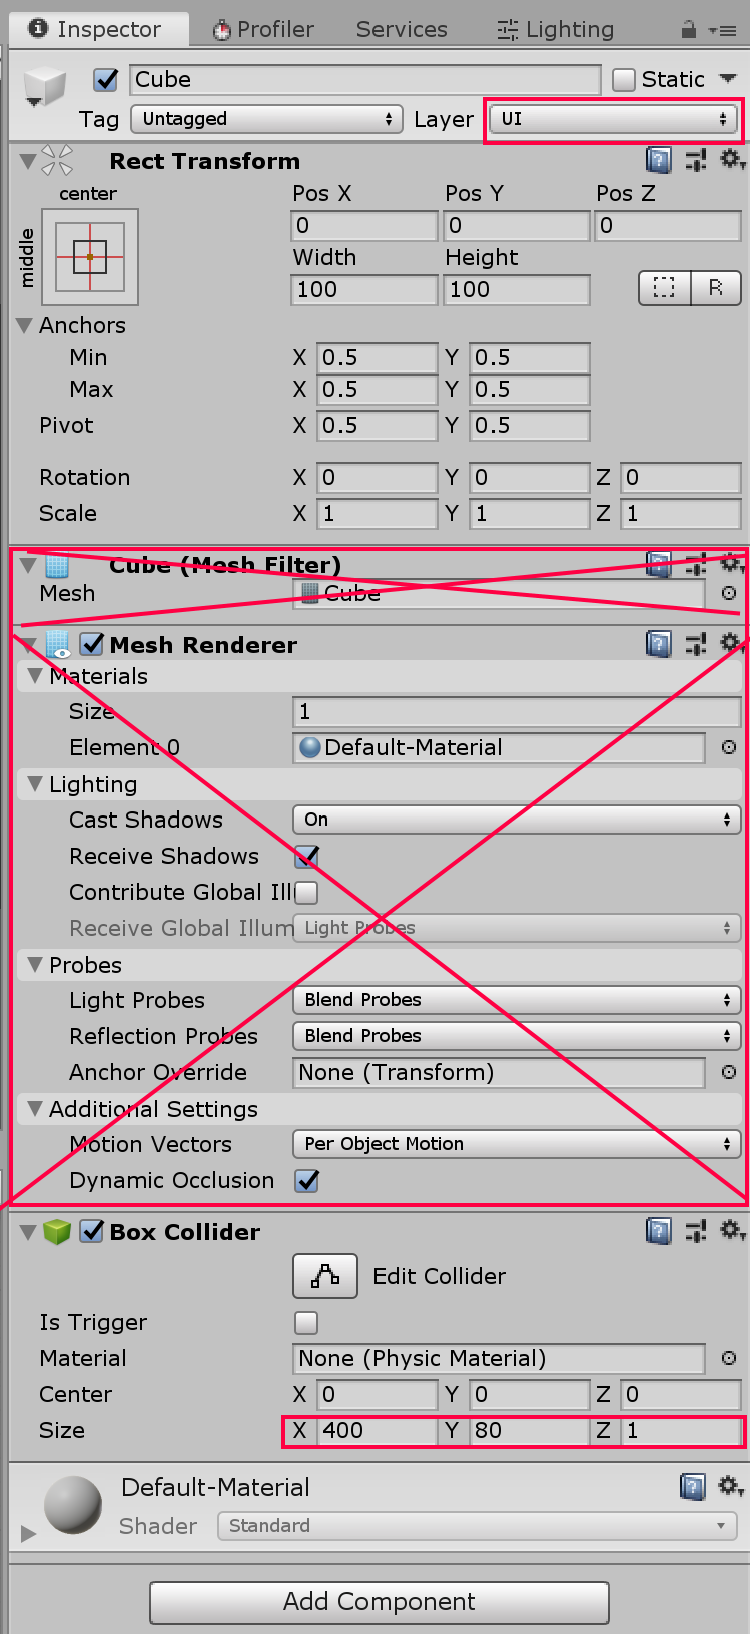
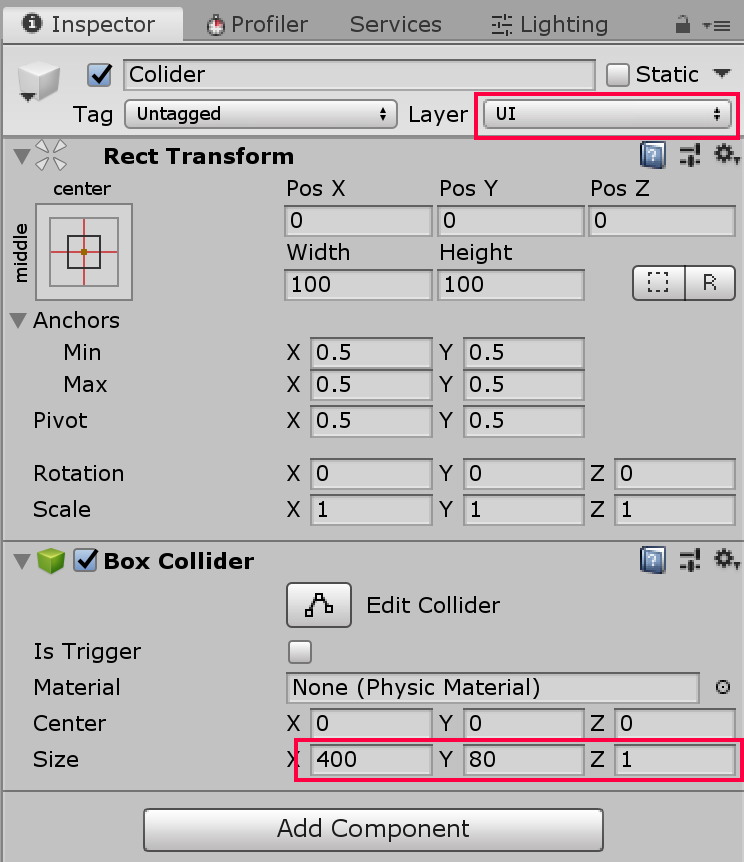
Gameobject 3: Collider
Inside the button we need to add a collider on the UI layer.
In the hierarchy right click on the button then add a cube “3D Object/Cube”.
Set the layer to UI from the UI drop down.
Remove “Cube (Mesh Filter)” and “mesh Renderer”.
Set the scale of the collider in pixel. (1000 pixel per meter)
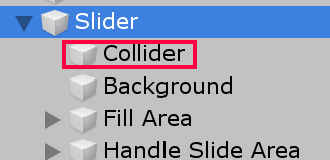
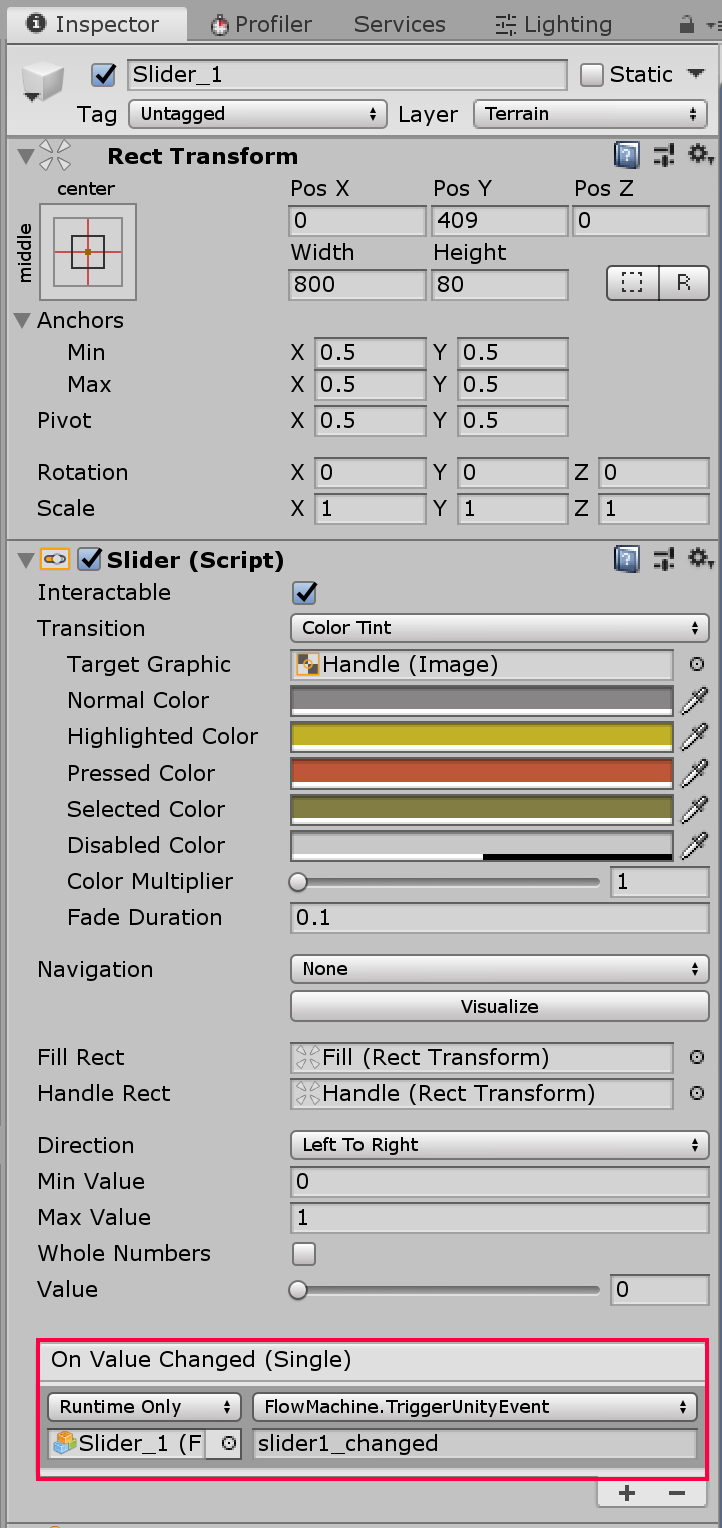
Setup UI Slider
The setup of a slider is similar to the button. You need to add a collider under the Slider Gameobject. Same as the button you need to change the layer and the scale of the collider (also remove the mesh renderer).
Link a script to the slider
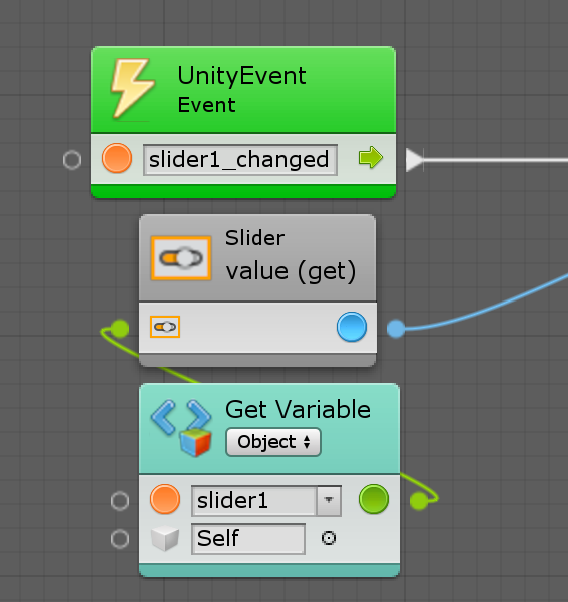
There is a litle difference on the script side. you will need to get the slider value when you receive the “On Value Changed()” event.
Reference the slider main Gameobject on an object variable.
use “Slider.value” on your script when you receive the event.
I suggest that you create a folder called “#Local” or anything else. This folder will contain all your personal assets. This way you can manage your own files without confusion with the other plugins.
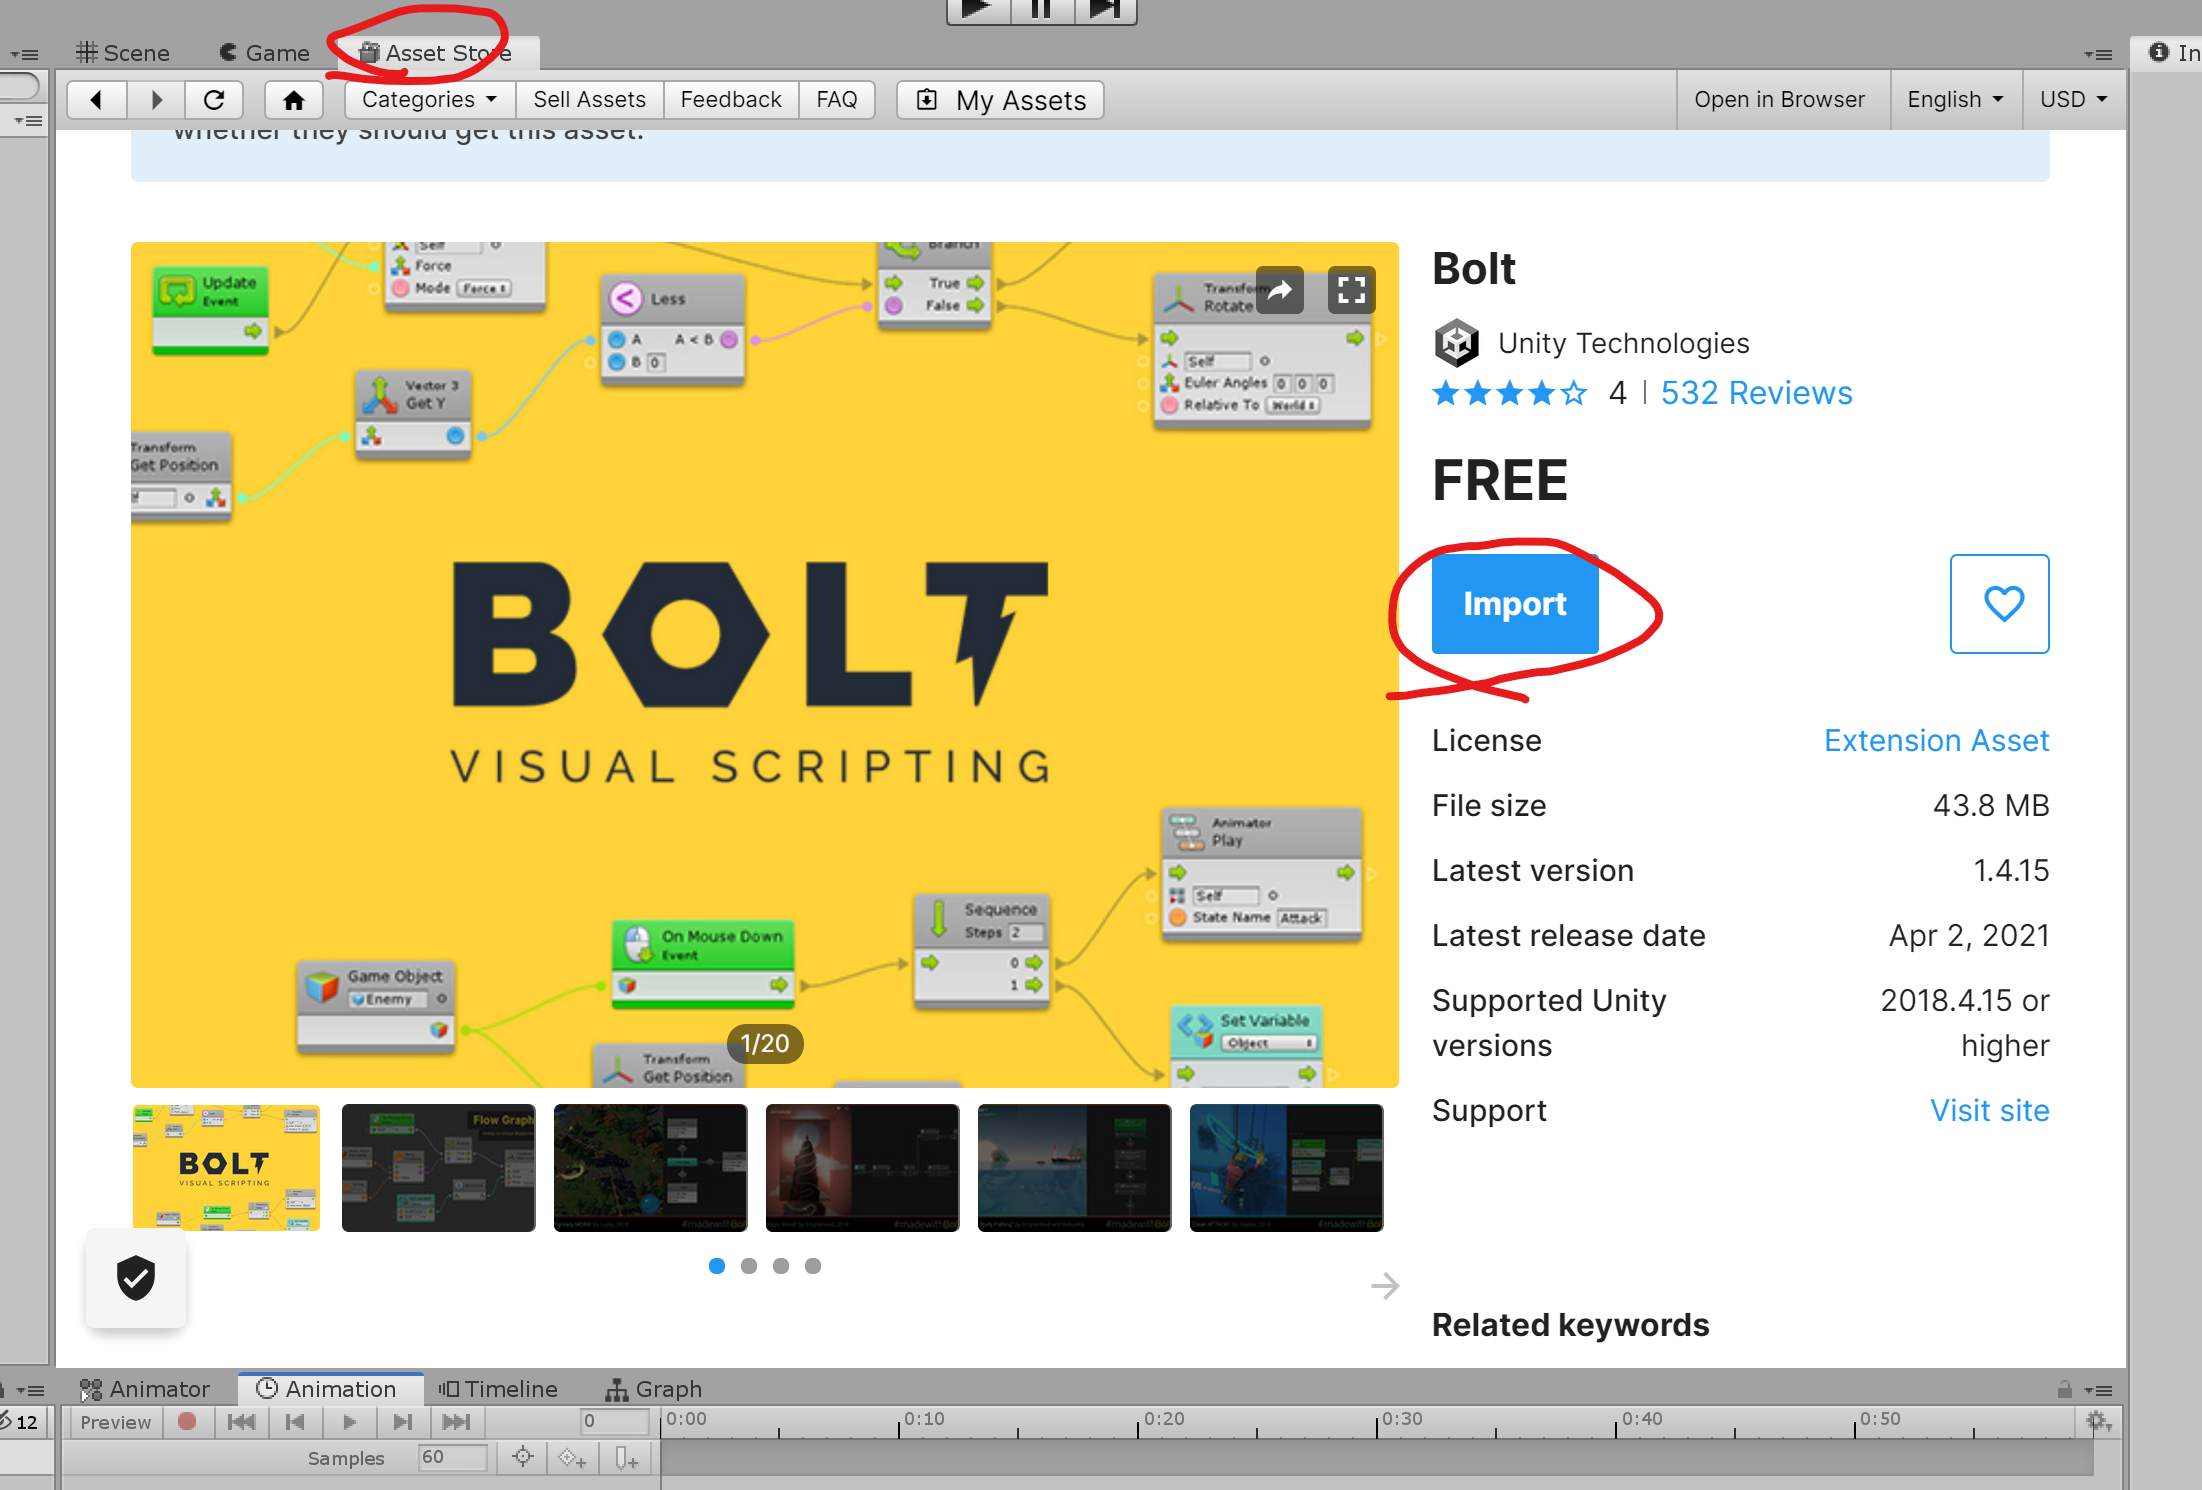
2. Bold installation and configuration
First get the Bolt and Photon plugin from the asset store, one purchased (they are free) you can install the add-on from the embedded asset store on Unity (Window / Asset Store).
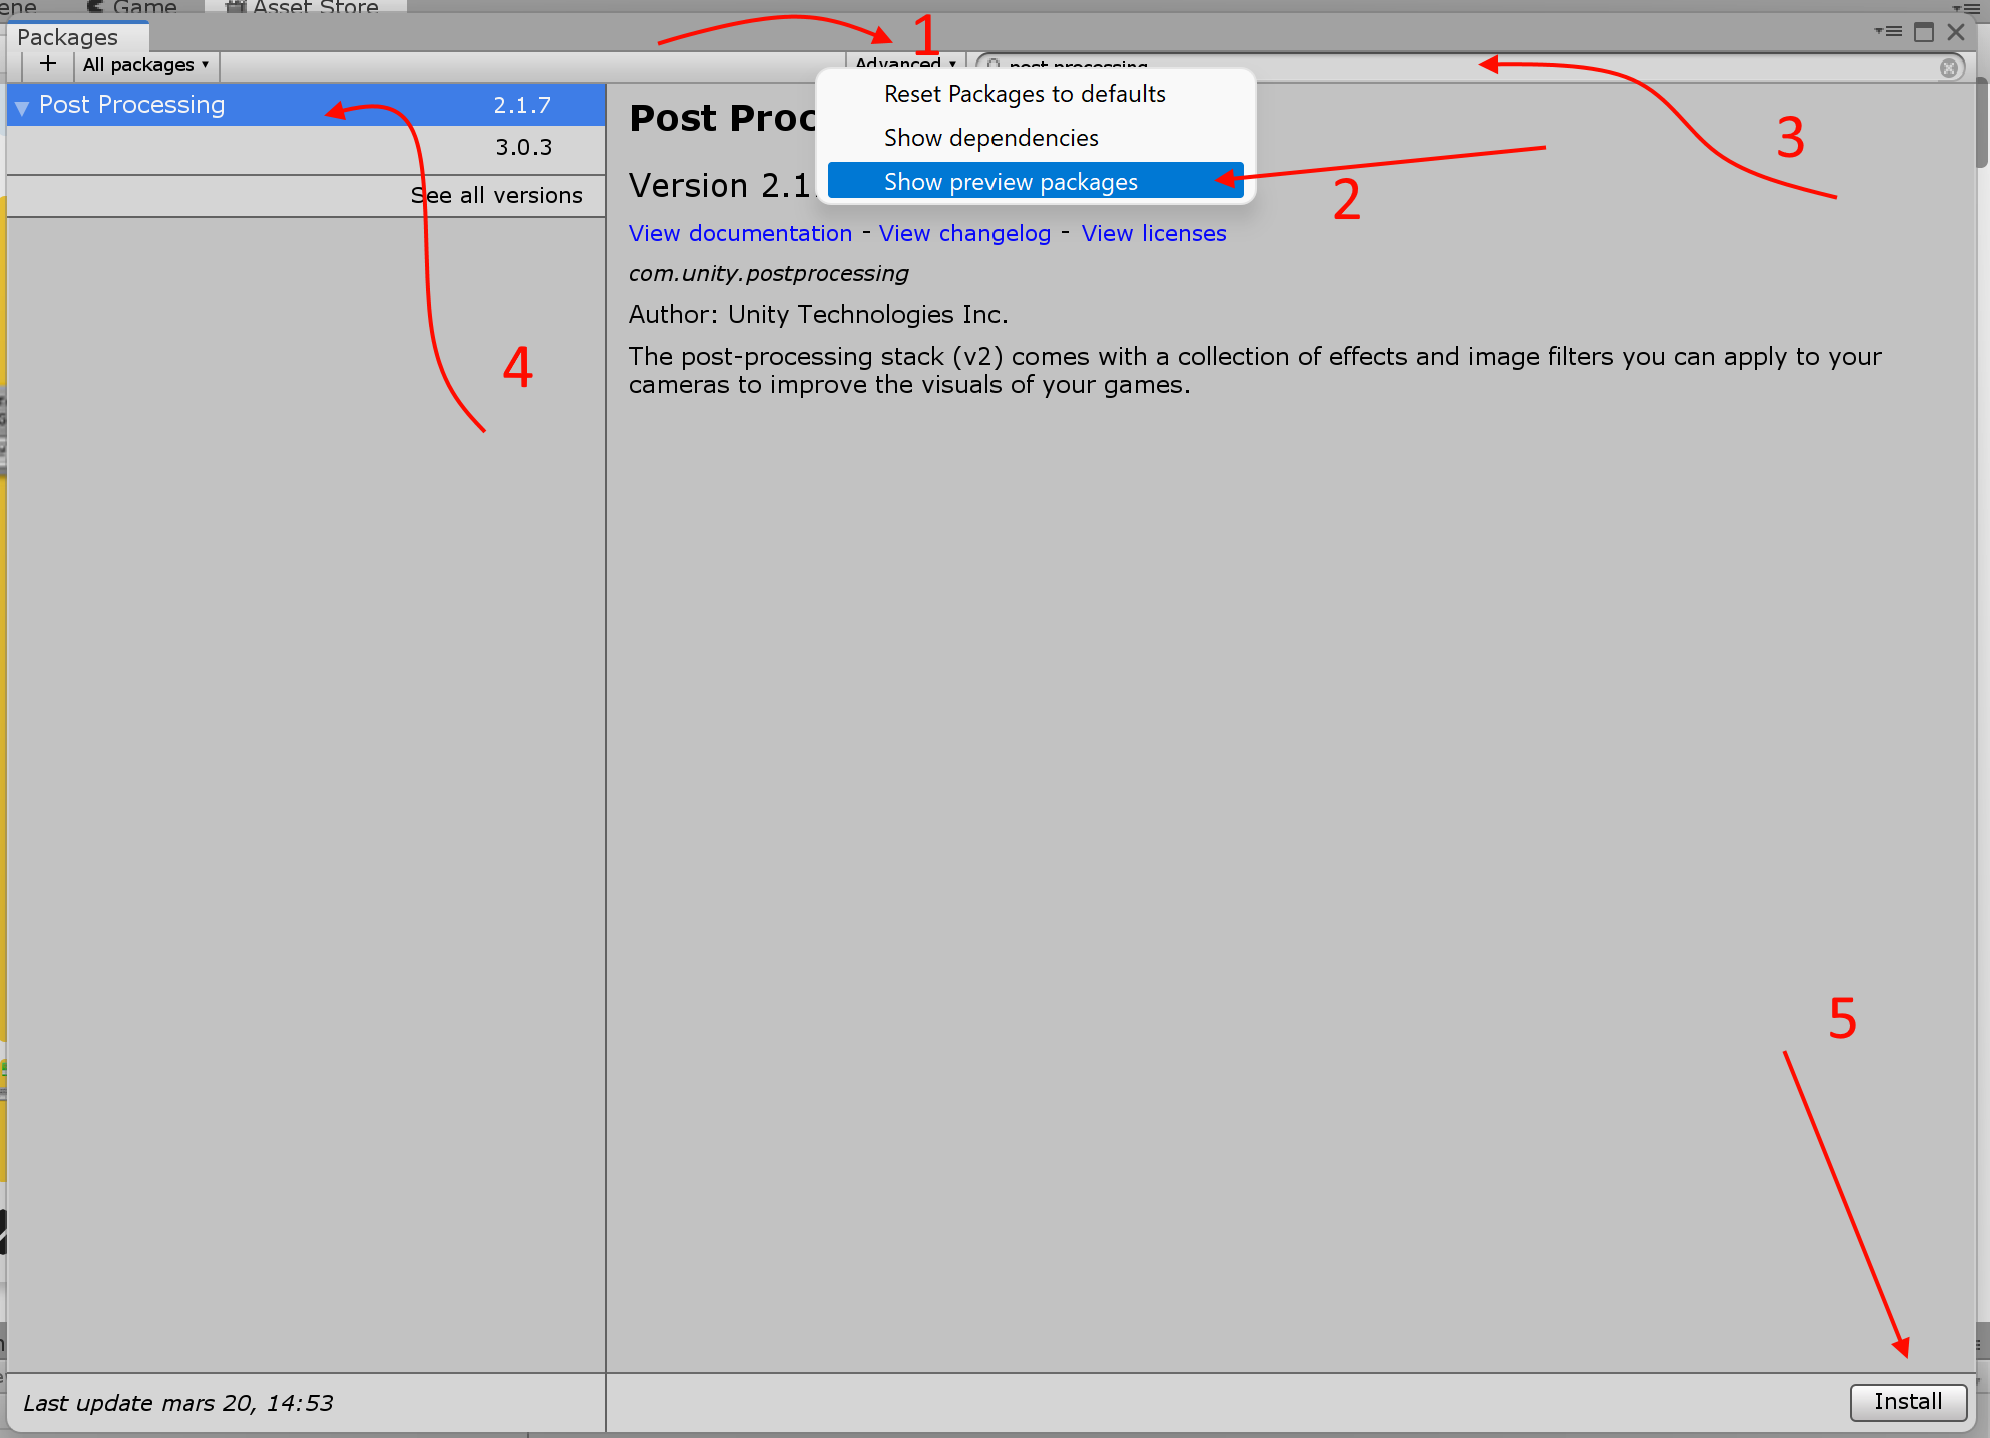
You can also install add-ons from the build in package manager. (Window / Package Manager)
You should enable “preview packages” to see every package. Use the search bar to find the package you want to install. Don’t forget to sellect the last version of package.
Suggested Add-ons: – Post Processing (beautiful visual effect) – TextMesh Pro (3D Text add-on) (Must be version 2.0.1)
4. Setup a basic scene
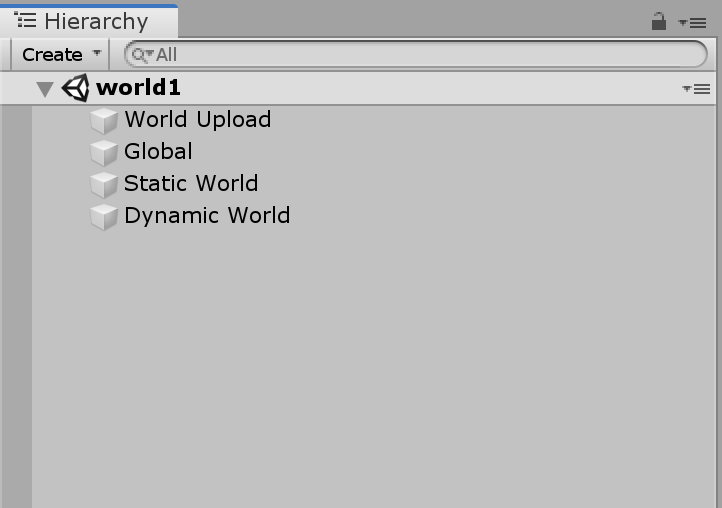
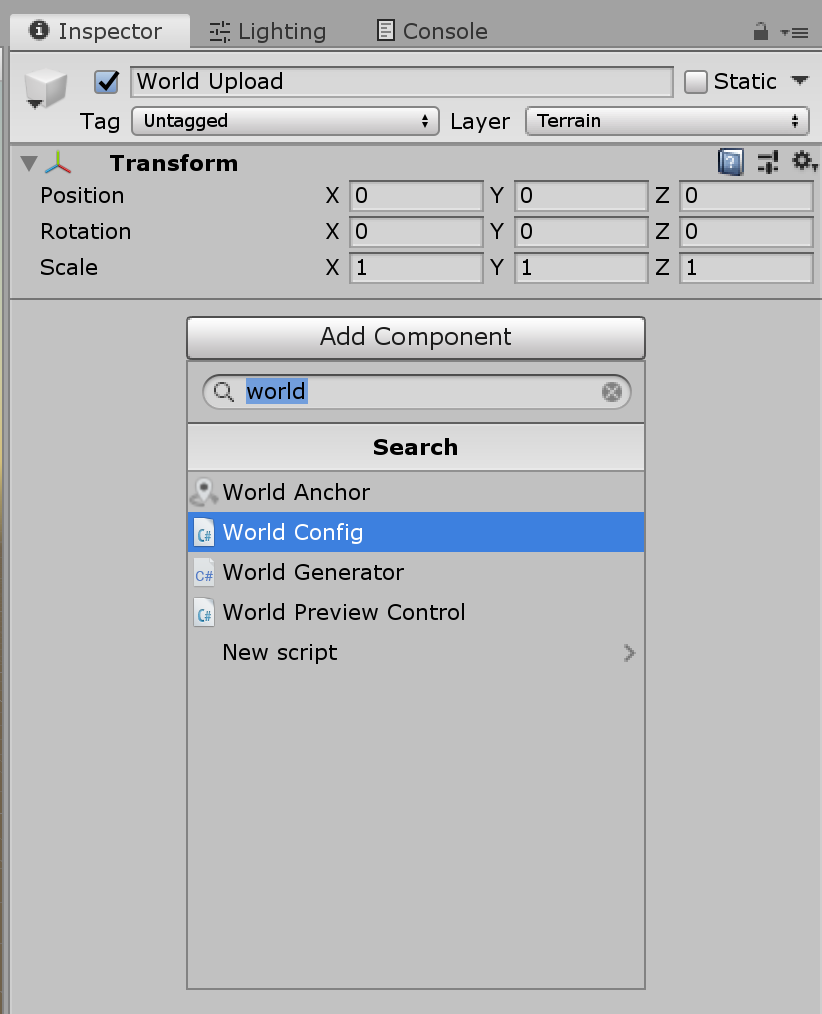
Delete the content of your scene (hierarchy) and create those 4 empty game object: – World Upload (For Somnium Space “World Congig” script) – Global (for everything that is not physical, including global script and effects) – Static World (For every physical (mesh) part that should never move) – Dynamic World (For every physical part that could mode)
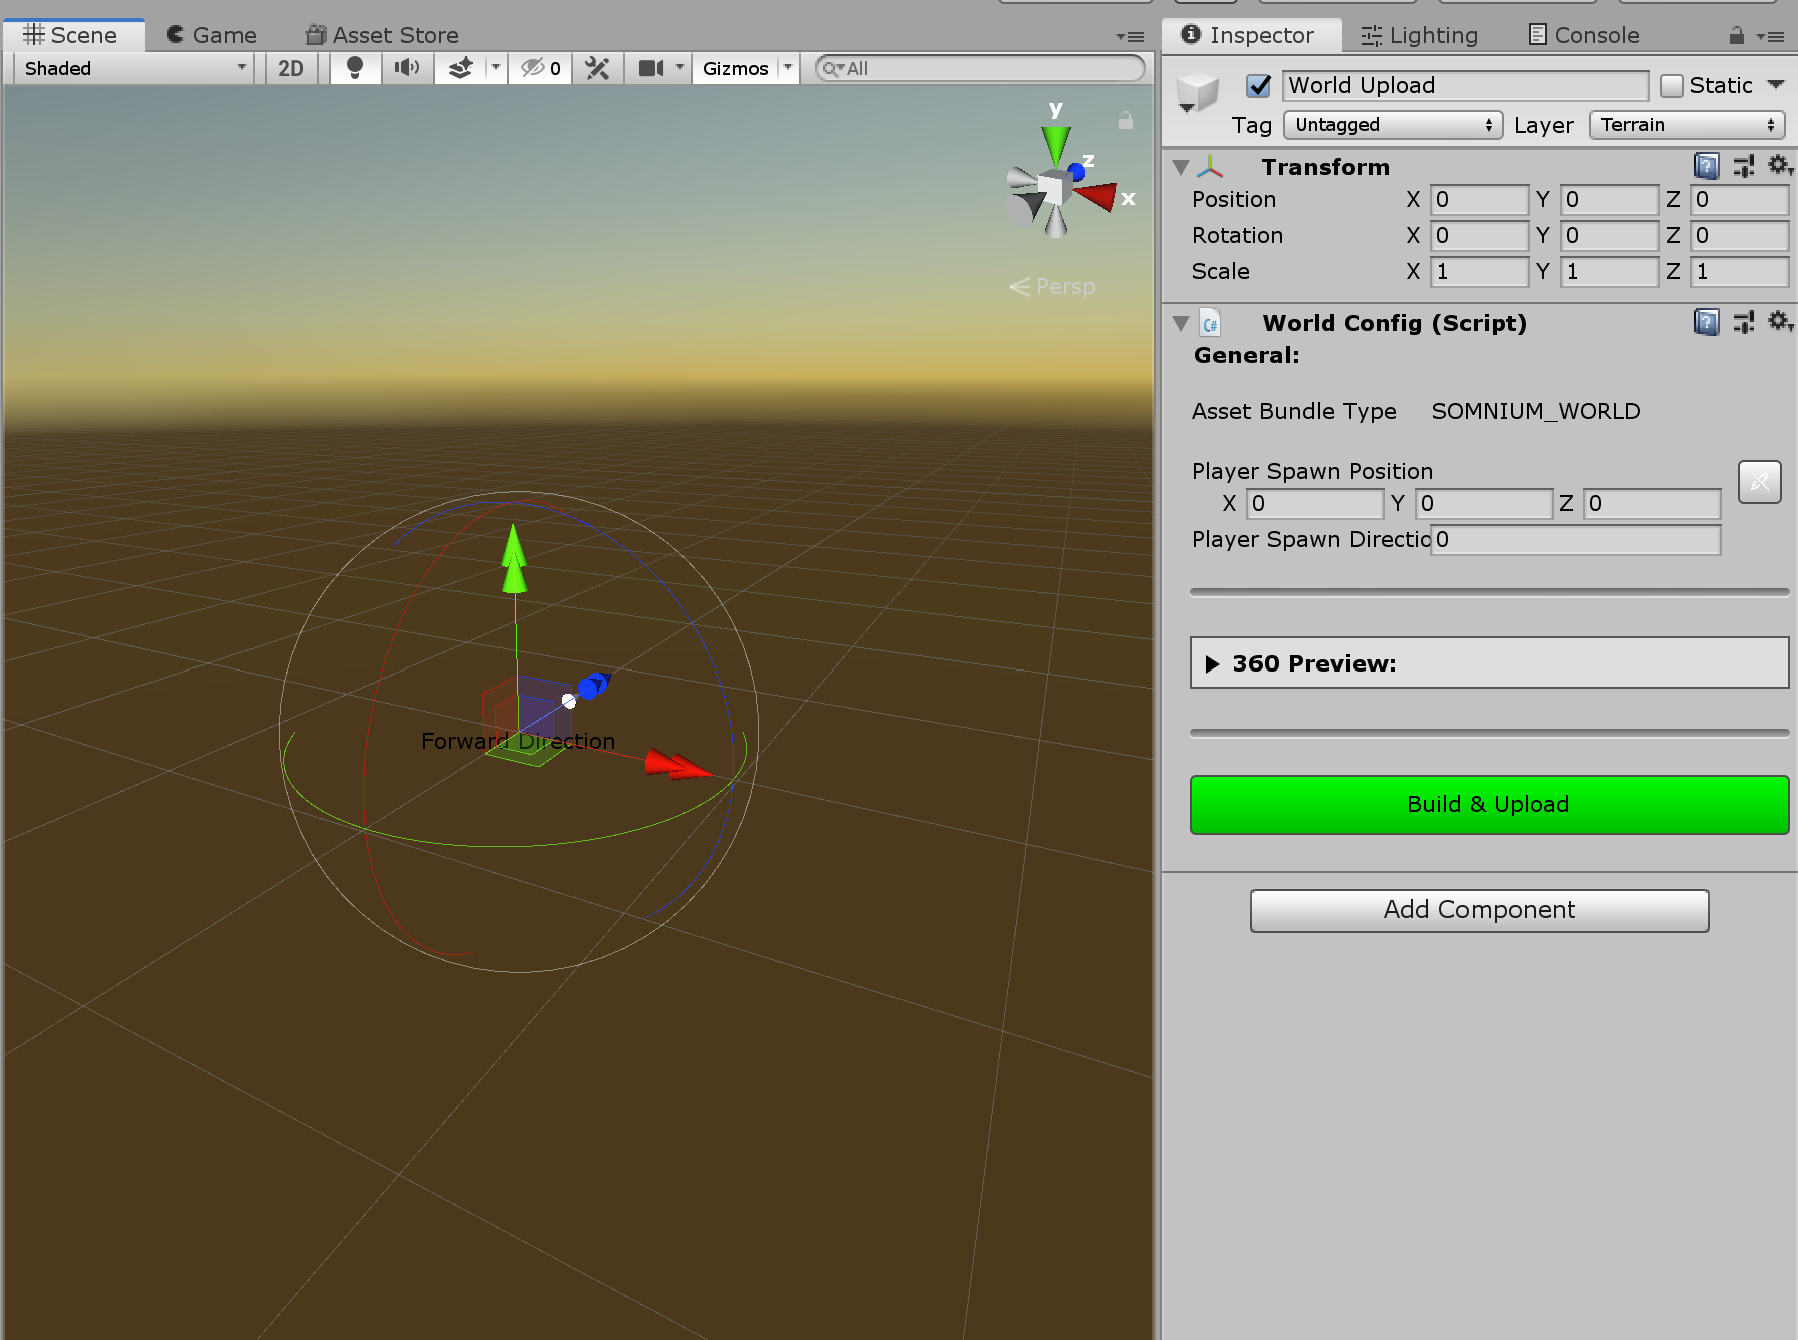
World Upload
First select the “World Upload” Game Object from the hierarchy, then search for “World Config” with “Add Component” button.
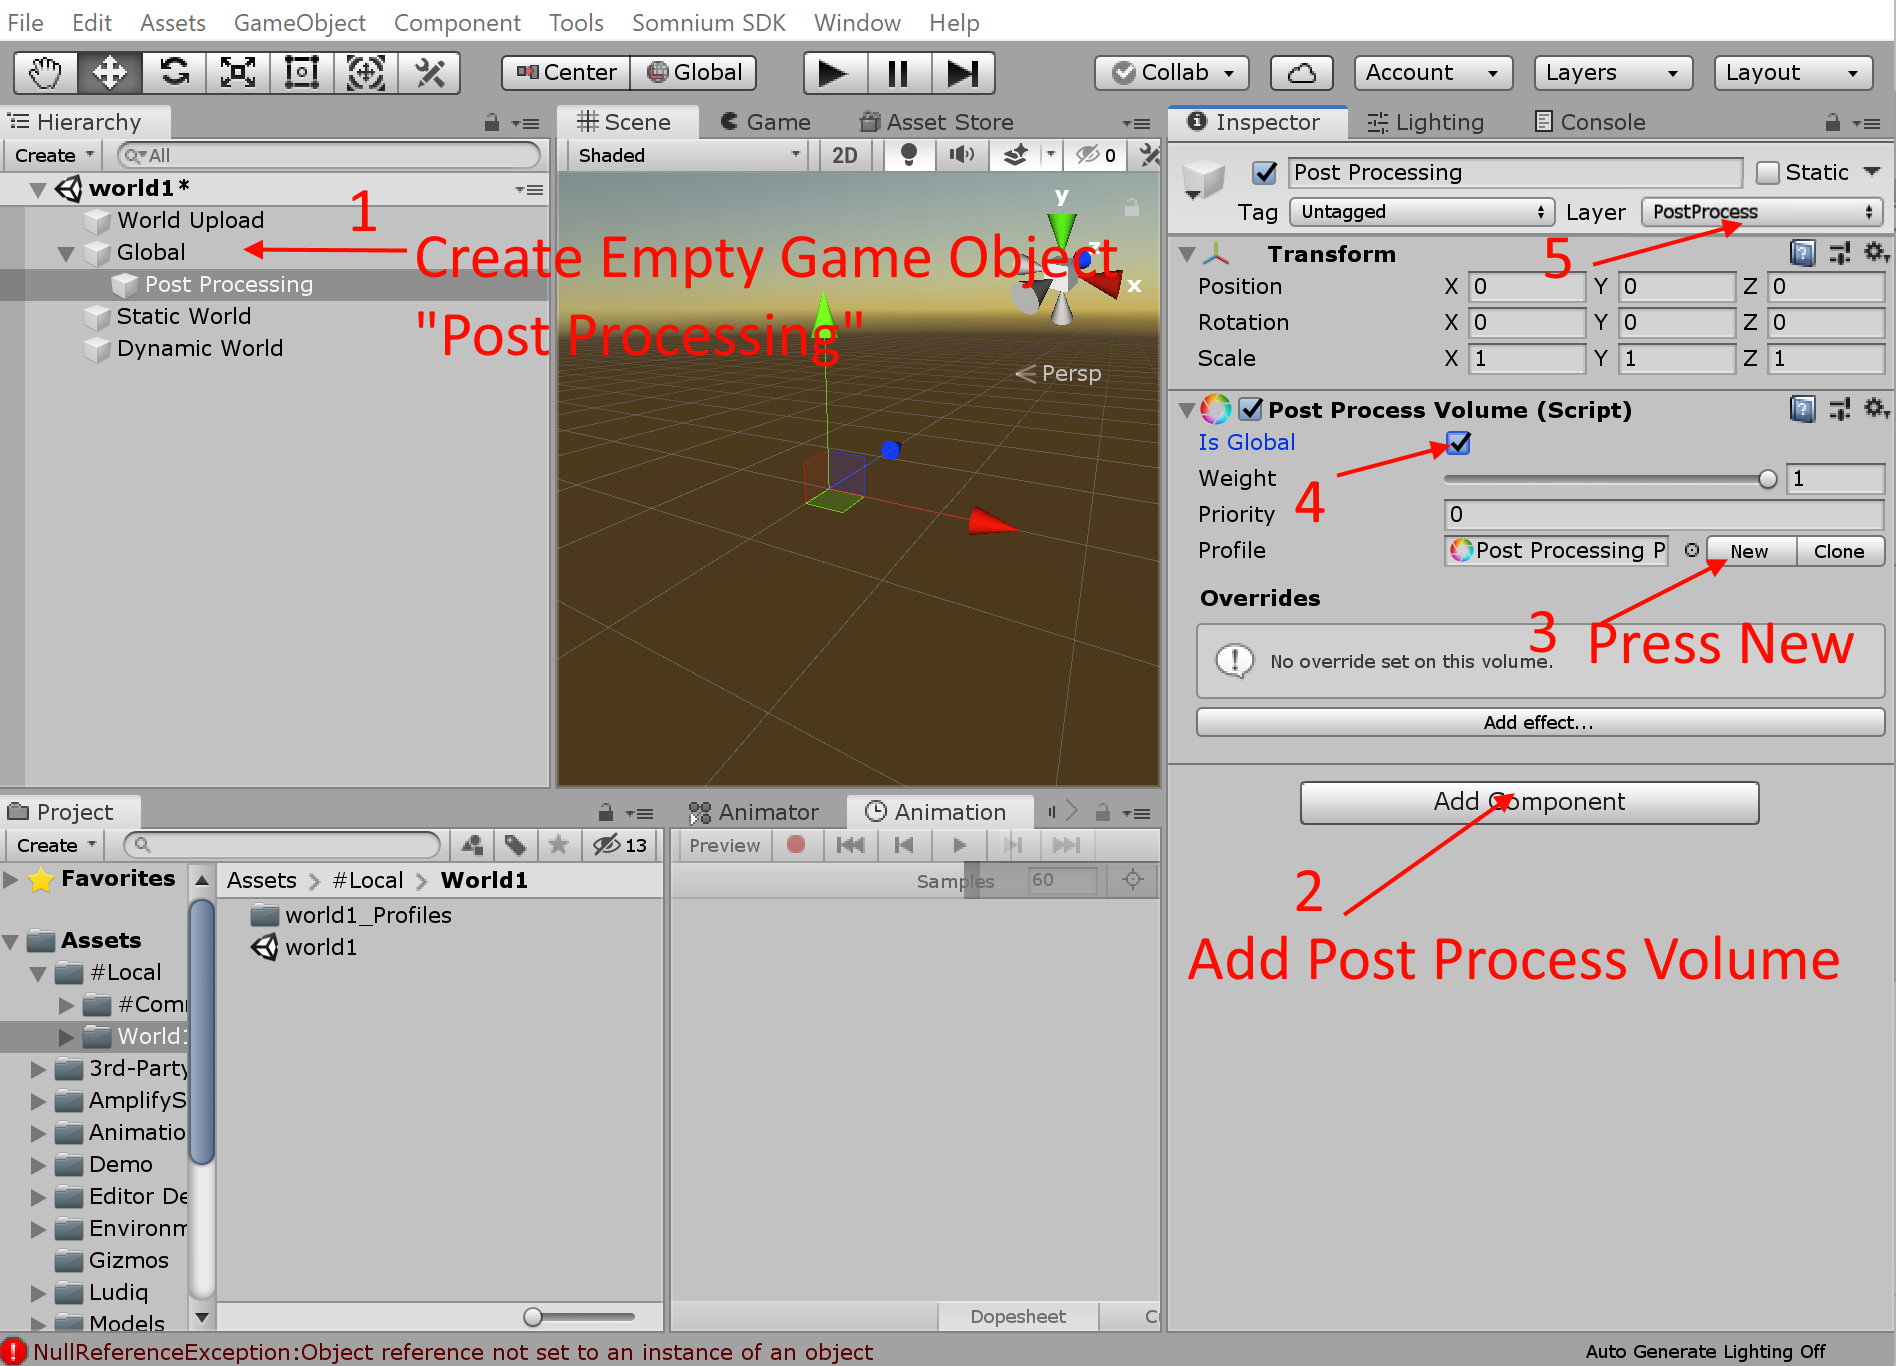
Global
In global Game Object, we will add a “post processing volume” Game Object.
Create an empty Game Object inside Global and name it “Post Processing”.
Add component “Post Processing Volume”
Pres New
Check “Is Global”
Set layer to “PostProcess” (very important)
Static World
For now, static world should be an empty Game Object set to layer “Terrain” (Very important).
Dynamic World
Dynamic world will also be empty, set to layer “Vehicle” (Very important).
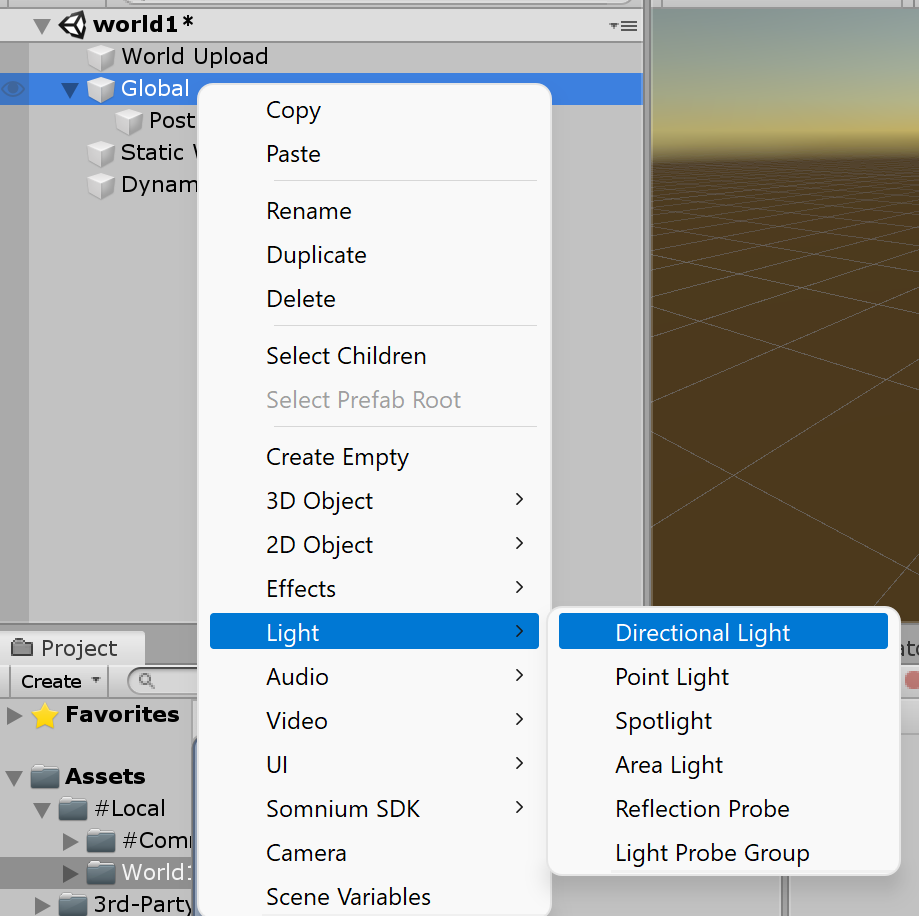
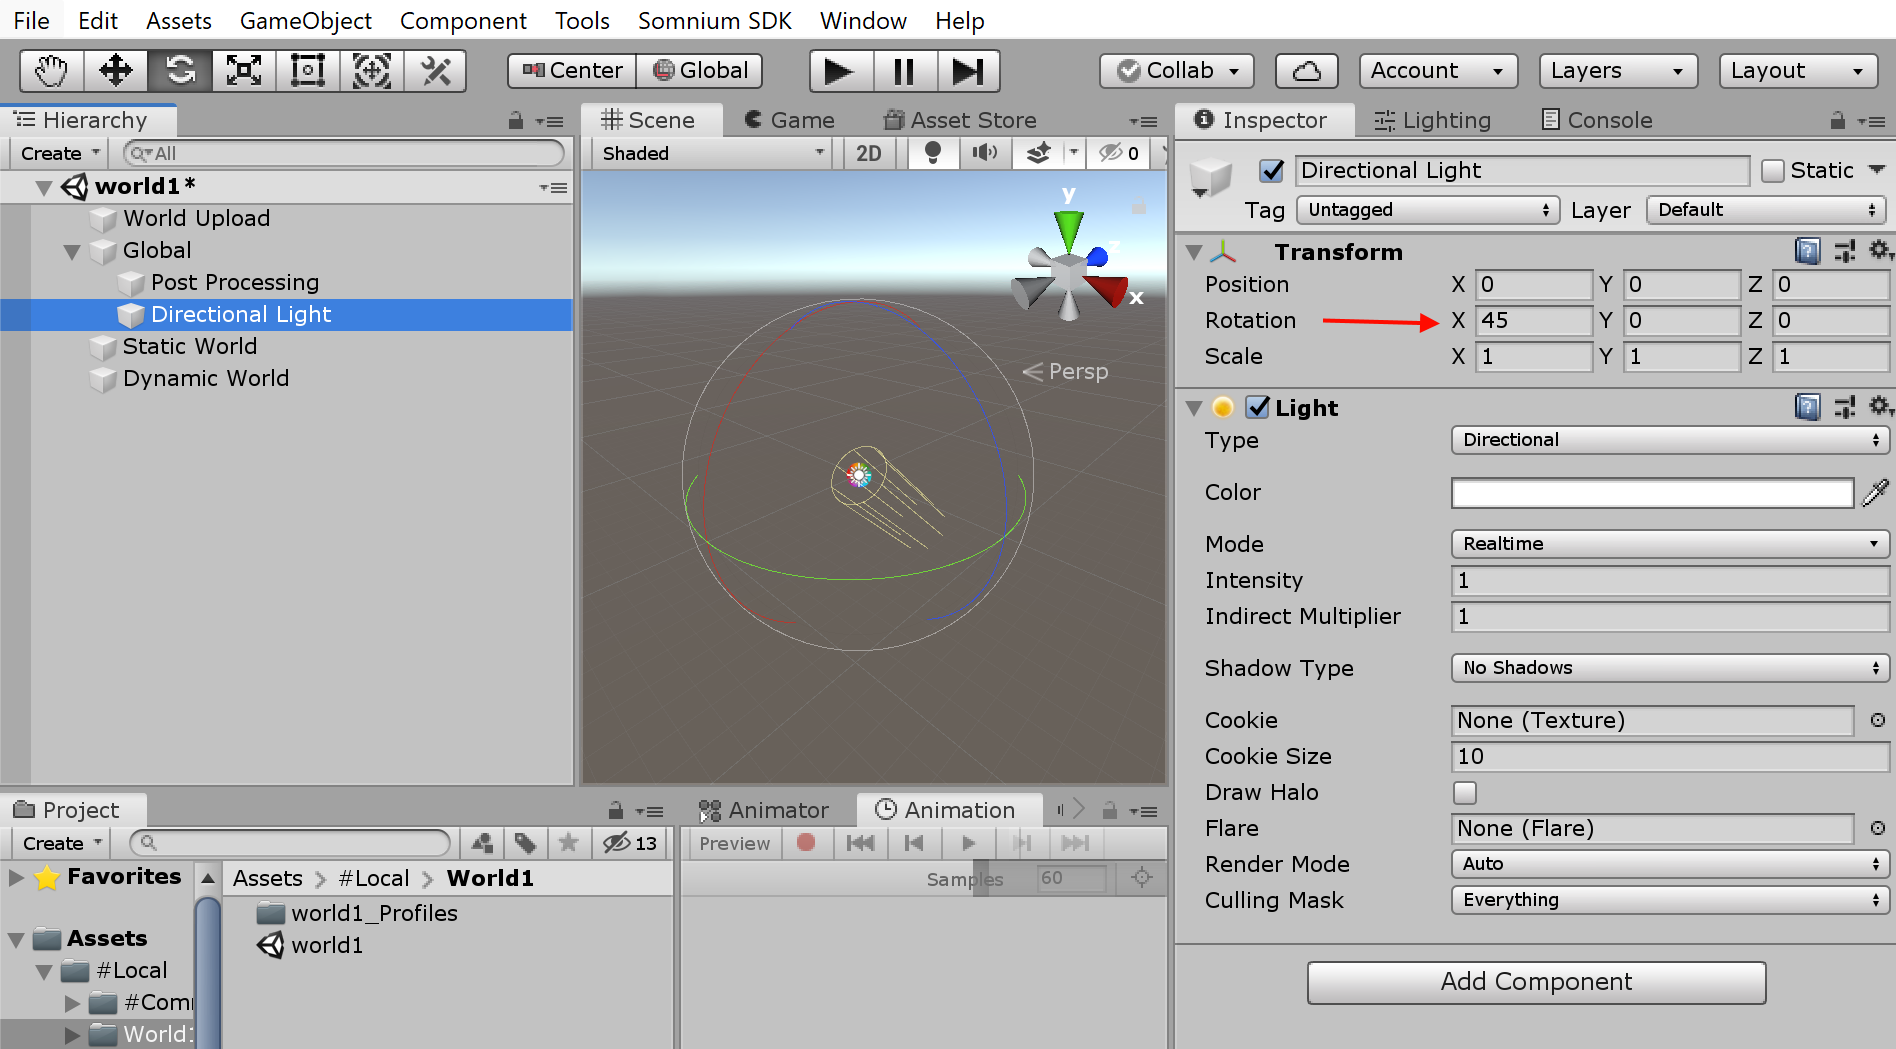
5. Add main light (Sun)
Inside “global” add a directional light (that’s gonna be the sun). Sun is the main default light, it determine the time of day by it’s rotation. So it will influence the sky-box.
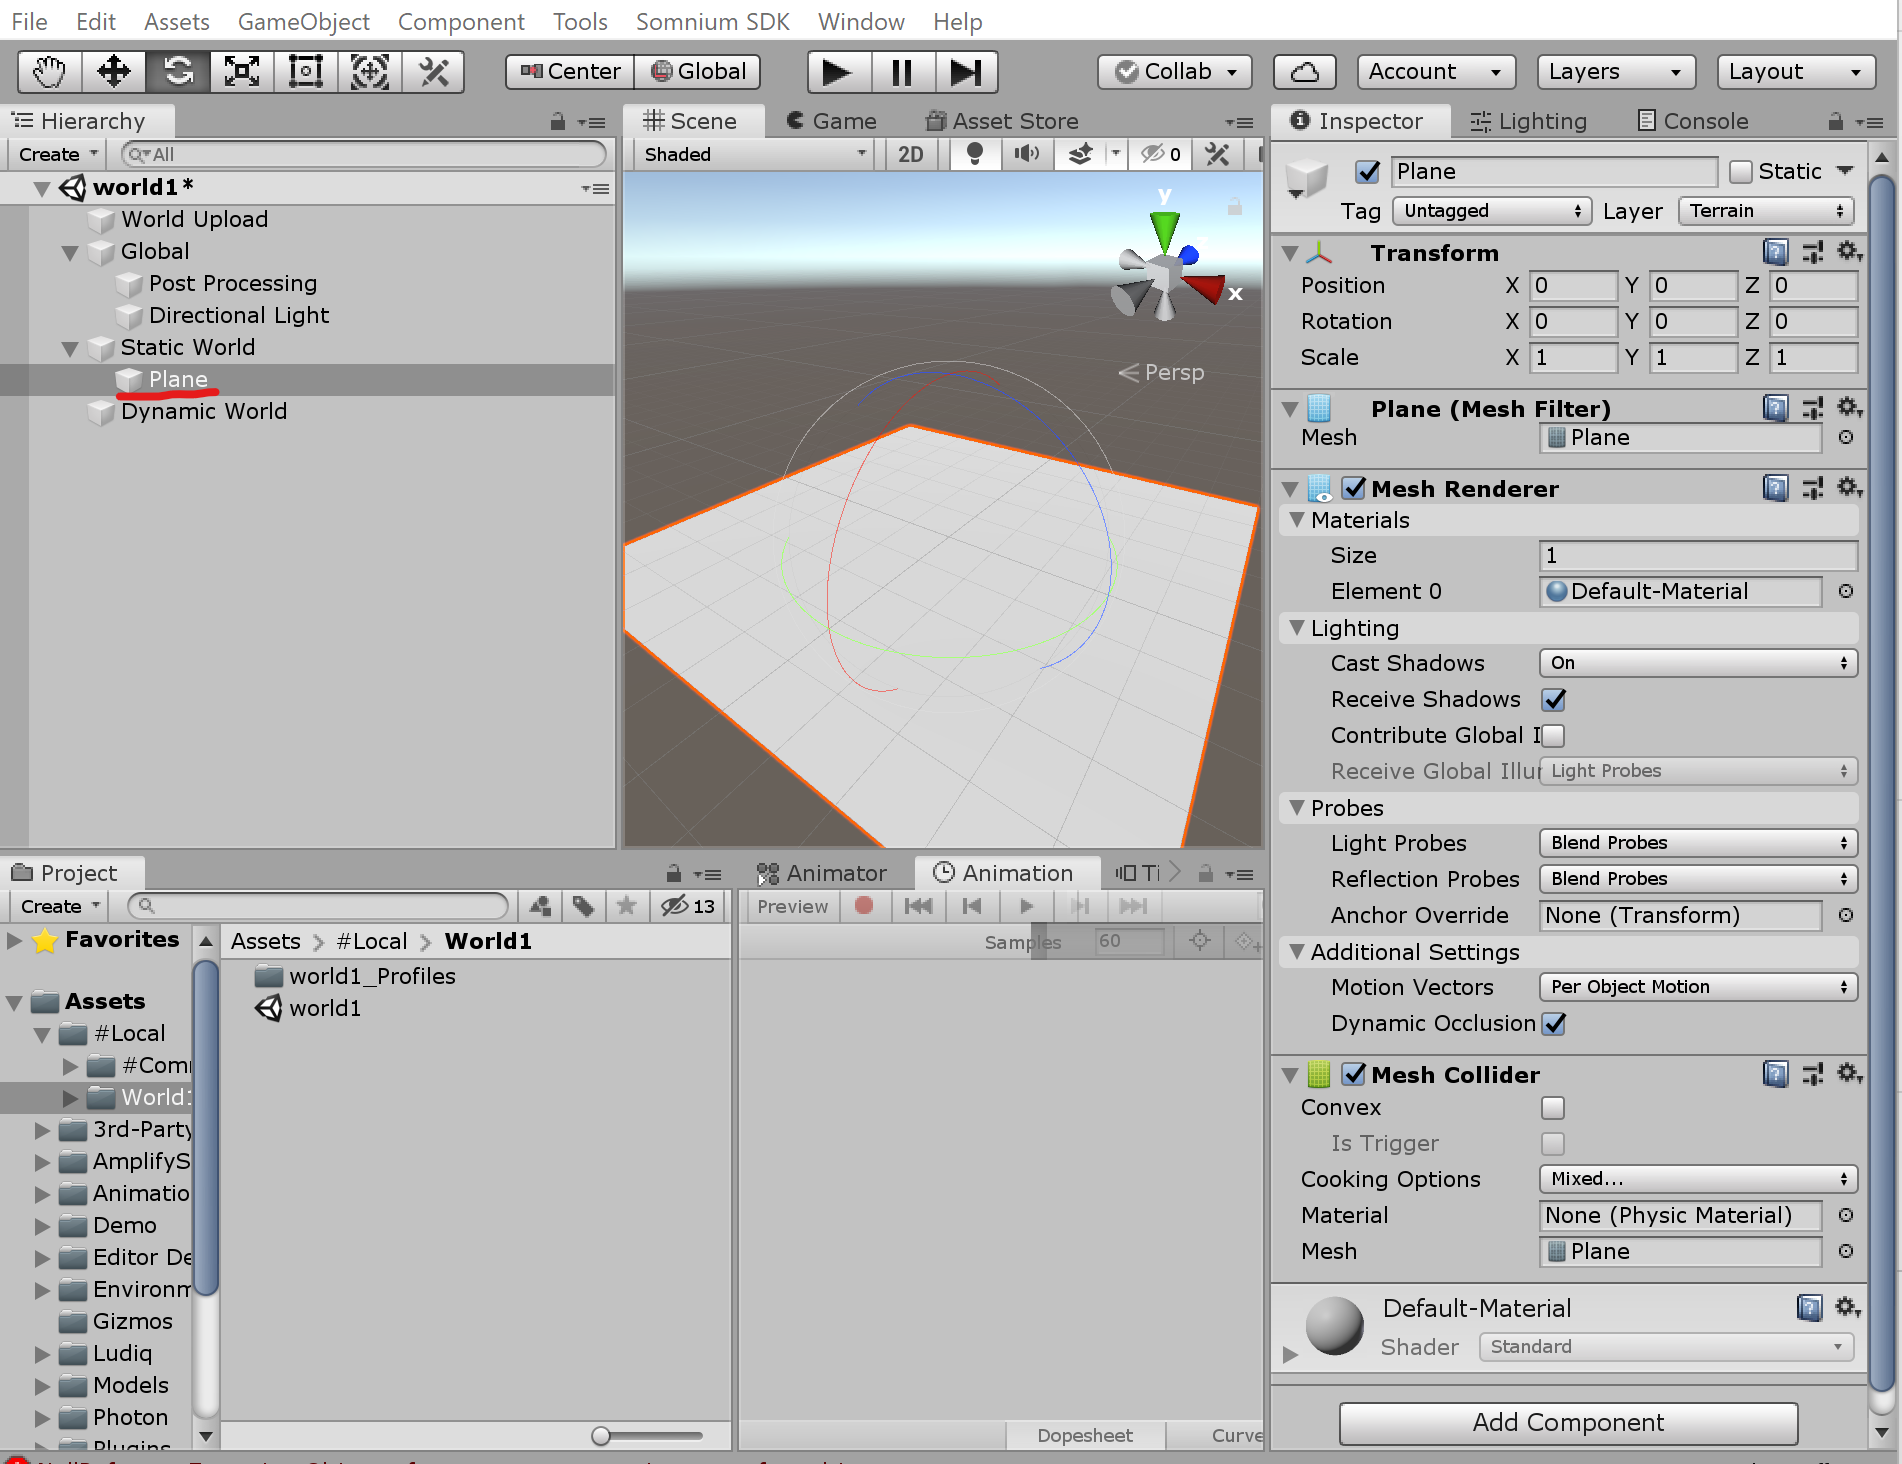
6. Add static mesh
Right click on the “Static World” Game Object and add a plane from “3D Object”. It will automatically be in Terrain layer, with also mesh collider. – The layer must be terrain, so make sure it’s correct. – The mesh collider is used as physical interaction with avatars. (Prevent you from falling in the void)
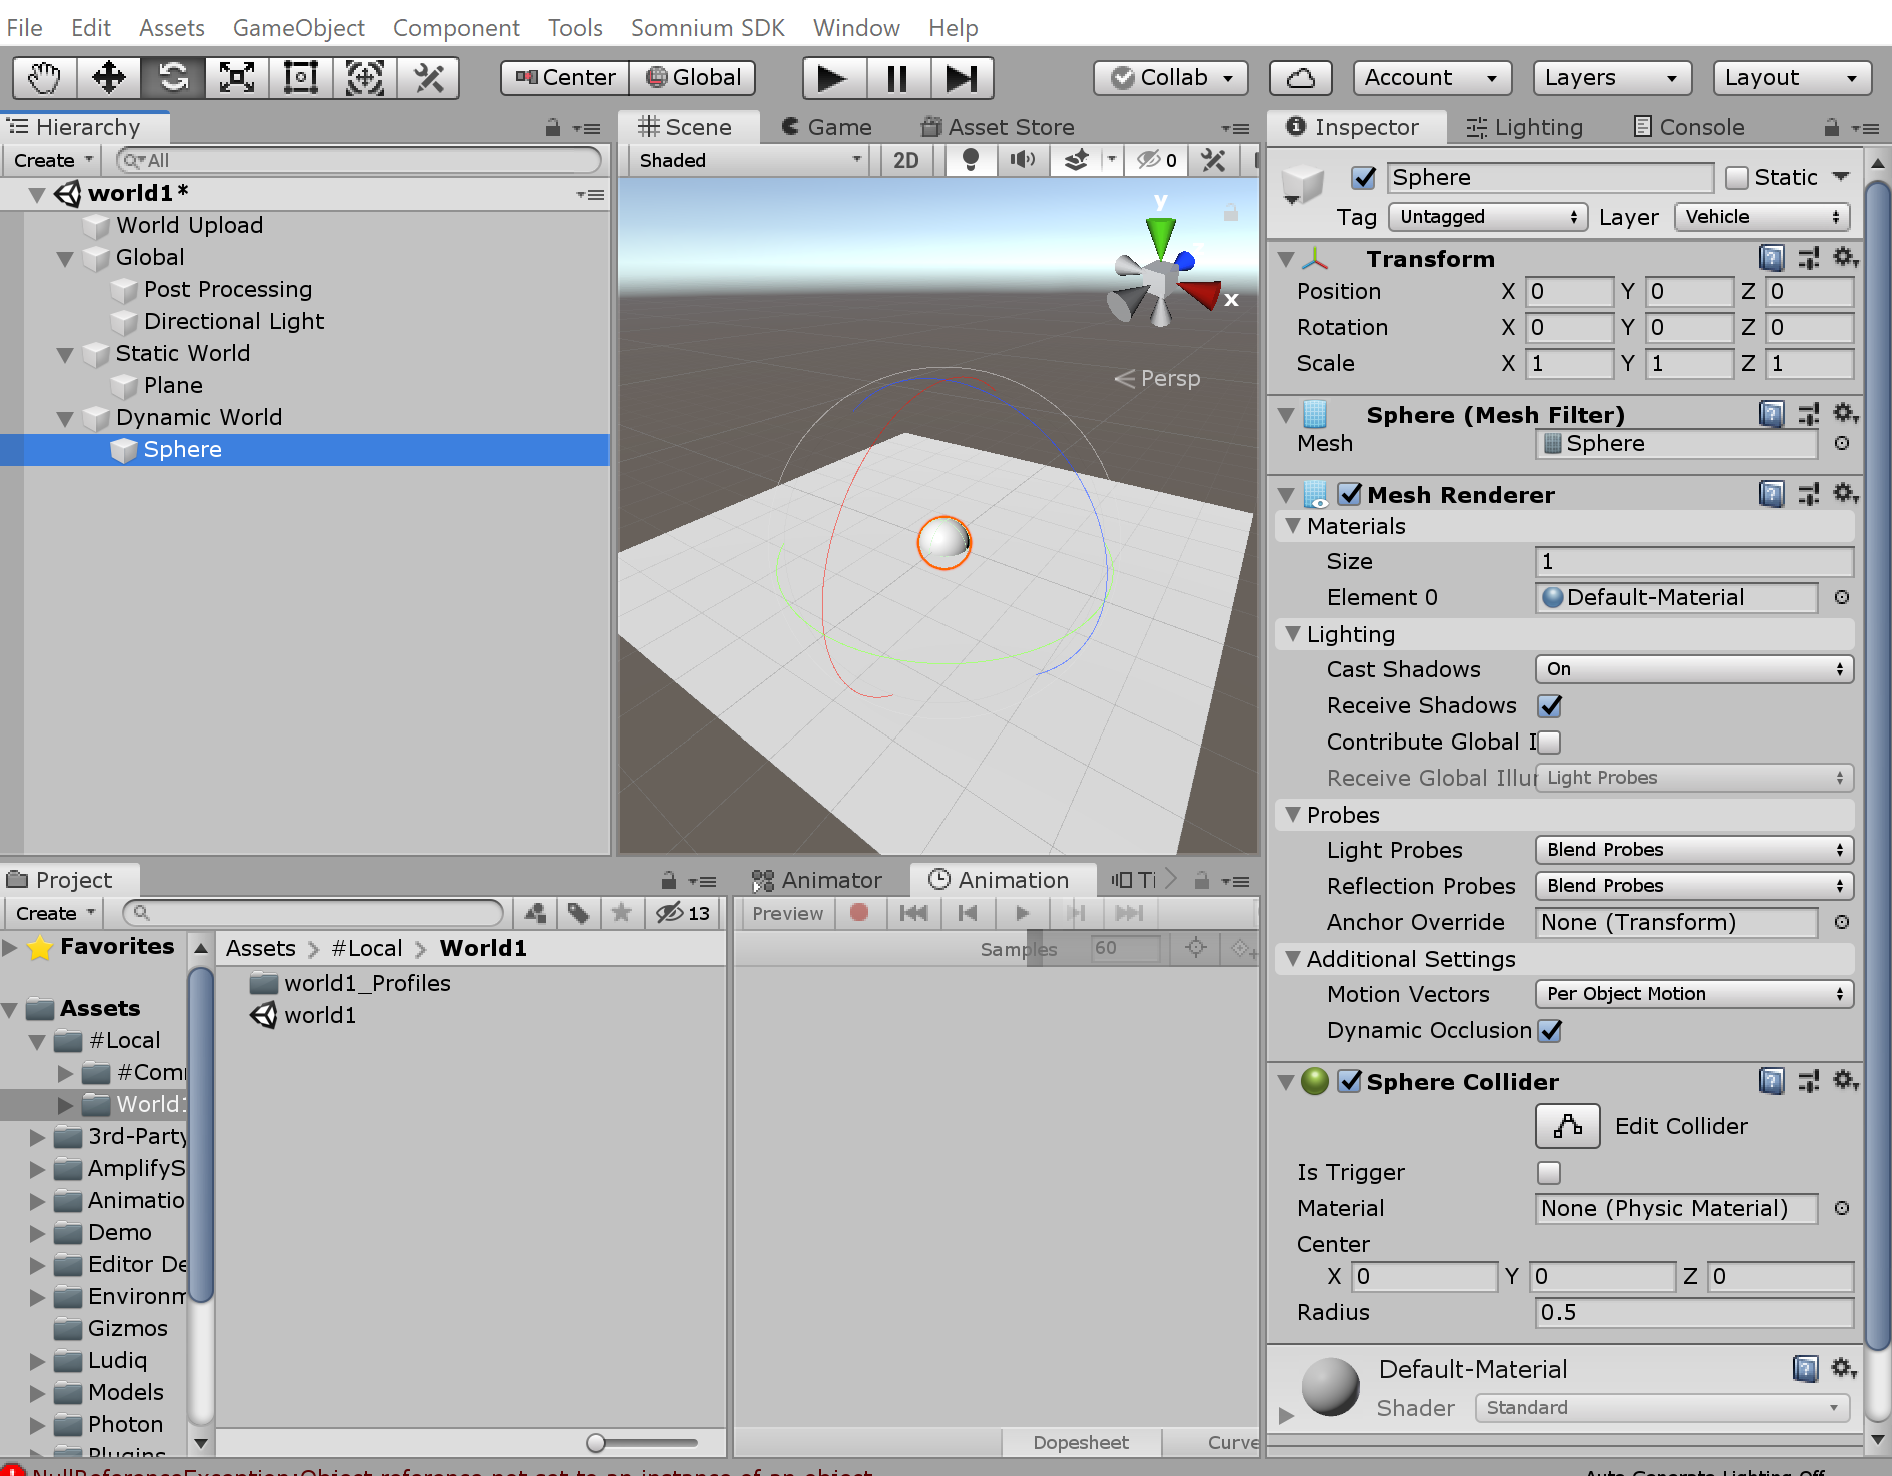
7. Add a dynamic object
Inside “Dynamic World” Game Object, add a (from 3D Object) sphere. Make sure the layer of the sphere is “Vehicle” or you will end-up with it disappearing when it move.
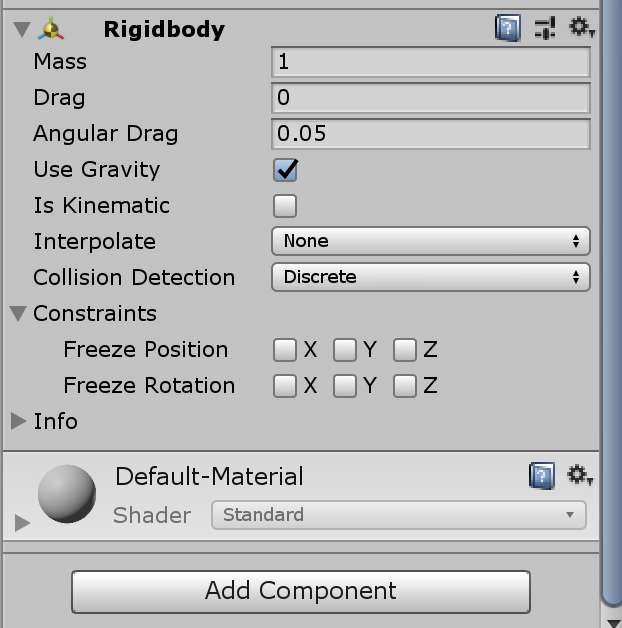
To convert the sphere into a dynamic object we will add the component “Rightbody”. With this component the sphere is now able to move and be affected by the gravity.
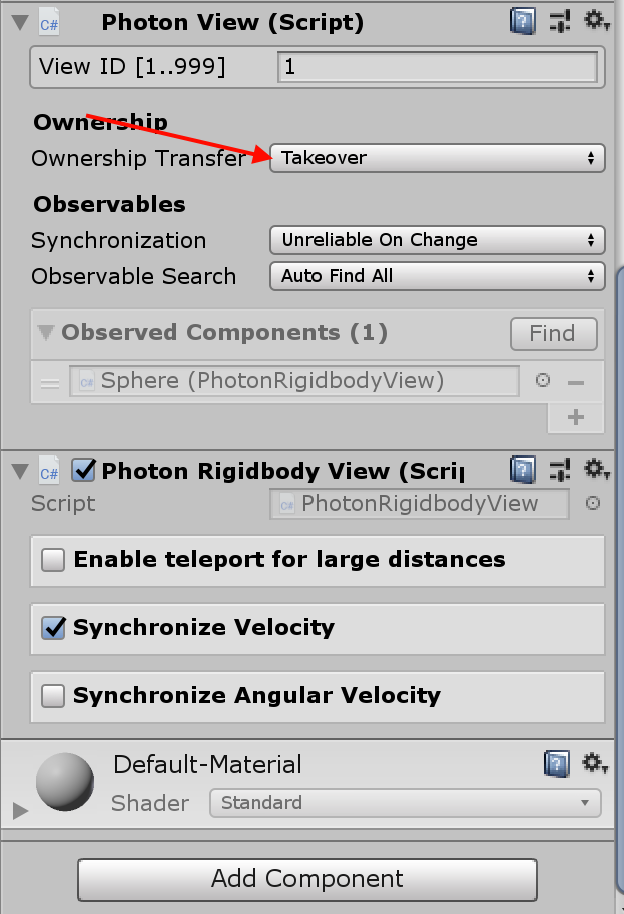
8. Make the Sphere synchronized in Multiplayer
Still on the sphere “Inspector”, add 2 new component: – Photon View (every multiplayer entity have this) – Photon Rigidbody View (make the rigidbody multiplayer)
With those components the sphere position is now synchronized within all the players.
Change the “Ownership Transfer” to takeover. This way, we can take control of the sphere by Bolt script.
* The way the multiplayer work, only one player can interact with a multiplayer object at a time. So if we don’t take the ownership, while we are touching the sphere, the sphere will start been un-synchronized and will be at 2 place at a time (from everyone point of view).
9. Multiplayer sphere control
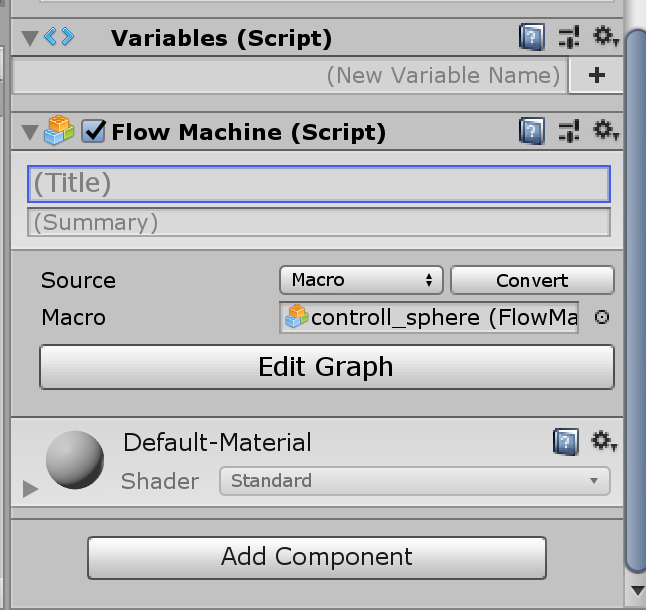
To control the sphere, we need some script with bolt.
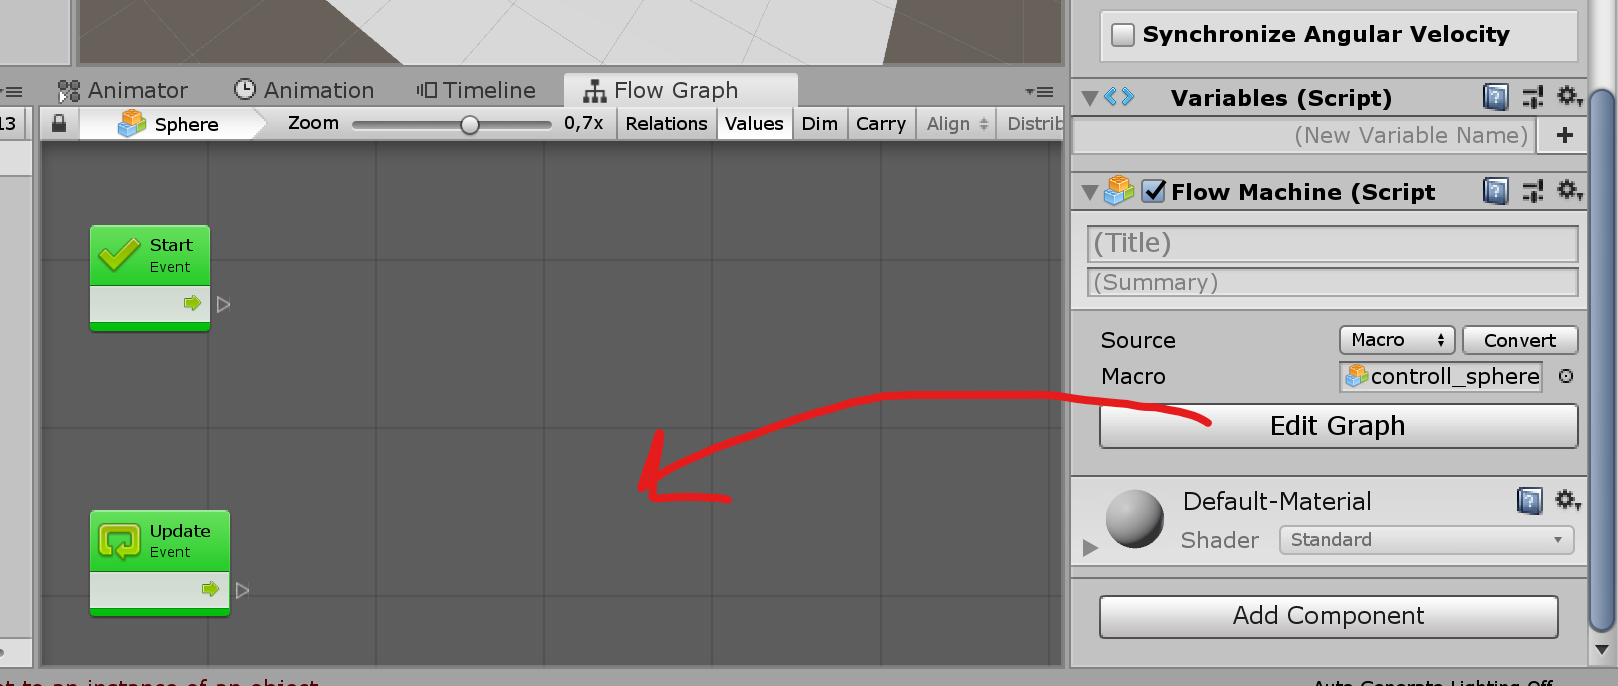
Add the component “Flow Machine“, and press “New” on the “Flow Machine”. You can now save the empty script to your “World1” folder.
This component will be used to execute script to our sphere.
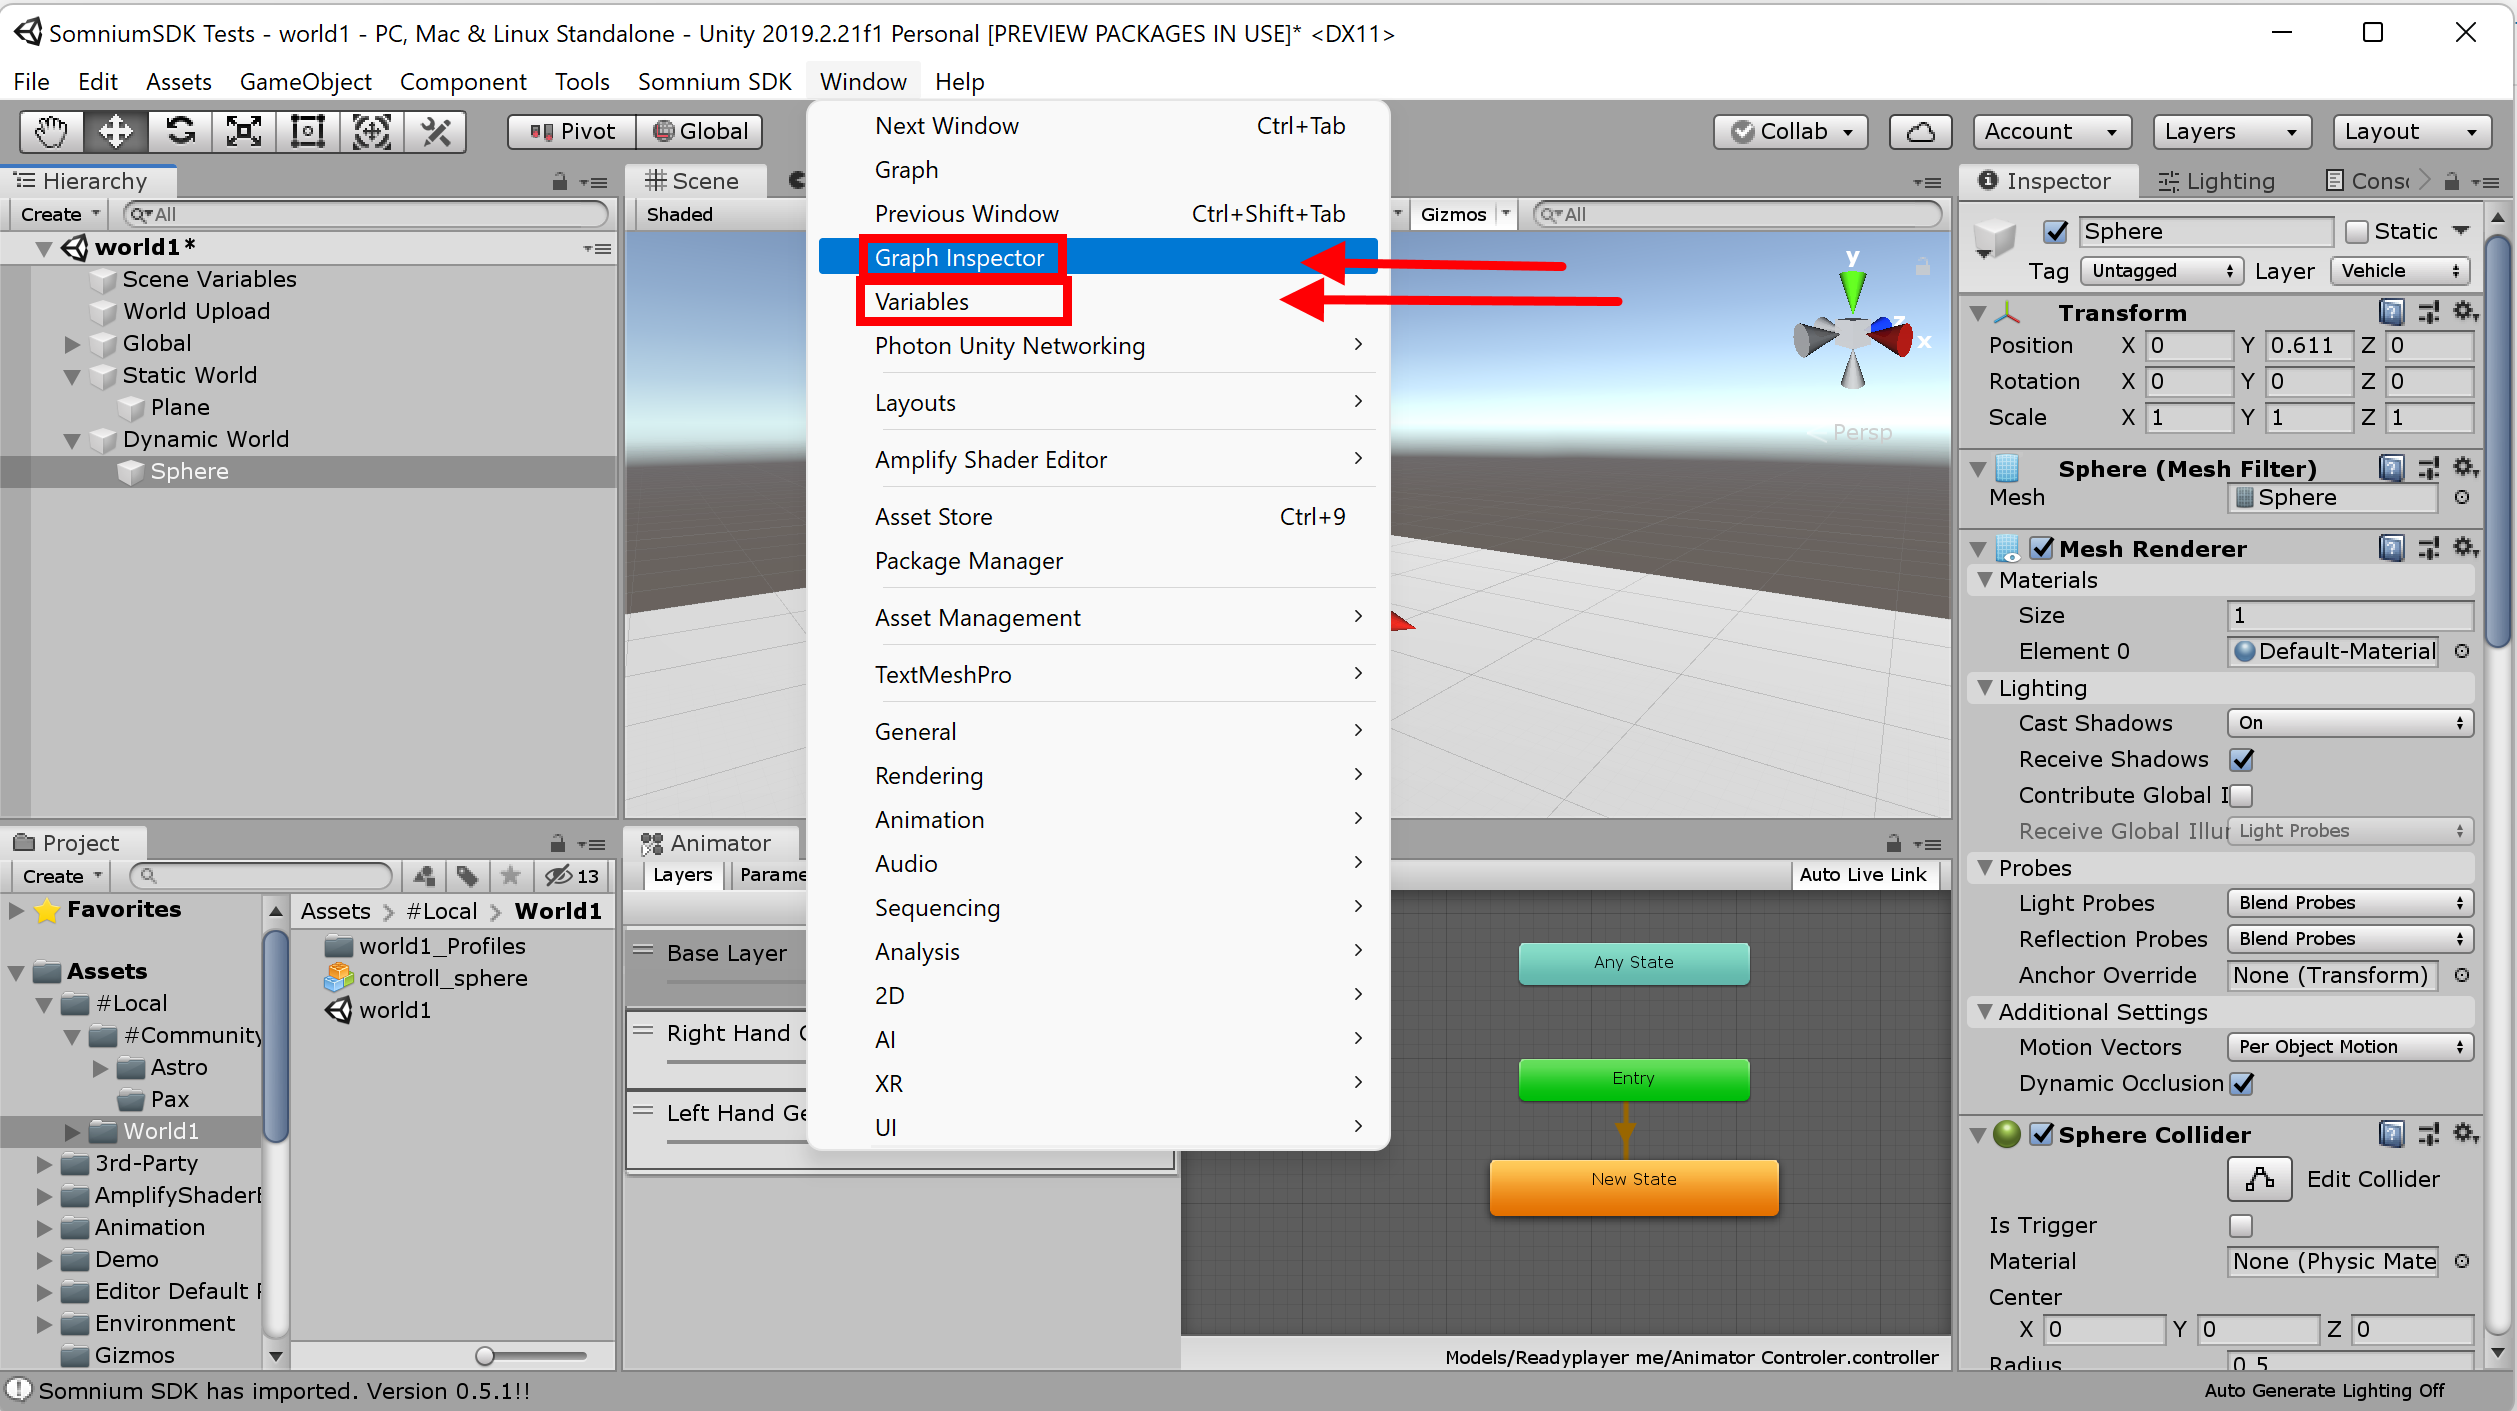
10. Configure Your Unity UI for Bolt
For better Bolt scripting experience, you can open “Graph Inspector” and “Variables” windows. Then you can anchor both window, withing the “Project” window
Graph Inspector: this windows is used to get info and configuration for the selected “node” (Every Bolt box is called “node”).
Variables (Blackboard): in this windows you can manage local variables.
11. Create a basic sphere control script
New Script
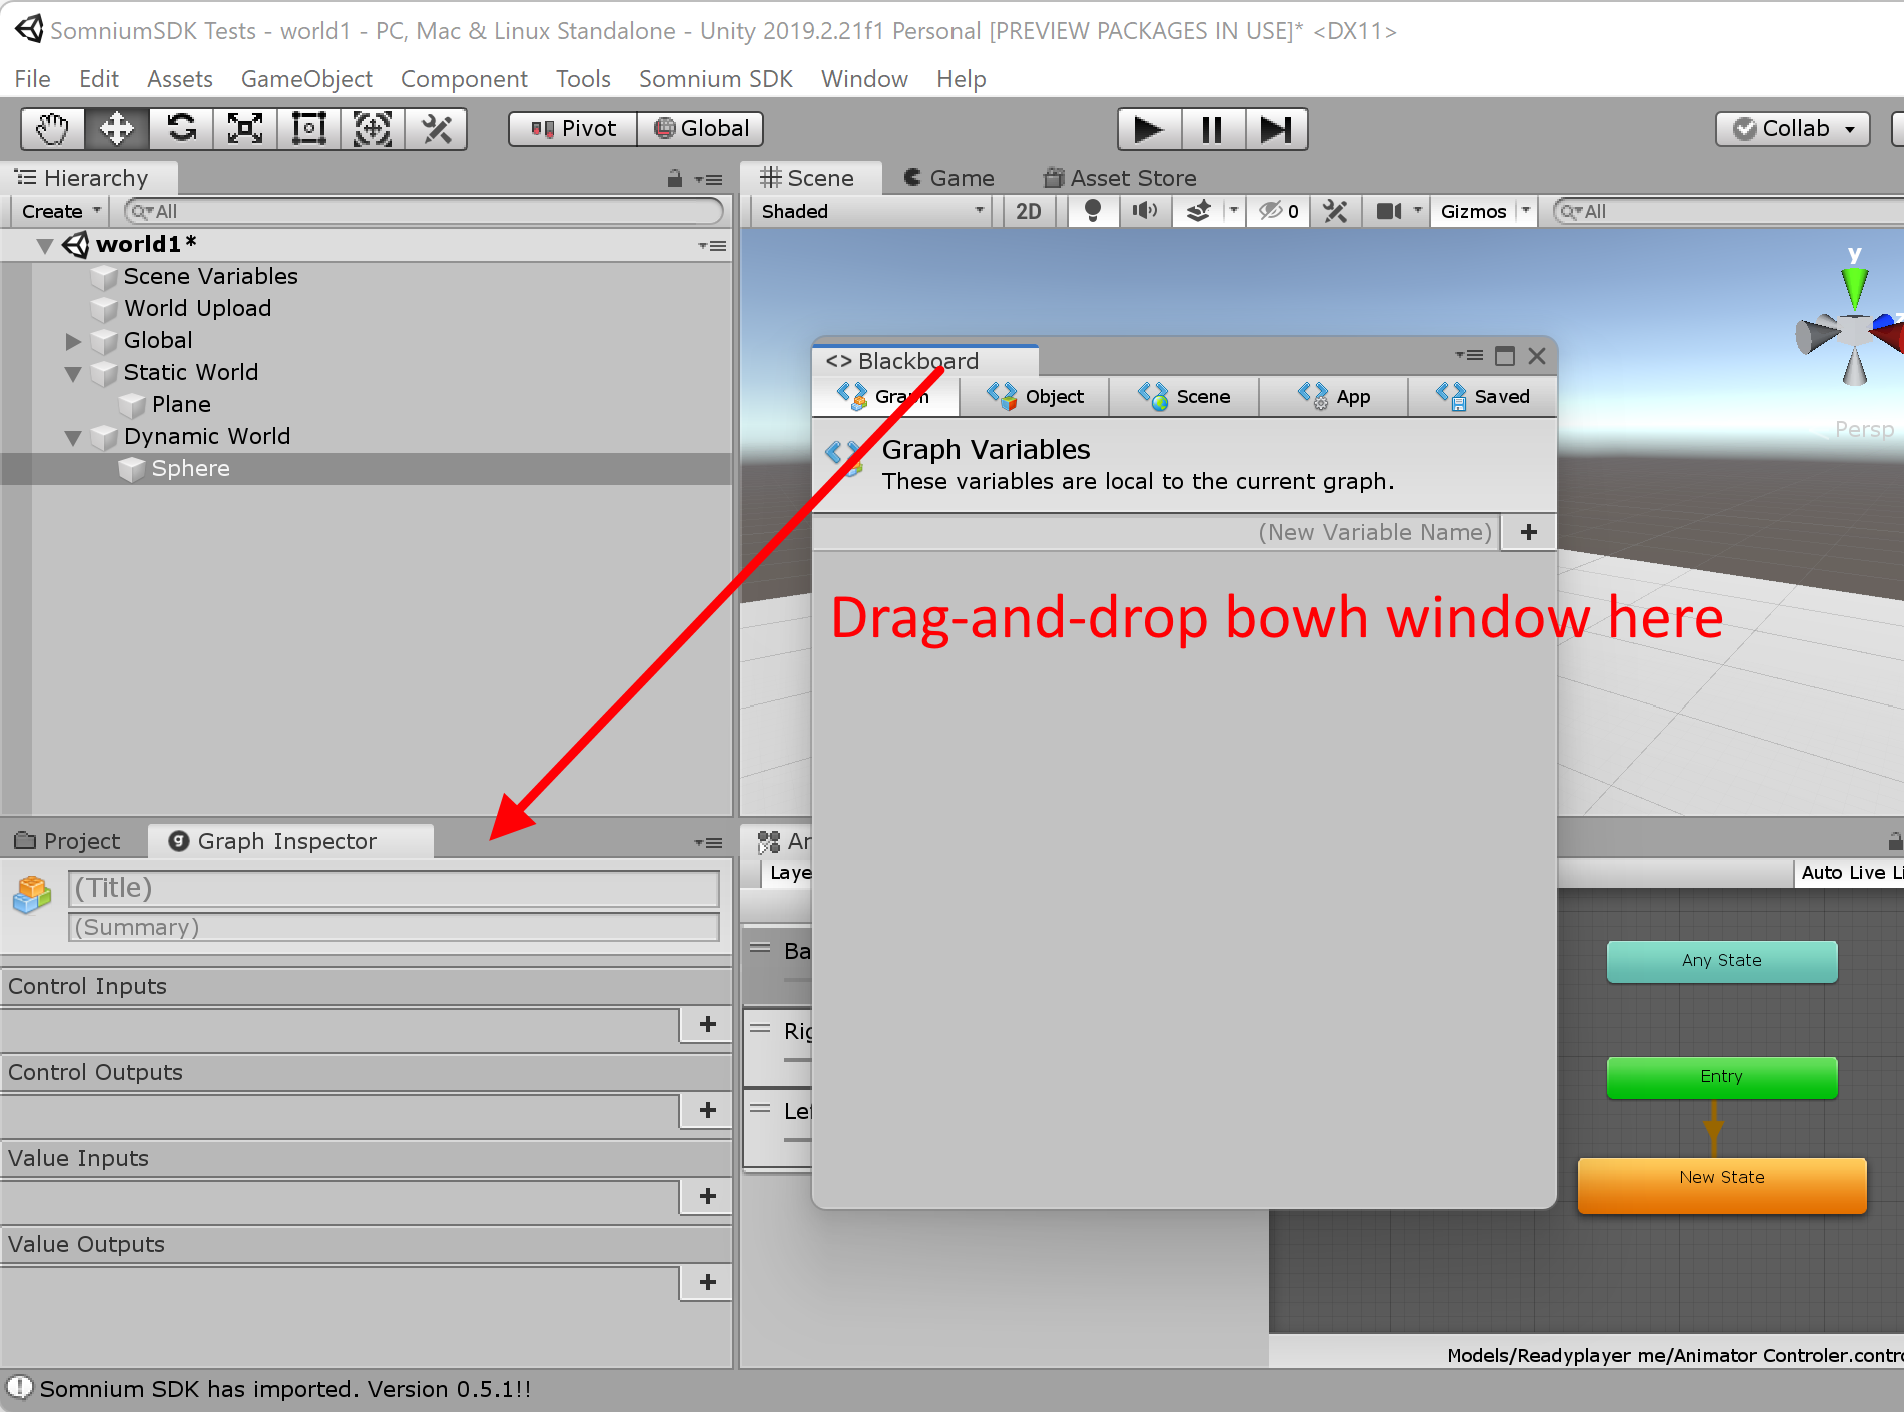
Press “Edit Graph” on the Flow Machine component.
Then the “Bolt” scripting windows will open.
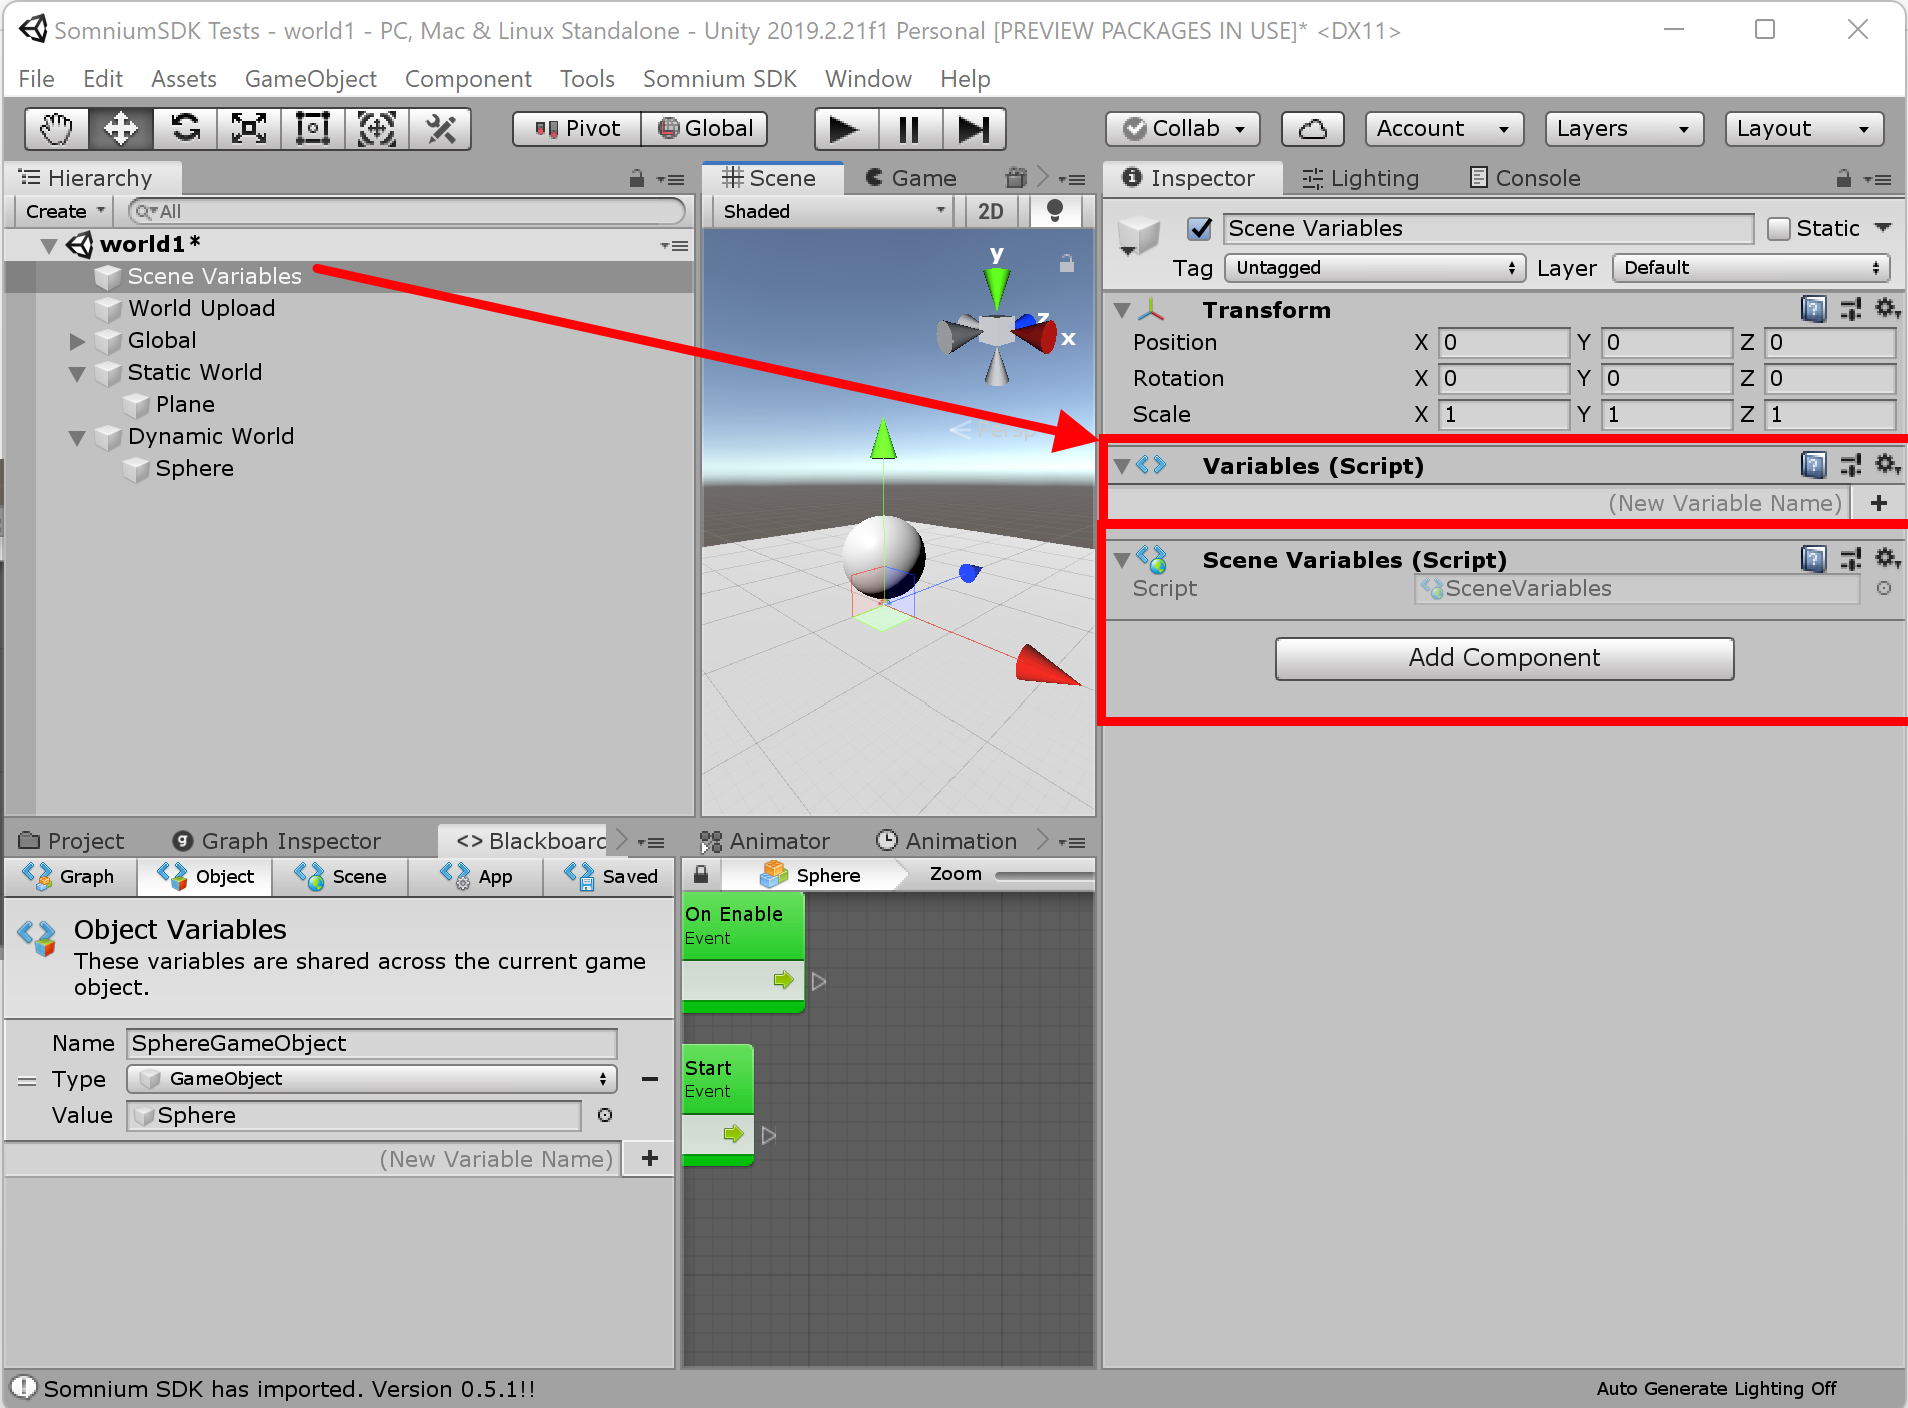
You can drag and drop this window to anchor it on the middle down area.
* Remark that a new GameObject appeared in the scene called “Scene Variables“
Variables
The way you store information and link elements in Bolt is trough “Variables“.
You have 3 places where variables can be stored: Scene variables: they are the global variables accessible trough all the game (they are not synchronized between players). Usually used to make something accessible for all the game (so you don’t have to find it).
Scene Variables
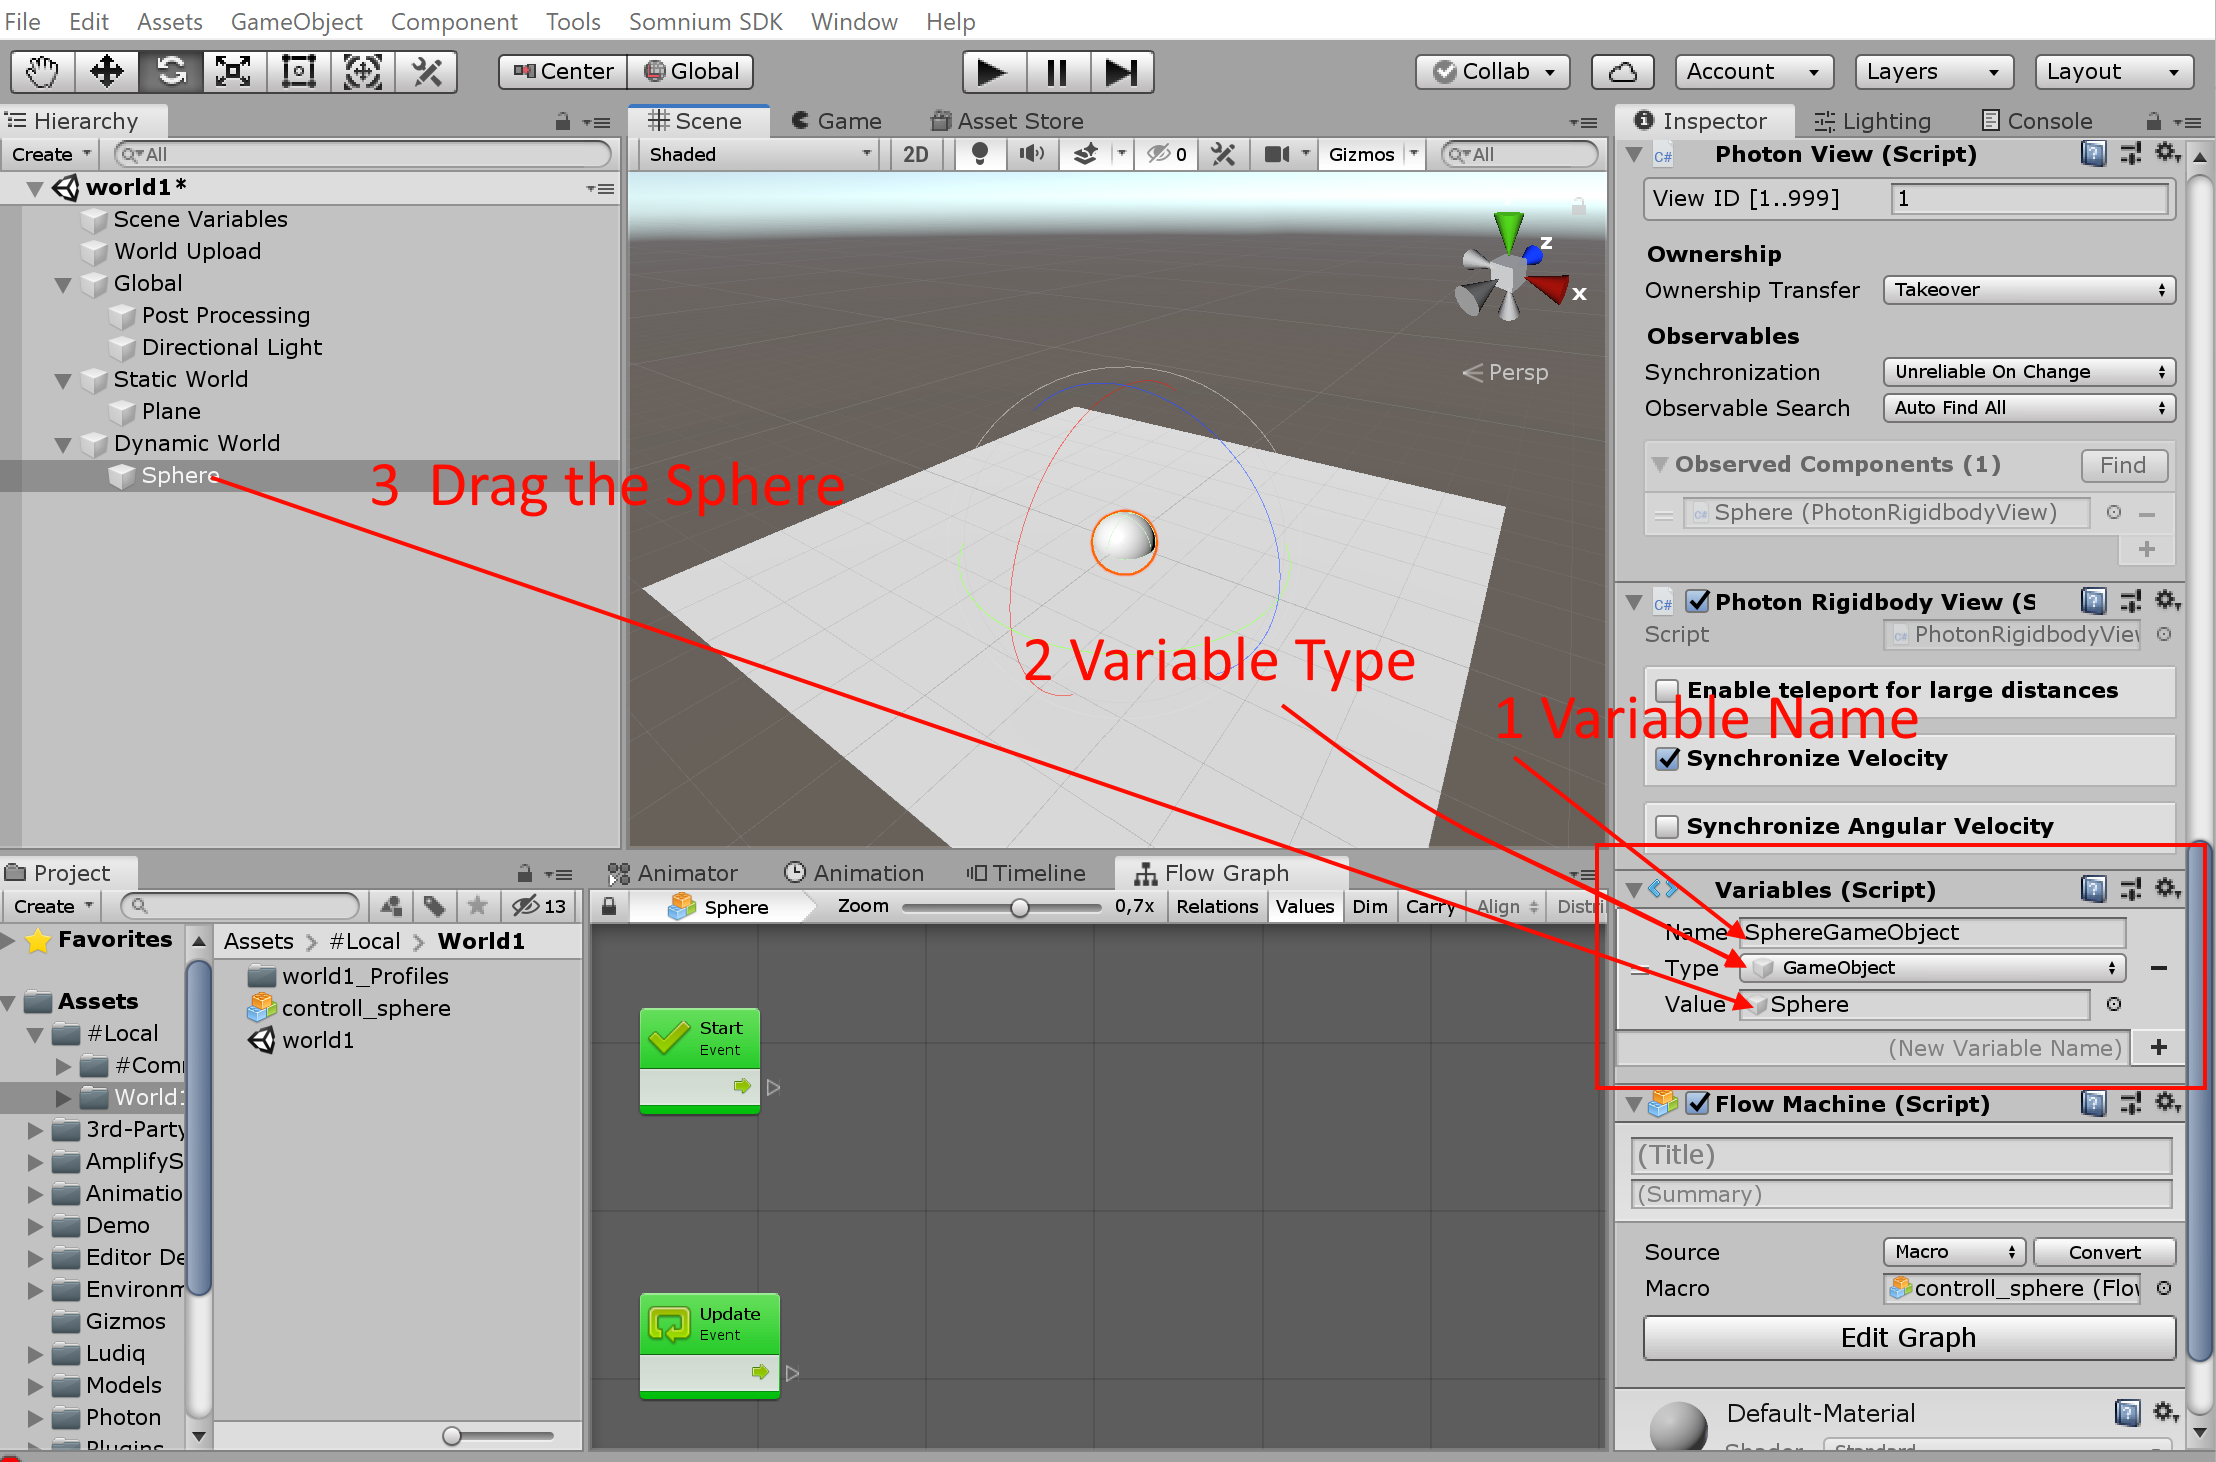
On the Sphere GameObject, you will see a component called “Variables“
We call a variable on a GameObject “Object variables”.
First main use is to configure a gameobject script (object color, object size, some delay, some text…)
Second main use is to link elements between the inside and the outside of a script (link an other object, link a rigid body, link a command…).
Lets start scripting
Lets convert English to script logic: “We need to interact with a sphere” – We (what will interact with the sphere) – Interact with (this is what the script is doing) – a sphere (this is what the script is affecting)
Detect a player interacting with the collider
When the sphere have been created, a “sphere” collider was added to it automatically. This component made the sphere physical.
Your Bolt script in on a gameobject, so he can have direct access to most of the components of this gameobject (collider, material, animation…).
If you want to access an other gameobject components (including script) you then need to use variables. (let’s get that for later)
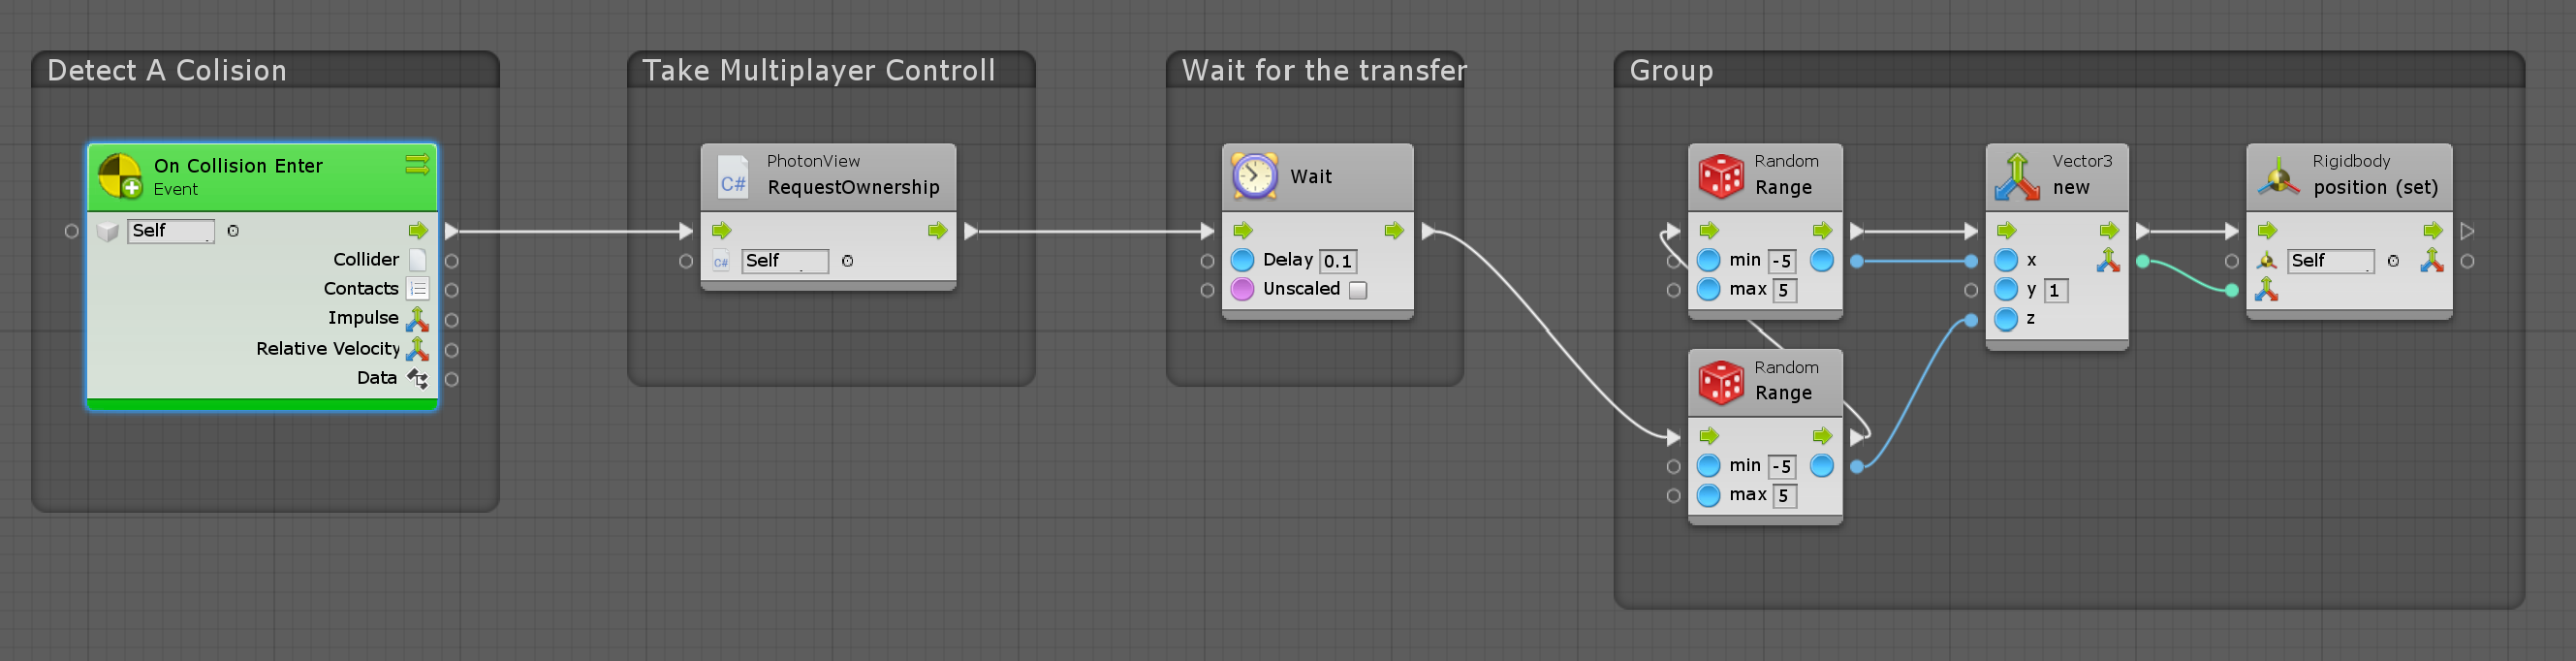
Complete Script, will be explained part by part
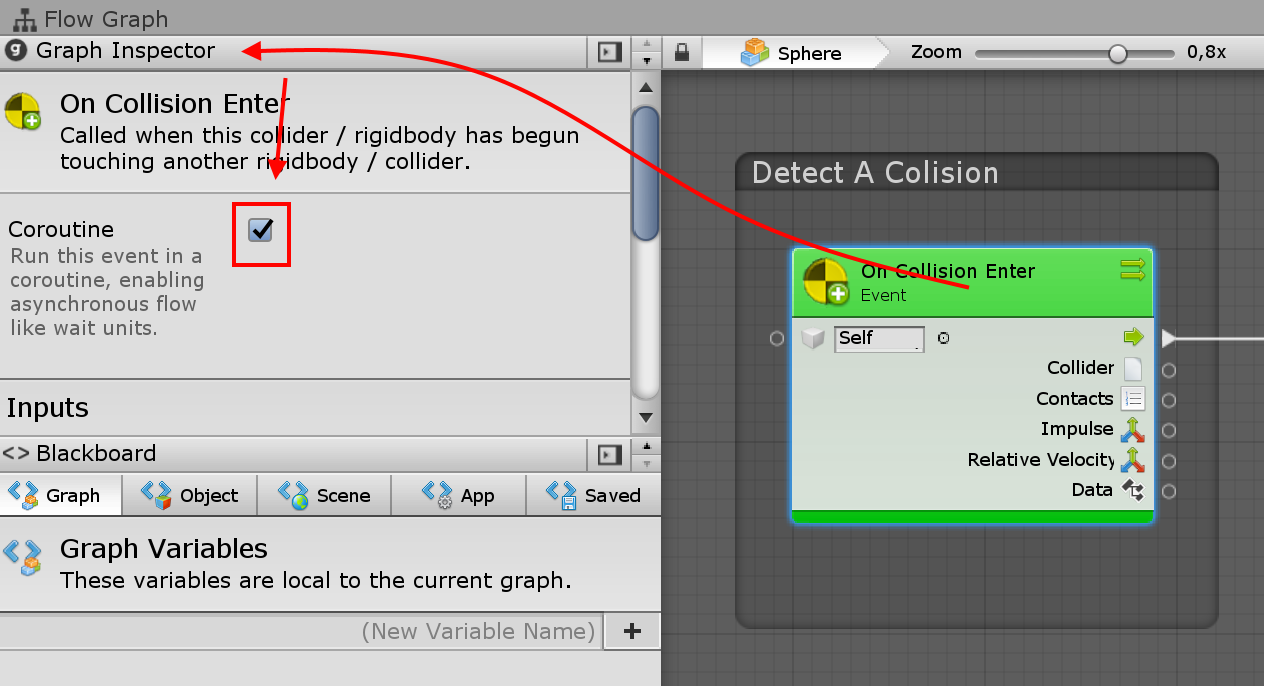
“On collision Enter” logic
To add a node, right click, press “add unit” then either way use the navigation or just type a part of the name of the node.
Here we look for “on collision enter”.
The search is quite smart, you can write part of the node name like this “oncolen” and it will find “on collision enter” since there is no other similar node name.
You have 2 type of green node (event node). “Normal” and “Coroutine”.
We will enable the “Coroutine” version of our node inside the “Graph Inspector” window.
Coroutine node are needed when you use any type of “wait” function. In fact, as soon as you have a “wait” node, the start of the script need to be a “Coroutine”.
Coroutine mean that the script can be executed independently of the rendering “frame” time. Normally a script is executed while a single frame. (delay mean that the script will take a long time to be executed entirely).
The input of this node is using “Self” it mean it will take the “collider” of the same gameobject.
Add new node to Bolt
We will use the node “photonview.requestownership”. To do so, we need to configure Bolt to find this node.
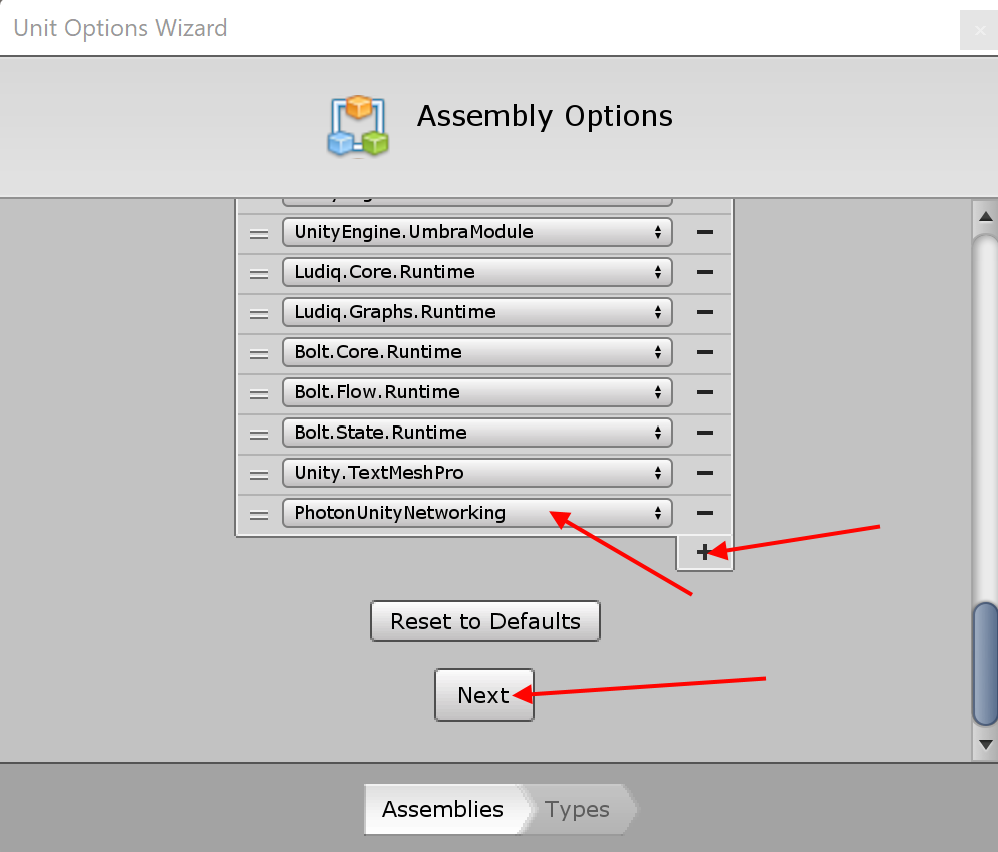
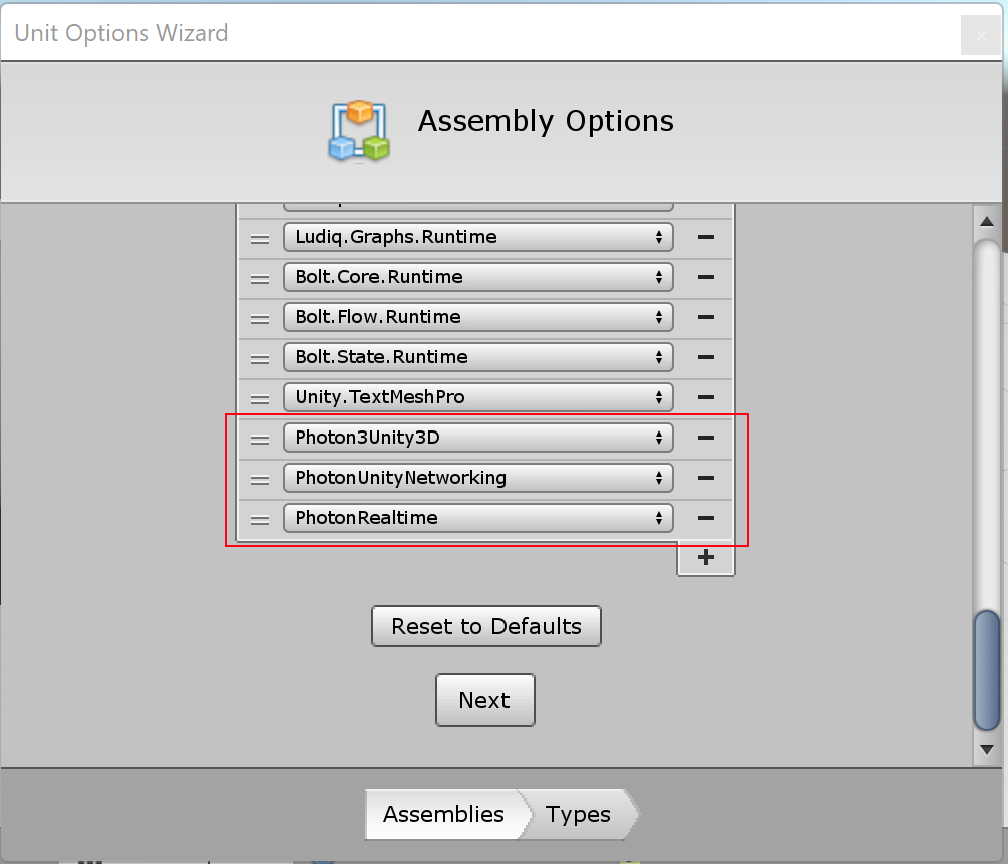
Open “Unit Option Wizard” from the quick menu, “Tools/Bolt/”
In the Assembly Option window, Press the “+” button and look for “PhotonUnityNetworking”. If you don’t find it, you maybe you forgot to install “Photon Pun 2 Free” addon from the Unity asset store.
Then press “Next”.
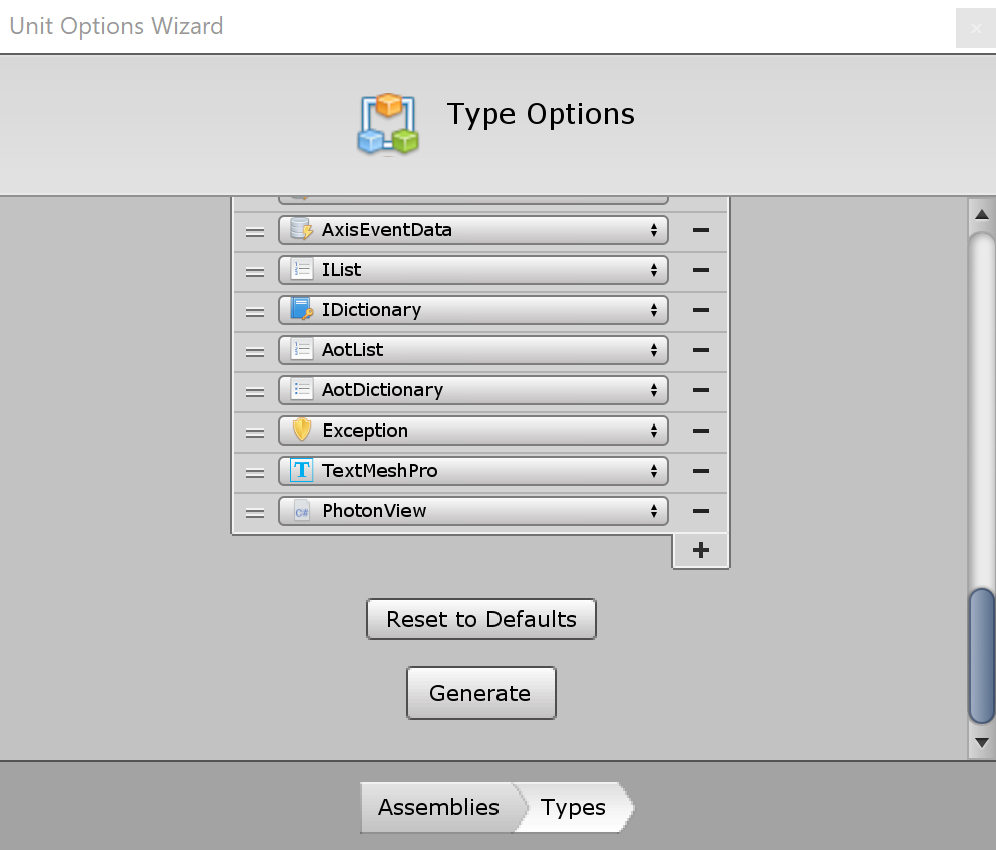
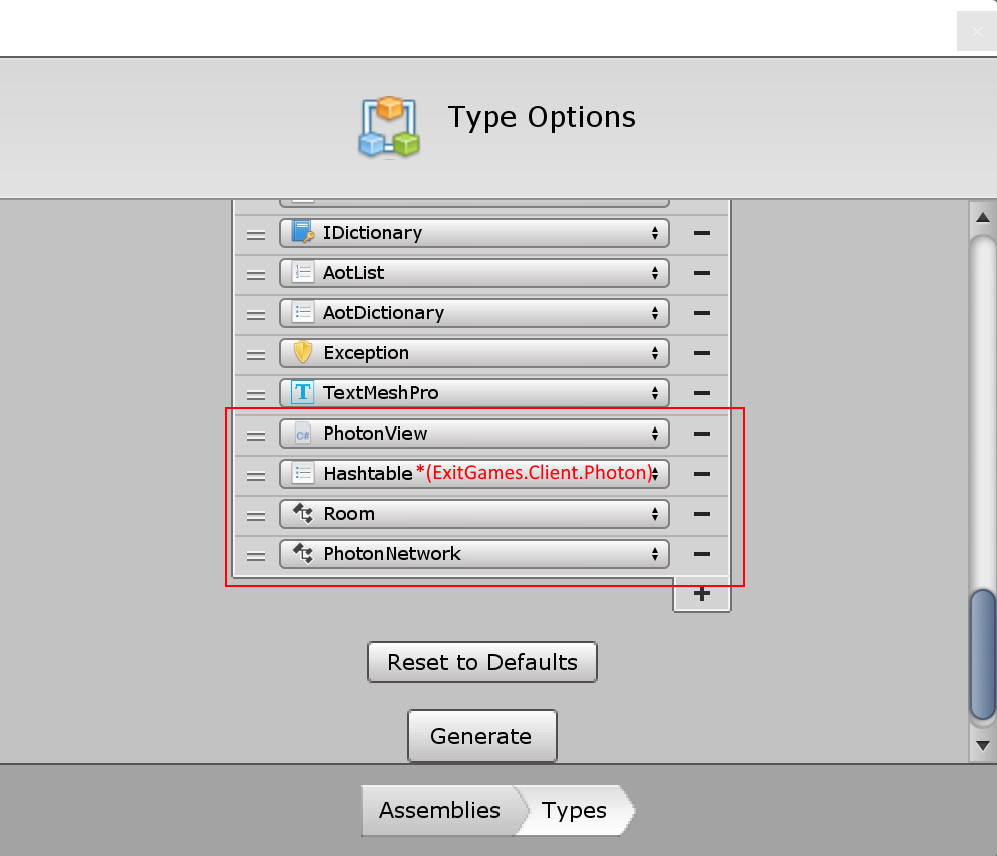
In the Type Options window, press the “+” again and add “PhotonView”.
To finish, press “Generate”.
Now Bolt can use the component “PhotonView”. He have access to most of his functionalities.
“Taking control of the sphere in multiplayer ” logic
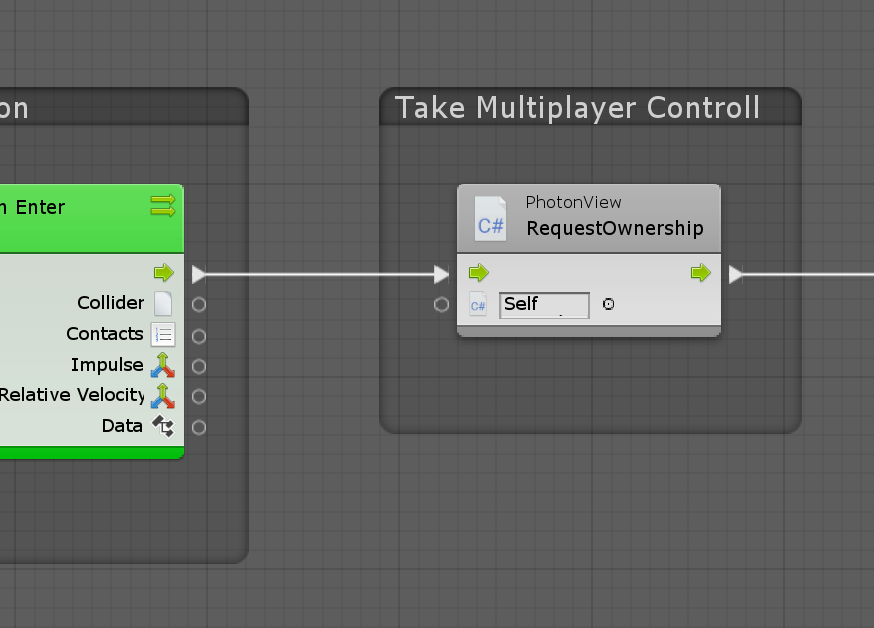
Now you can add the “photonview.requestownership” node. It will use “Self” to access the PhotonView component of our sphere.
This step is necessary for moving a multiplayer object.
In Photon multiplayer games, there is no server where everything is synchronized. Instead the first person that join the game will “Control” every multiplayer objects.
So if you don’t have control you cant move something.
Since the ownership is unpredictable, we just take it without asking.
Normally we should ask for it, but it’s not possible in Bolt.
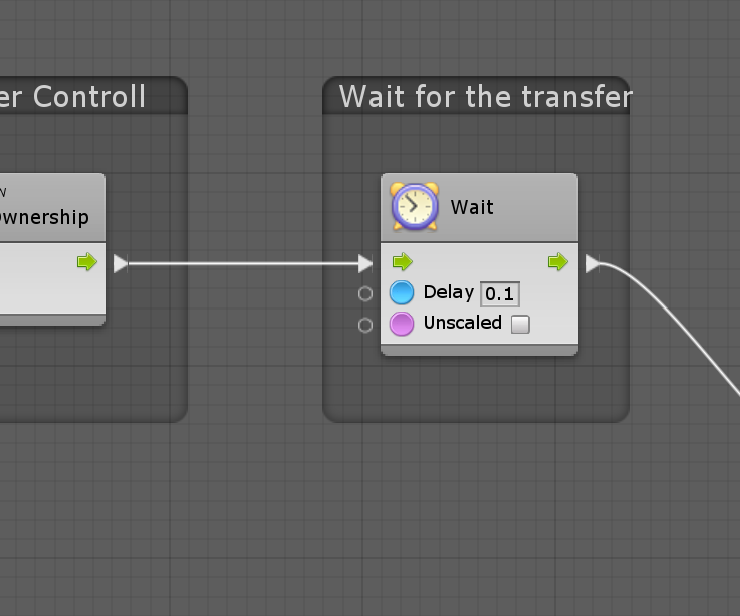
Since there is a unpredictable delay when you take the control, we need to add a delay yourself to be sure the action will happen.
To put it simple, we don’t want the ball to be at 2 place at the same time.
“wait for the transfer” logic
You can add the node “wait for seconds”.
Set the delay to 0.1sec (this is experimental and may need to be higher or lower).
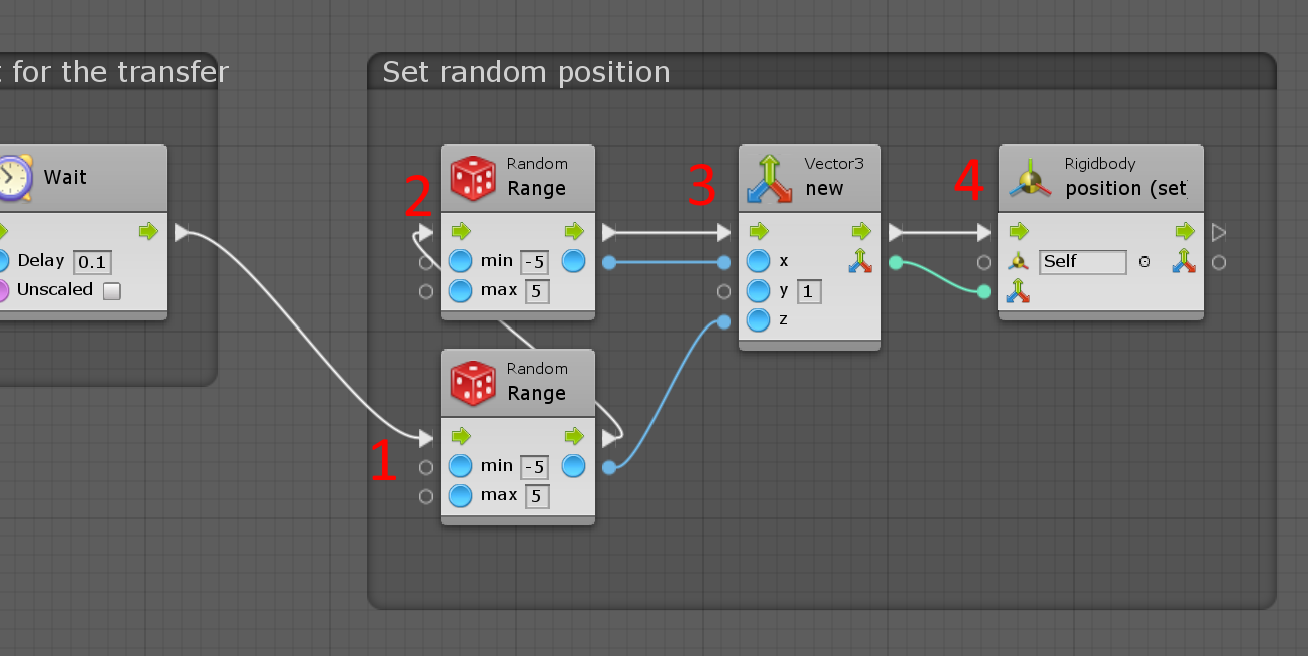
“Set random position” logic
The first node (1 and 2) we will use are “Random.Range”. They are used to generate 2 number between -5 and 5.
Since nodes are executed step by step, you can generate any of the number before the other. (the order doesn’t mater here) since the the information is took later.
So if you understood well, the input wires of the node 3 will grab the values only when it is executed.
Once a node is executed, his output can be used later.
You can’t access output of a node that haven’t been executed yet.
So here we use the “new Vector3” node that store a position in 3D. We set the Up position (y) at 1, it will stay at this high.
To finish this script, we will use the node “Rigidbody.setposition” then we will connect the new position at his input.
The “Rigidbody” component have been automatically added to the gameobject when you added “Photon Rigidbody View”
Again, since the Rigidbody component is on the same gameobject than the script, you can access it without doing anything.
A Rigidbody component add the ability of a object (with collider) to move with gravity and inertia (if controlled by speed).
The object won’t have velocity conservation since we teleport it.
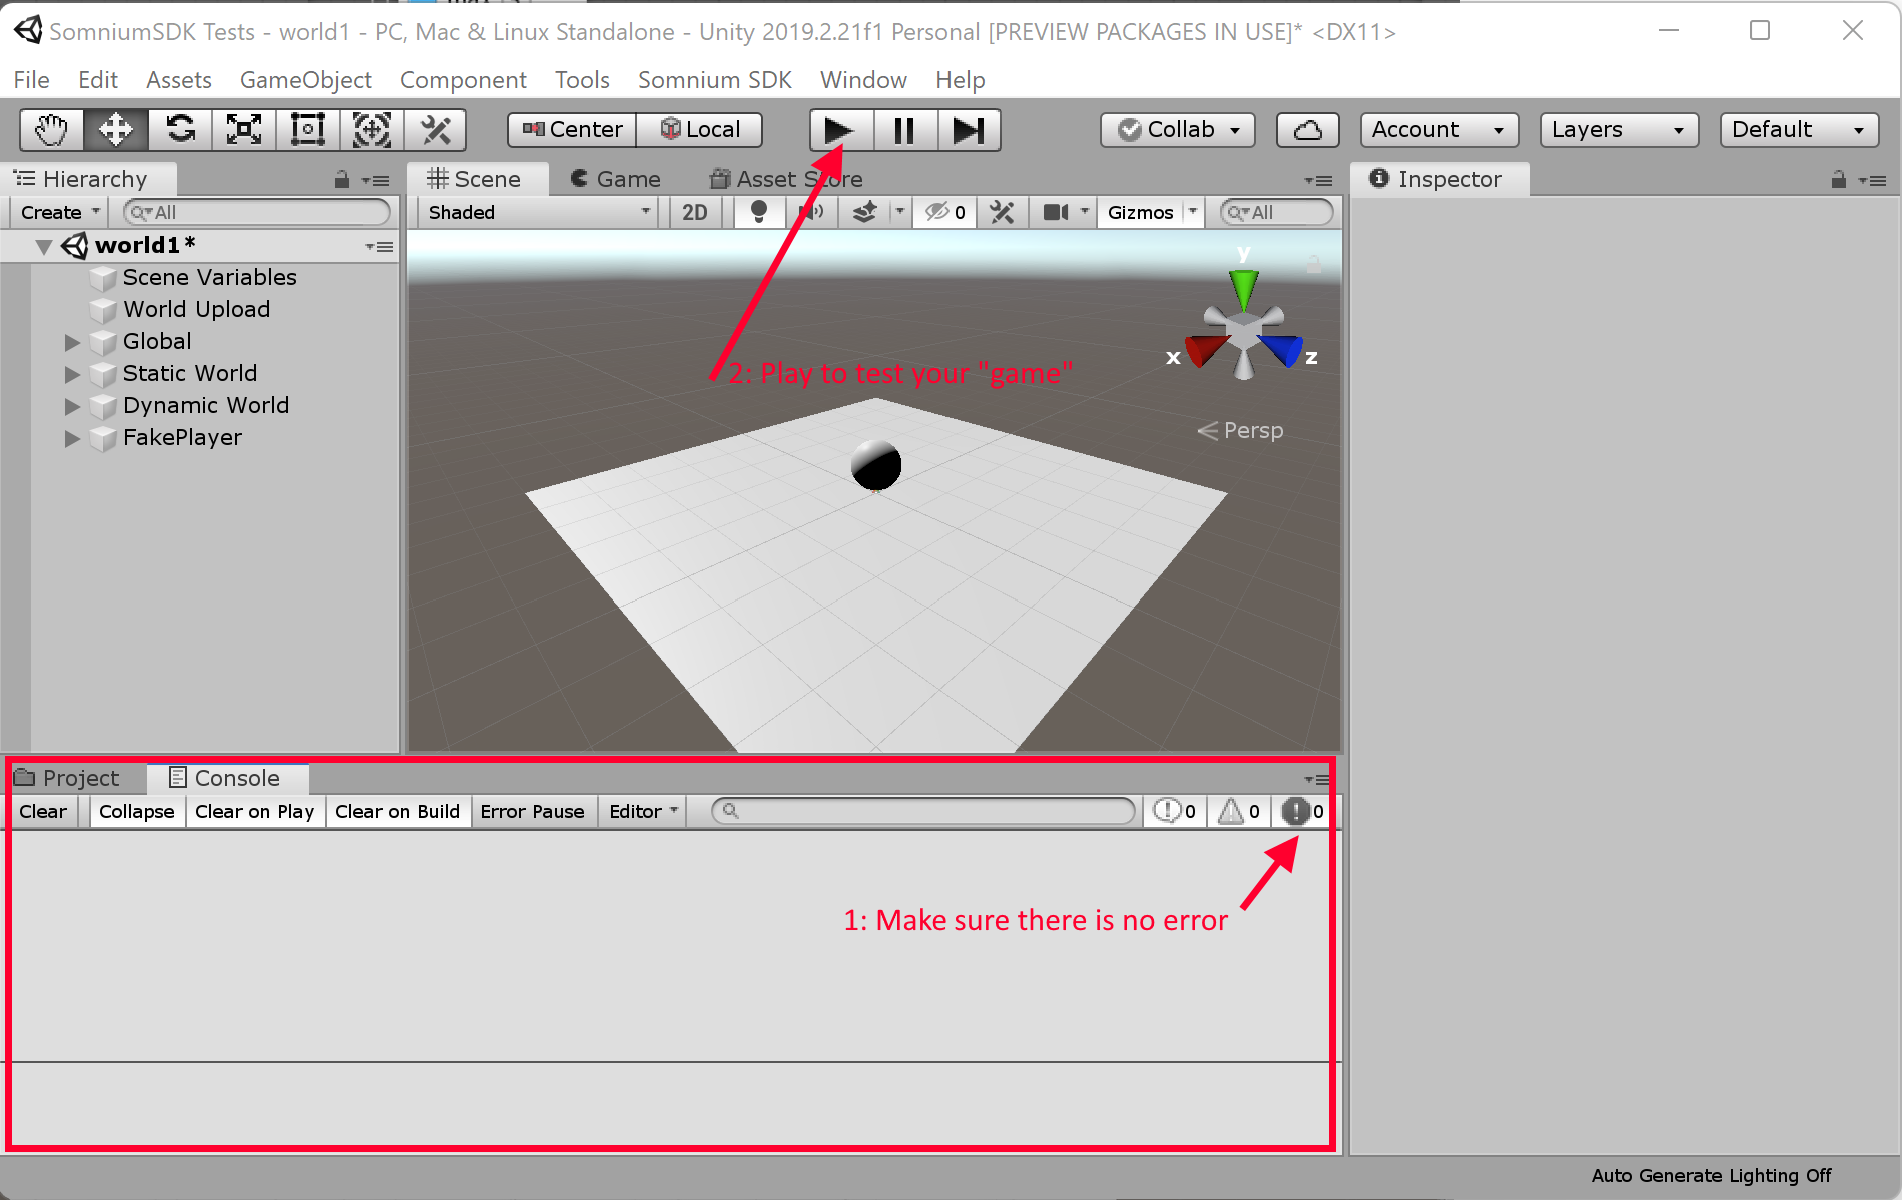
We are not finished yet, but you can try it in test mode
Just press on the “Play” button.
If there is no error in the “console” the game will start.
12. Add a filter, to detect player only
We will first learn some good practices, “custom nodes” and “comments”.
“Custom nodes” called in bolt “Super Unit” are used for reusing script and making your script easier to read and understand. They can be saved on your project folder and be reused in other script. Everything done in a “Super Unit” is not shared across all the reused one. So consider every copy as independent.
“Comments box” can seam to be a time lost, but it is important to understand that even for professional readability can make you save time and effort for developing.
To add a comment box hold “Ctrl” and drag the left mouse button !
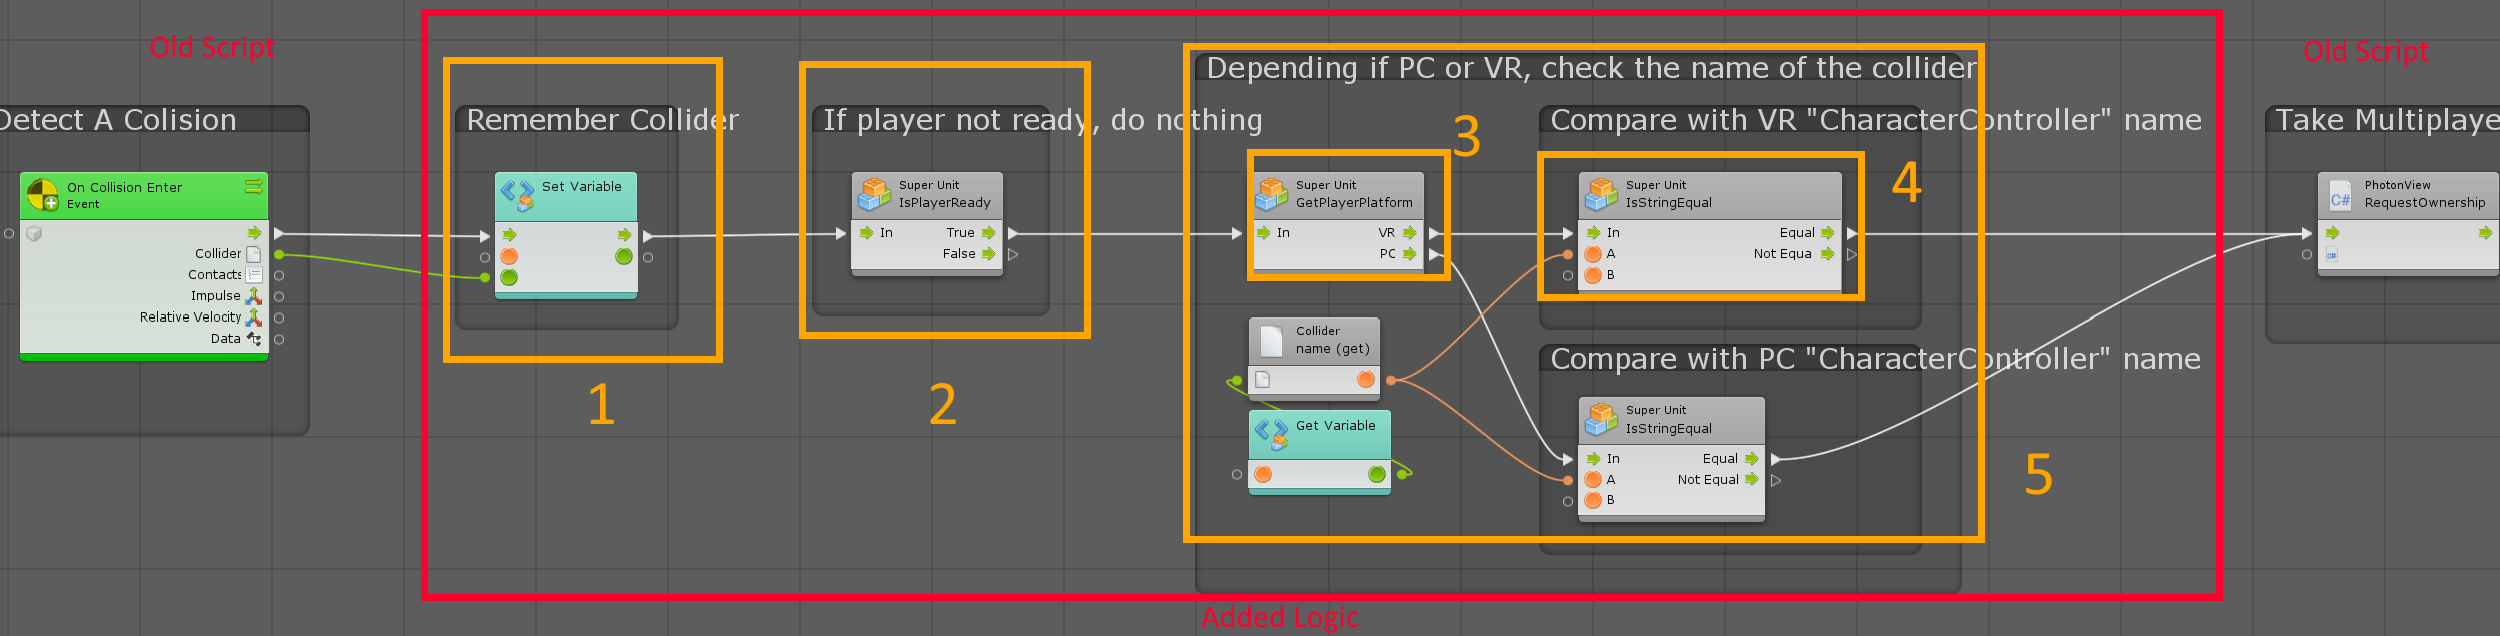
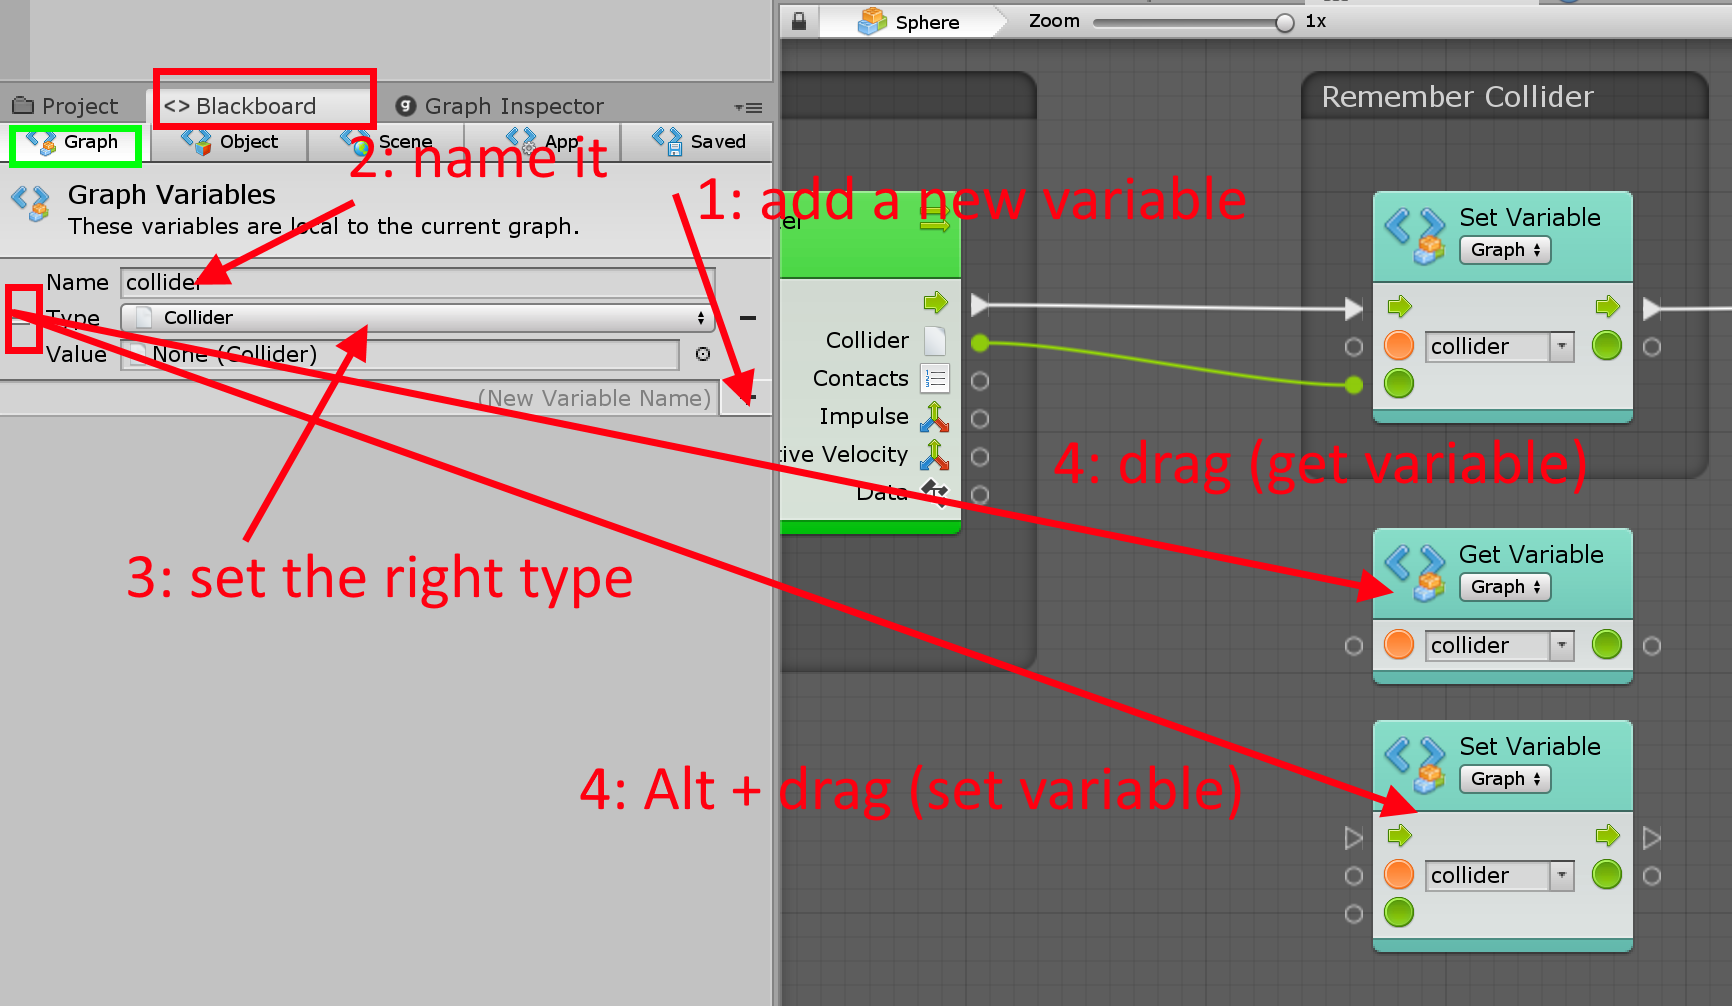
Detect a player step 1: remember the collider
An other best practice is to use “graph variable” to prevent using super long cable that would reduce readability. Don’t try to replace every cable by “graph variable”, the objective is to improve readability so to much variable could create more problem than it could solve.
Step 1: Int he “Blackboard” window, select the “Graph” section then press the “+” button to add a variable.
Step 2: name the variable, you can call it just collider here.
Step 3: Set the correct type, or leave it null (you can leave it null if you are sure that you will never read the variable before setting it).
Step 4: You ha 2 nodes related to variables, “Get Variables” and “Set Variables”. You can create the “Get Variable” node by searching in the quick menu or drag and drop the variable from the burger menu (3 lines on top of each-other). The same way, if you hols “Alt” by drag-and-dropping you will create the “Set Variable” node.
Detect a player step 2: check if the player is ready
When you join a world, it is important to understand that the player is not created/loaded first. There is a little delay. A good practice is to check if the player camera exist to know if you can interact with it.
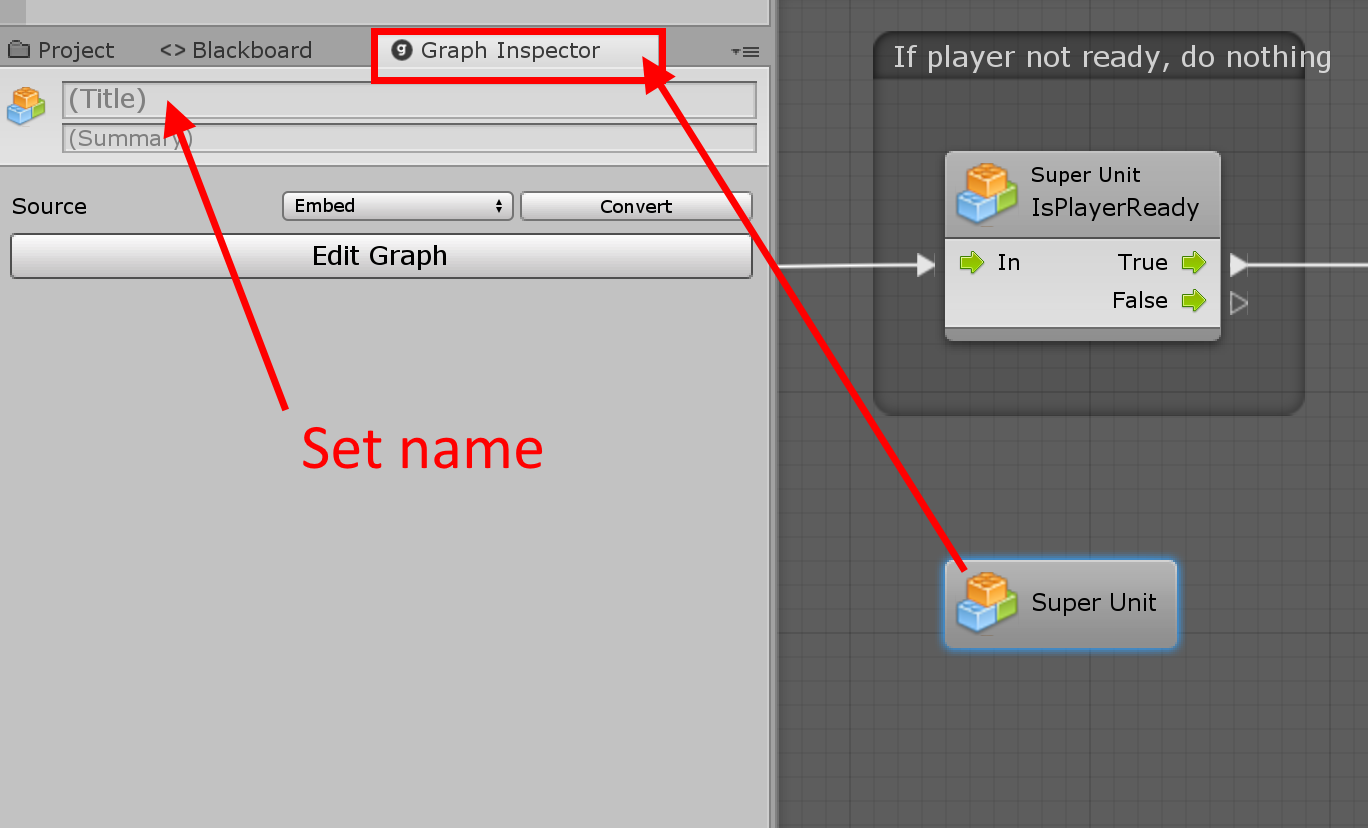
Now we will learn something new “Super Unit”. We will embed script inside a “Super Unit” and save this custom node.
First you need to add a node called “Super Unit”.
Then, once selected, go in the “Graph Inspector” window. And set the name of this super unit.
Just like this, this super unit is not saved or sync (it’s part of this active script). If you copy it and edit the new one, the old one won’t update. This is useful if you have a very specific logic that wont be reused. This use-case increase readability without adding more file to your project.
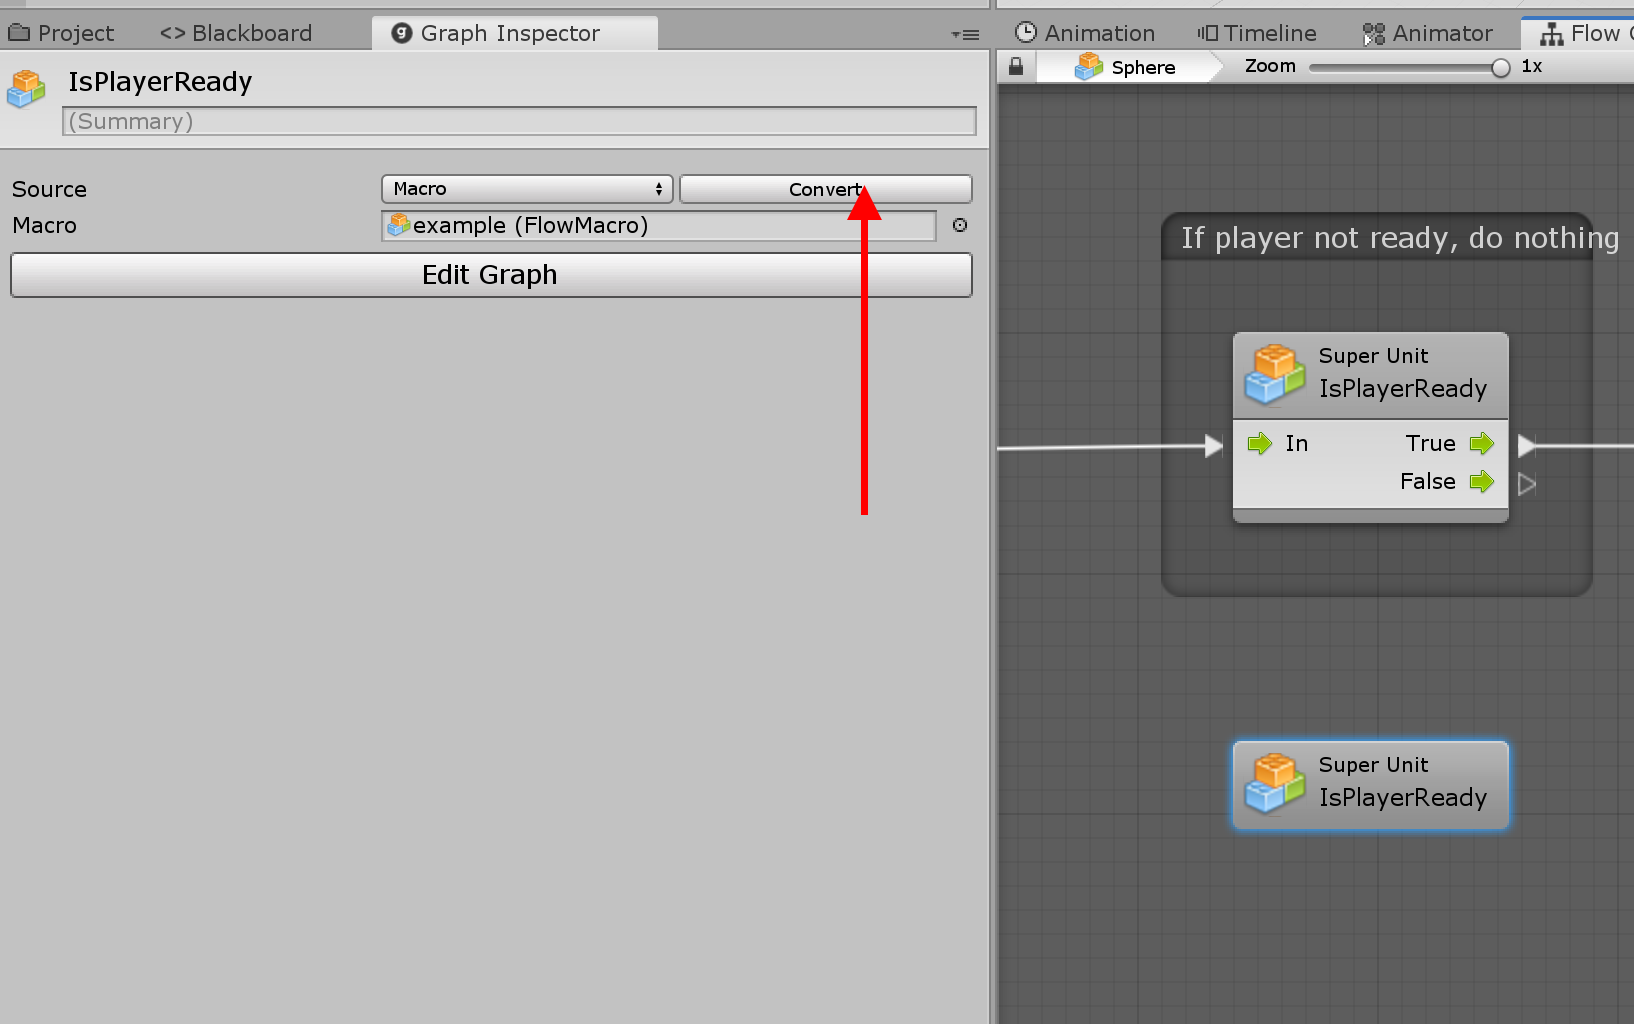
Since the “Super Unity” we are working on is very useful, we will save it for later use.
To convert (or save) the Super Unity into an independent script, just press “Convert” in the “Graph Inspector”. The windows file manager that will open will always be at the root of the project (a little frustrating). So i recommend to save your custom nodes (“Super Unit”) to a “Script” folder inside your scene folder.
Like i said before, try to put every files you created into your own folder hierarchy. (“Asset/#Local” for me). This way you separate Unity and libraries from your project.
Now if you edit the node, it will be saved and every clone will be updated.
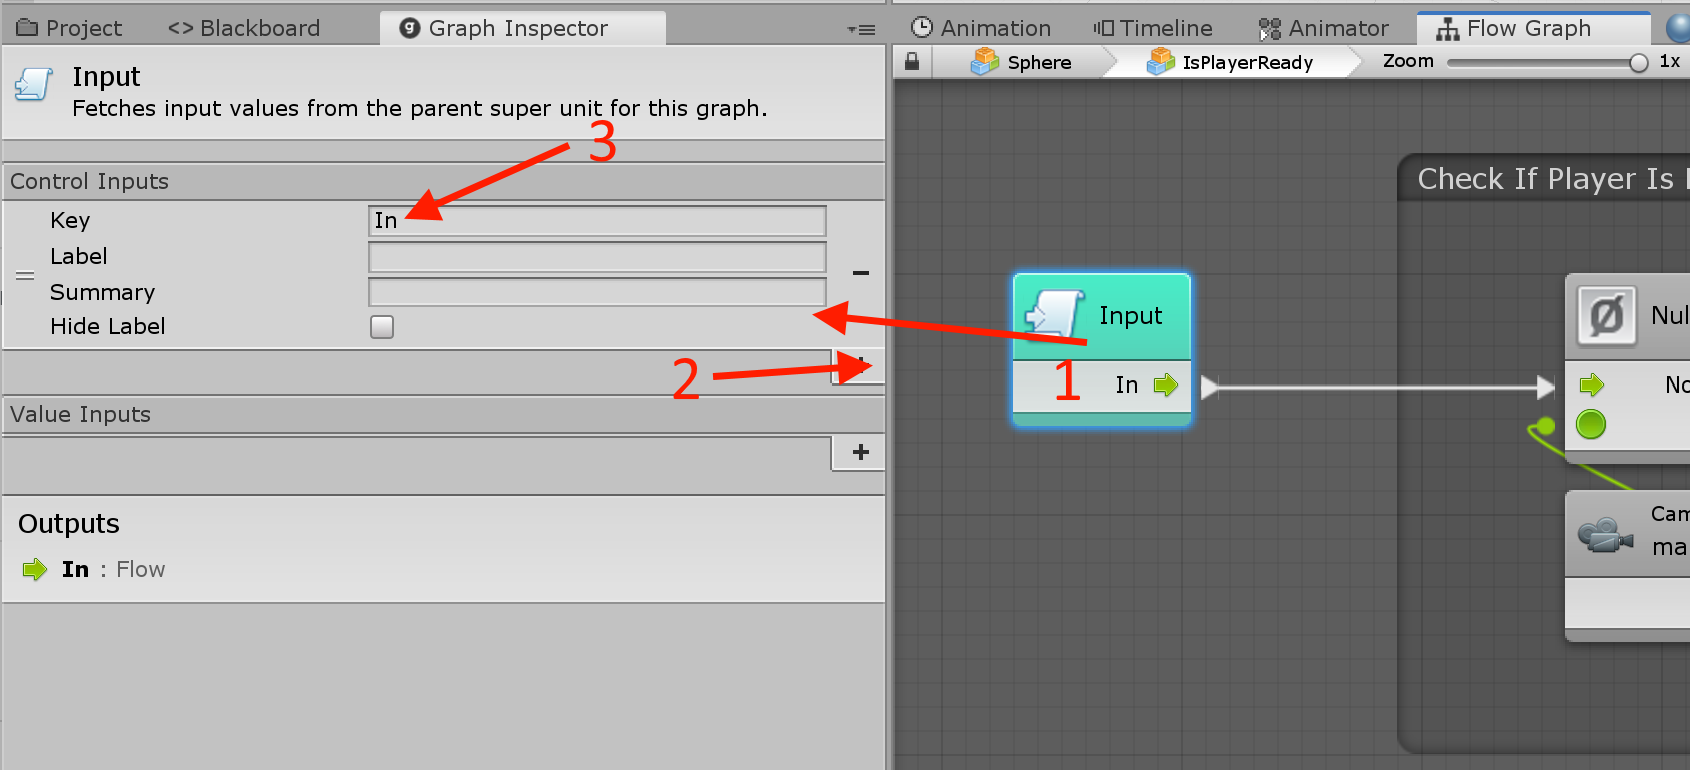
Double click on the node to open it. When you are inside a “Super Unit” you can always go back by using the little hierarchy buttons on the top left.
You will now have 2 new nodes (don’t delete or make more of them):
From “Input” you will receive the “Flow” and variables from the higher script (the one calling this one).
In “Output” you will send back the “Flow” and variables to the higher script.
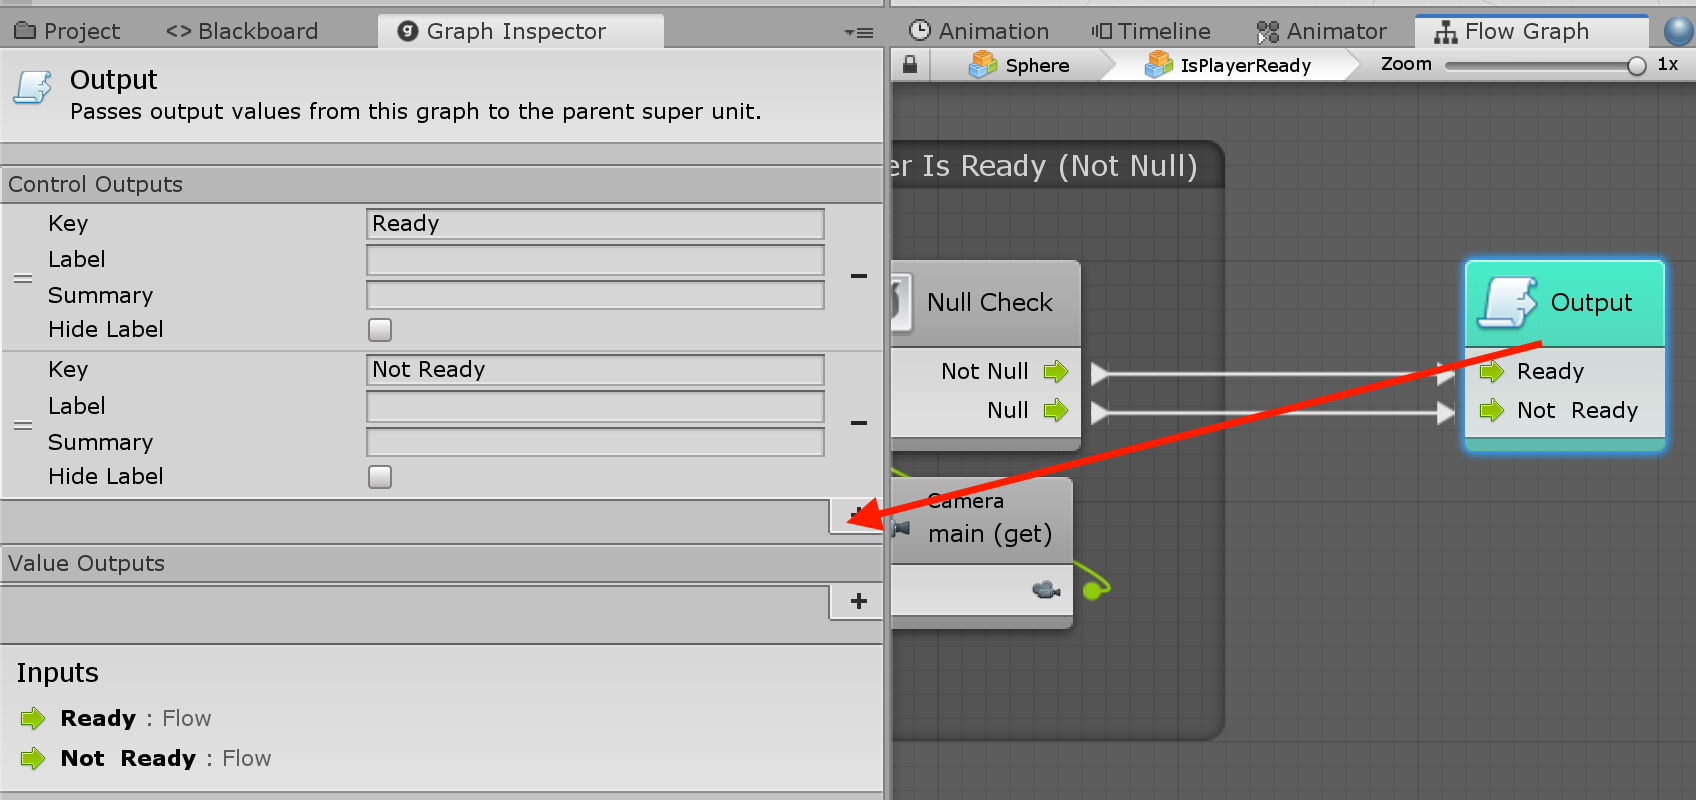
Select the “Input” node, add an input (+ button) then name it to “Flow” or “In” (this name don’t really matter). * Just make sure any input or output have the same name as a variable.
Repeat the process for the output, add 2 “Output” with names that tell you something. Here we will use “Ready” and “NotRady” (Spaces are added just for readability). In this case, the Flow will go out from only one of the 2 output.
Like I said you can imagine the flow like a Ball or a Pointer that travel the script one node at a time.
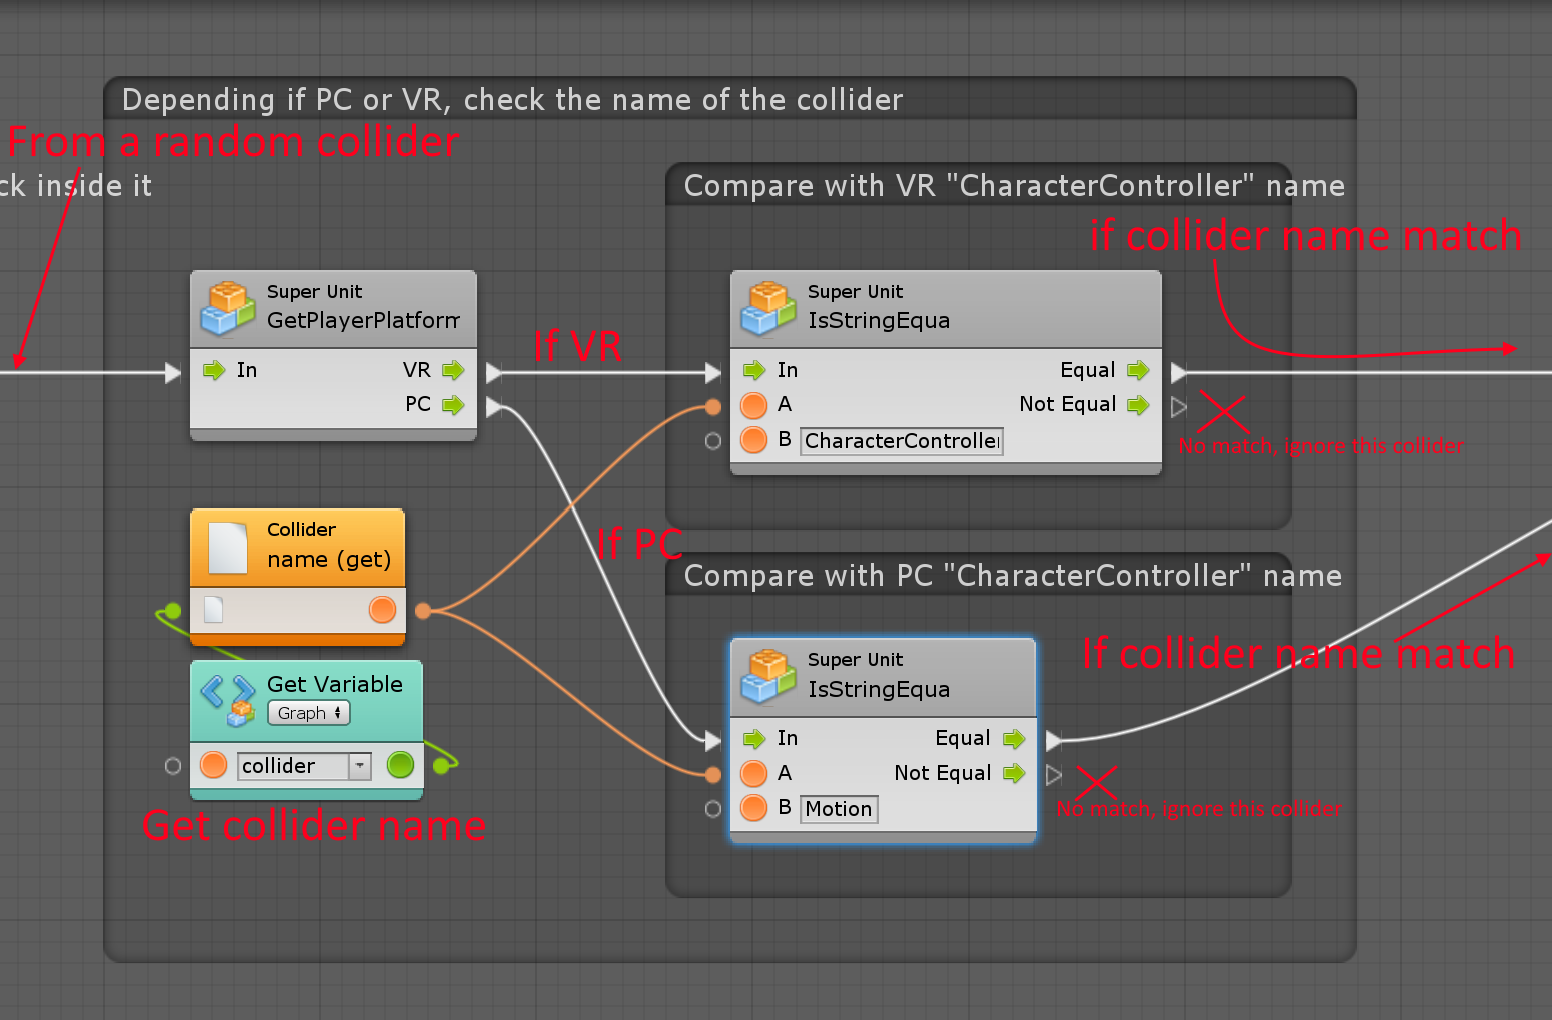
Detect a player step 3: Check if you player is PC or VR
The player generated by Somnium Space will be different for PC and VR.
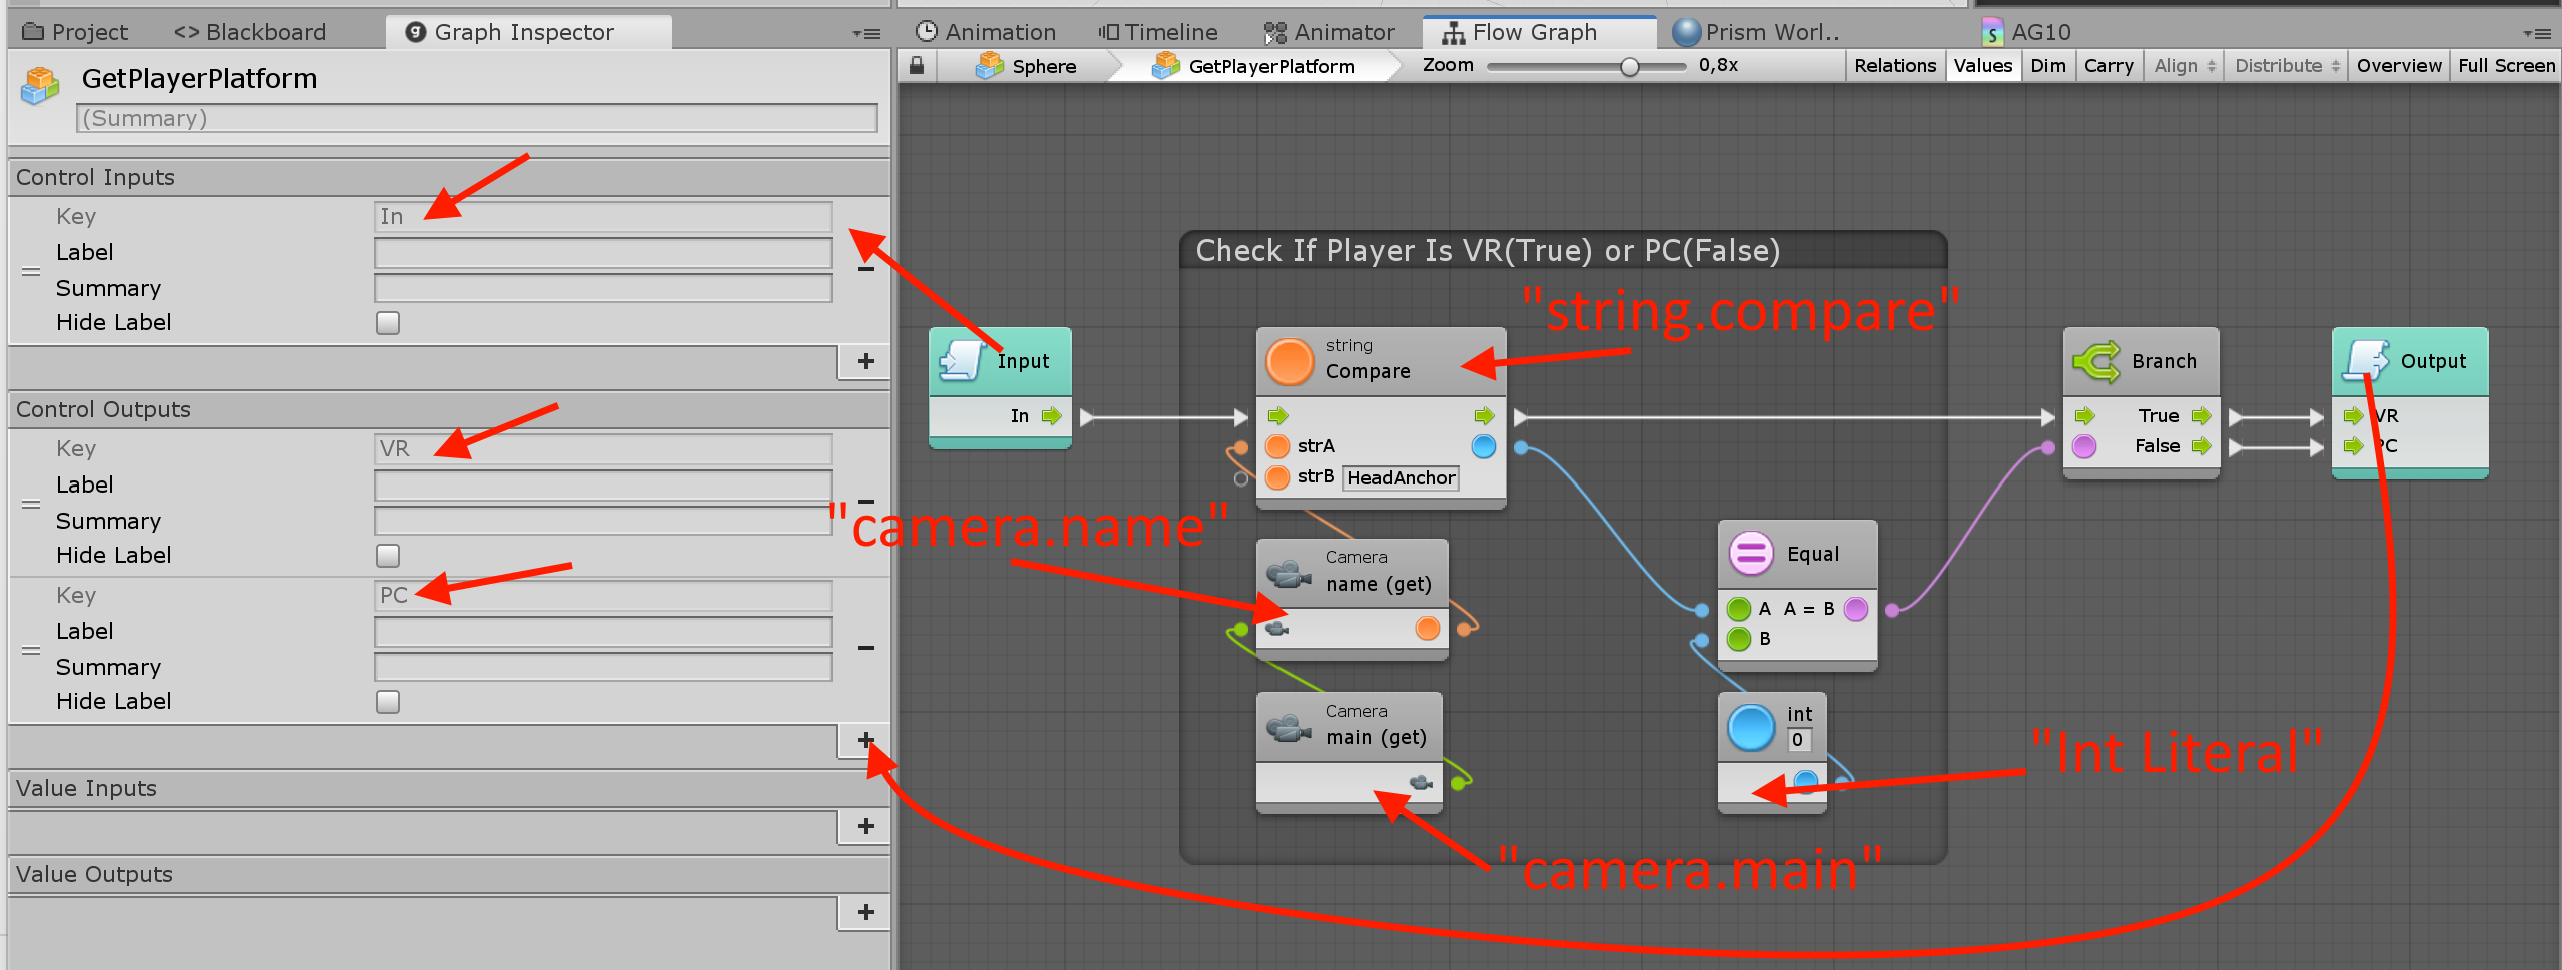
The simple way to check if a player is PC or VR is by checking the name of the main camera GameObject.
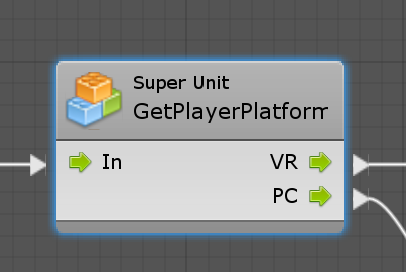
Create a new “Super Unit” called “GetPlayerPlatform”.
Save the node then configure the input-output.
You should know everything needed to reproduce this script.
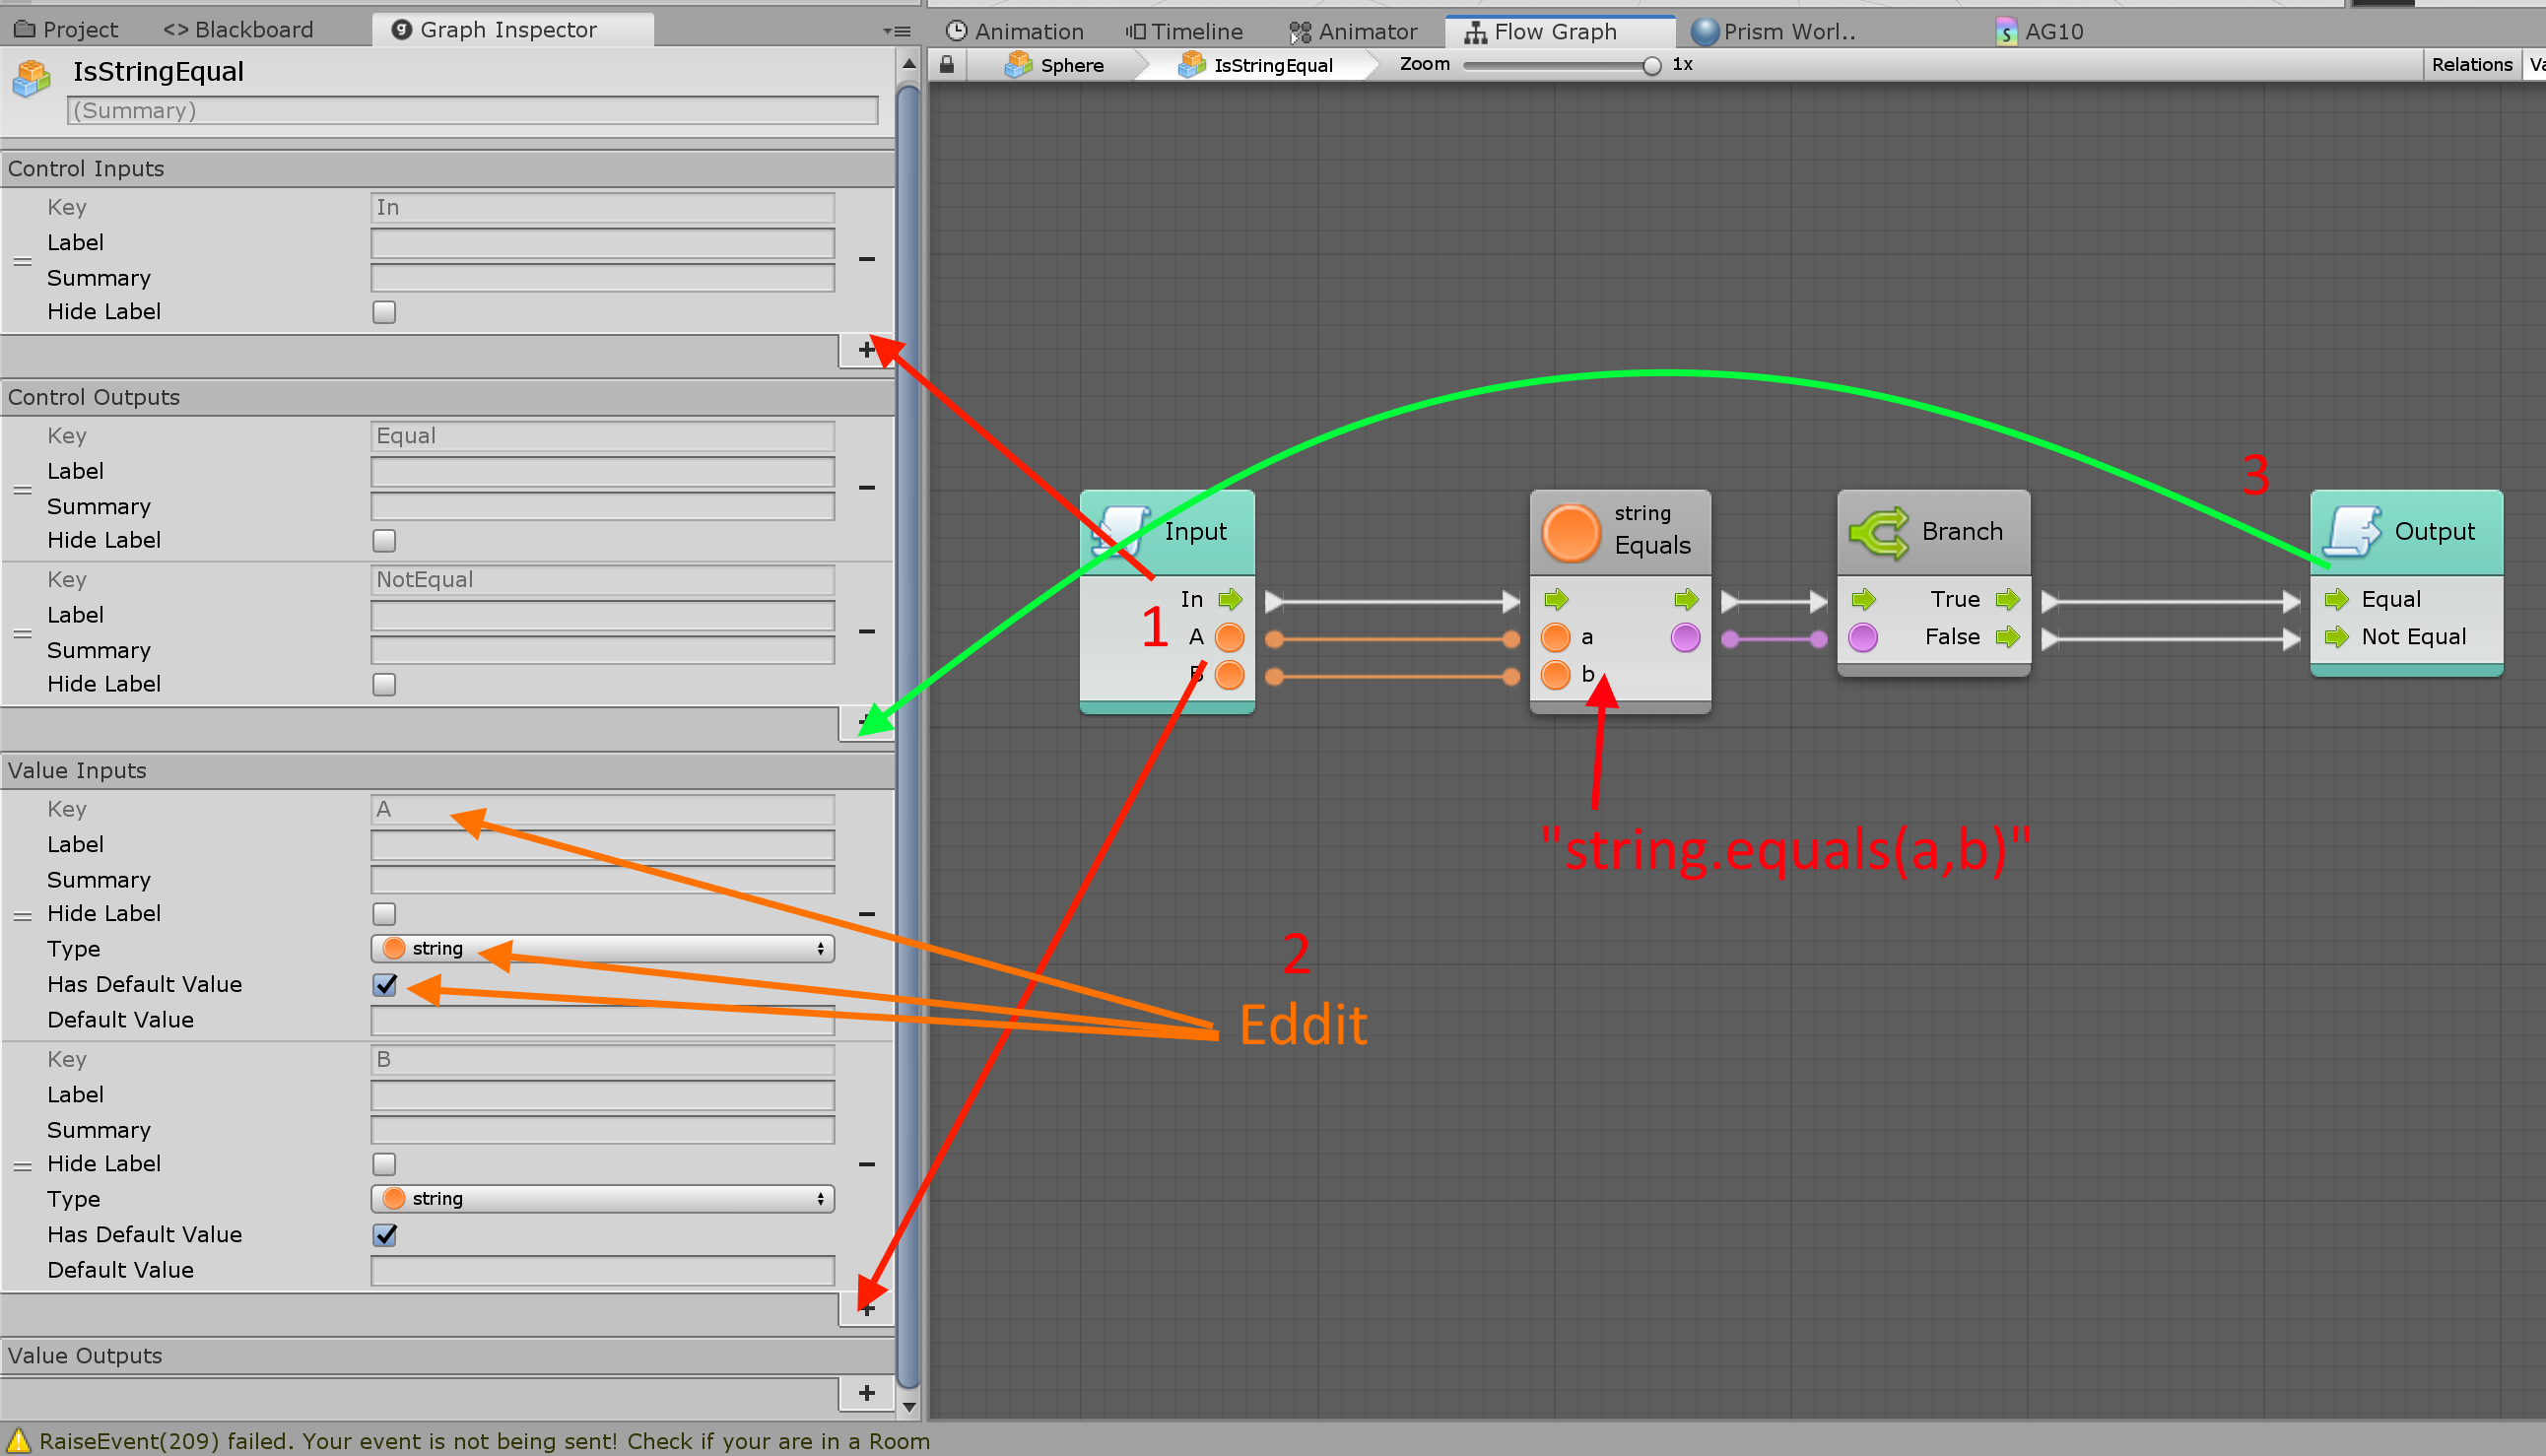
Detect a player step 4: Check if collider name match
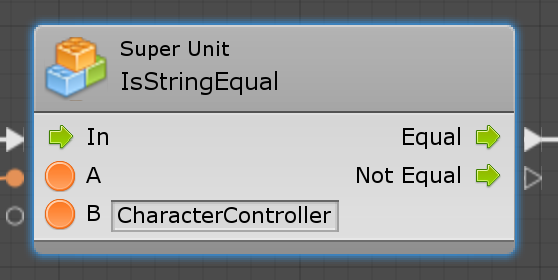
We will create a new saved “Super Unity” called “IsStringEqual”.
This Super Unit is used to compare 2 string and branch the result.
Now you will need to setup input variables (variables that are linked to the input of the Super Unity). You need to specify the type to string and enable the “Default Value”.
“Default Value” enable the text input on the node, we will use this field to put the collider name we want to find.
The composition of the script is quite simple, you could have used the 2 nodes without making a “Super Unity” but it’s just really convenient to make your main script simpler.
Detect a player step 5: Check if the collider name match depending on PC /VR
In this part you are just duplicating the “IsStringEqual” then connect all your new scripts.
Since we have the collider in a variable, we call the variable “Get Variable” then use “collider.name” node.
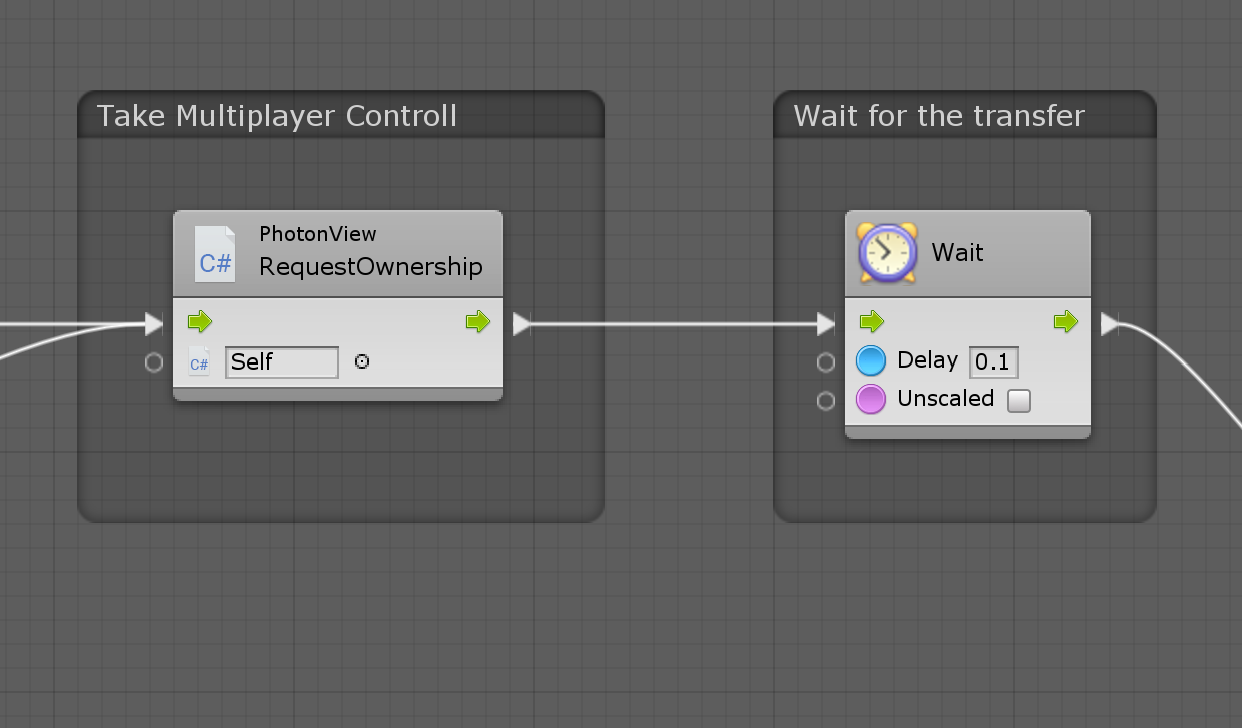
13. Request multiplayer object control
Since we using “Photon Pun 2” multiplayer system there is some rules to respect to have multiplayer sync objects.
The way Somnium Space world work in multiplayer is by synchronizing every client together. In fact the main server do not simulate anything he just route the information we ask to be sent.
Because of the delay of the network and other reason, a multiplayer object can only be controlled by one player. We say the player is the owner of the object.
By default, the first person to join a world will own everything.
If anyone want to interact with a multiplayer object, he need to take ownership.
The process can take a little moment, so we also add a small arbitrary delay. * There is a better way but i don’t master it yet so we will use the delay.
Be carefully, if 2 person request ownership at the same time, it can end-up in one of the having it and not the other, so both will see the object at different place. (The object will be un-sync for a moment)
Returning to our code. we will use the nod “PhotonView.RequestOwnership” (you can just type “request” to find it fast)
Since this script is on the sphere and that this sphere have a “PhotonView” you can lest the input to “Self”.
Then add the node “Wait For Seconds” and put the delay to 0.1
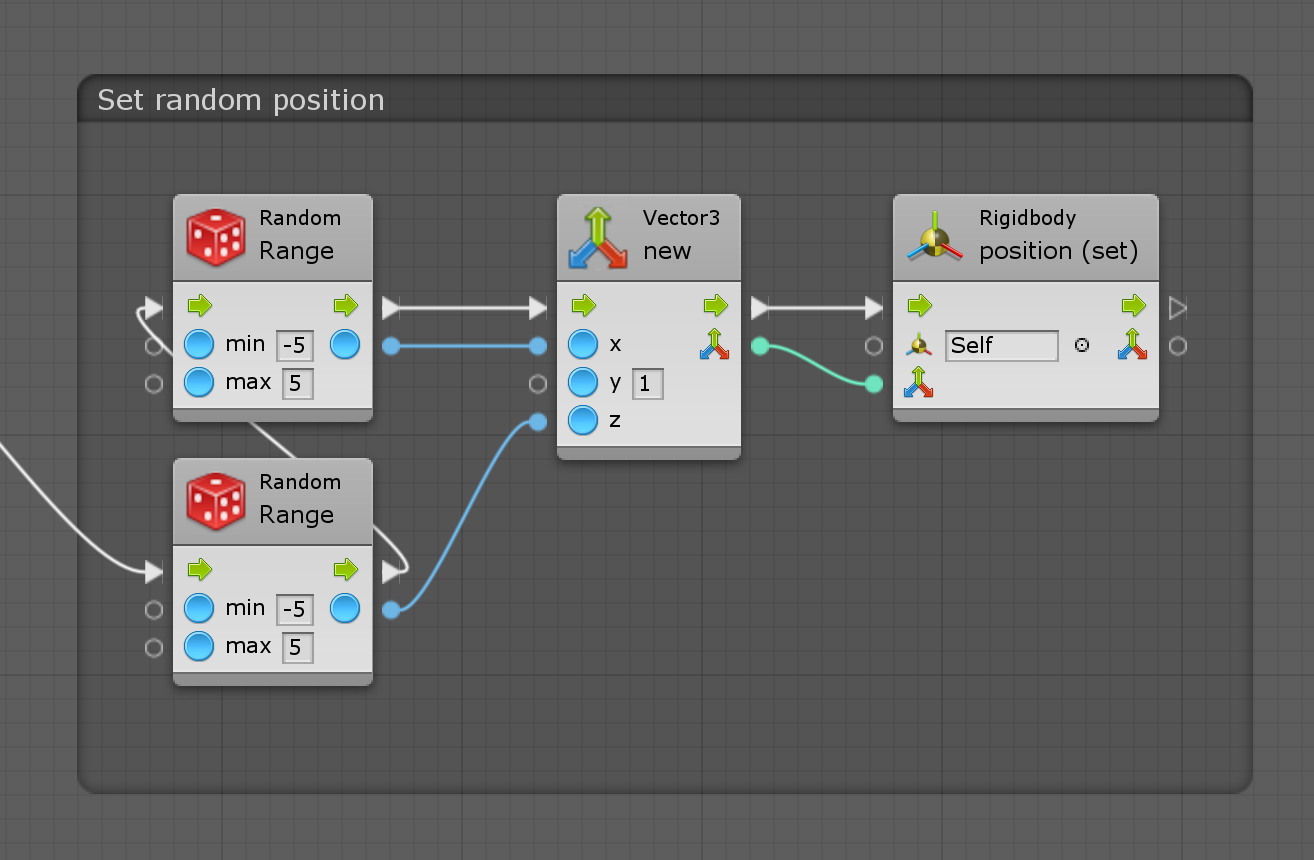
14. Move the sphere to a random position
Now you need to stay calm because we will talk about vectors !!!!
Vector are simple, they basically just 3 numbers in one variable.
In our case the Vector 3 represent the position X , Y and Z.
We wont change the UP position, so we wont will just set the UP (y) position to 1.
Remark that Unity use the standard Y is UP. Other software use Z is UP.
Next step is to generate 2 number between -5 and 5 with the node “Random.Range”. Select the one that have float input.
(Integer -> ex 1024) ( Float -> ex 1.25426)
At the end you will move the sphere by it’s “Rigidbody” component. You could move it by it’s “transform” component but if a gameobject have a “rigidbody” it is better practice to use “rigidbody”.
Again, since the Rigidbody component is on the sphere GameObject direly, we can let the input to “self”.
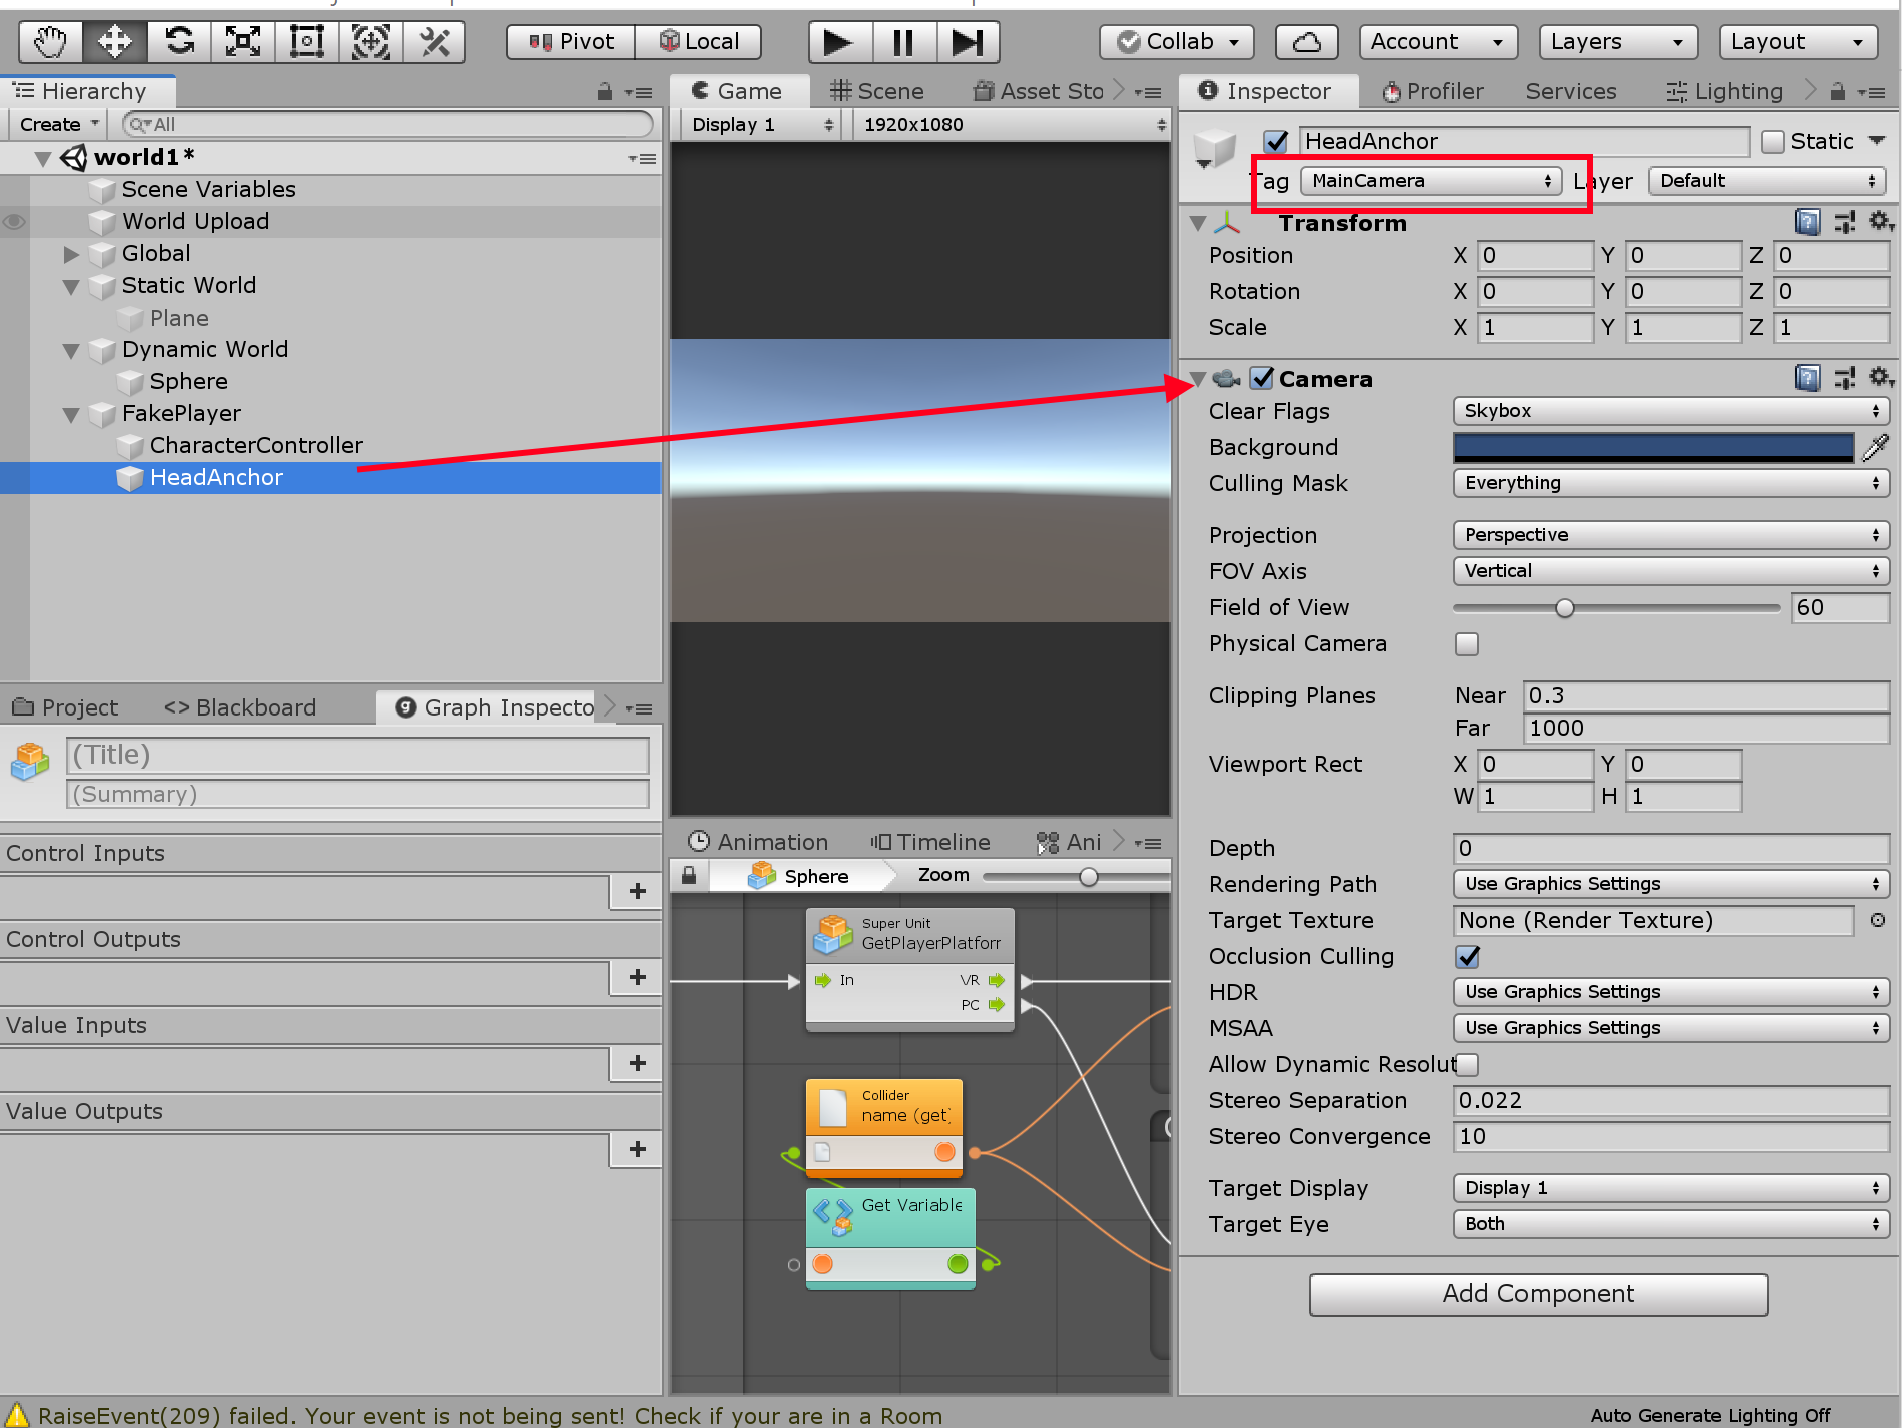
15. Fake player for simulation
To test, we need a fake player. This player will contain a “character controller” and a camera tagged as “MainCamera” (don’t mind the rest i messed up around)
Add a gameobject at the root (top level) of the scene and called is “FakePlayer”.
Inside Fake player create an empty gameobject called exactly “CharacterController” then add a component “CharacterController”. You don’t need specific other config.
The add an other empty GameObject called exactly “HeadAnchor”.
In this one add a component “Camera”.
To finish, change the Tag to “MainCamera”
16: Local Testing
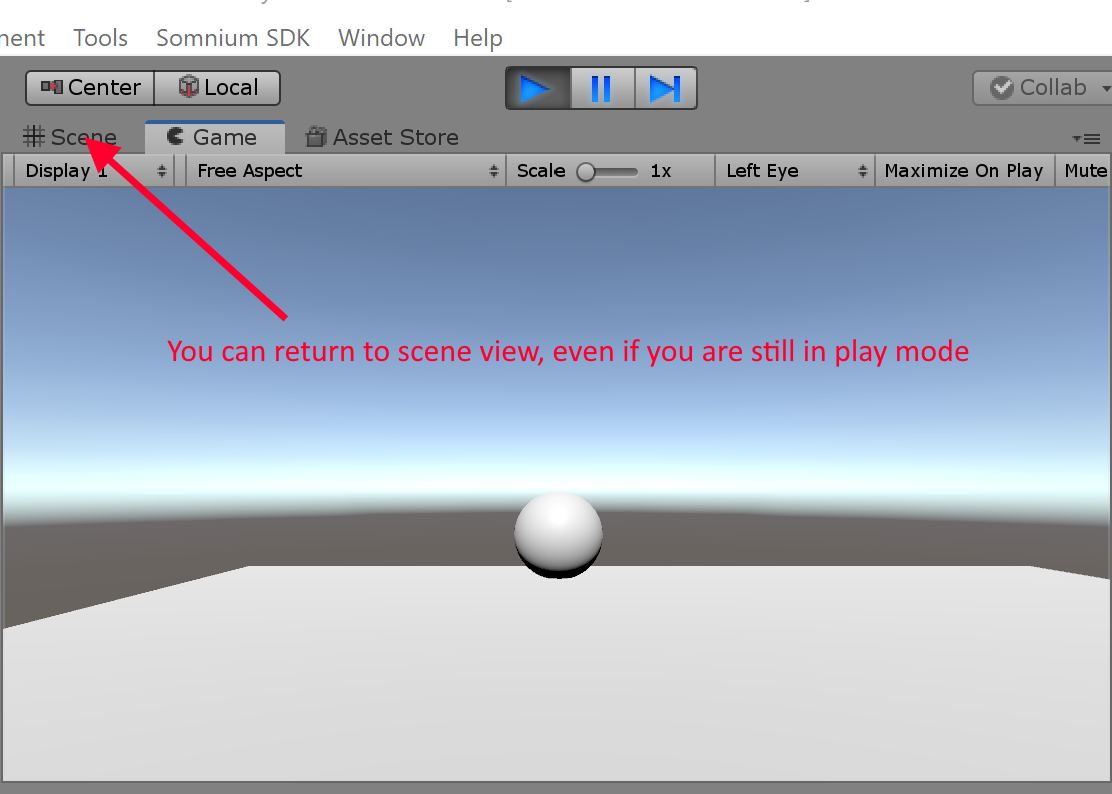
Now if everything is correctly setup, you can press play and go to Scene window.
In the scene window select and move the Character Controller to hit the sphere.
Normally the sphere should teleport if you touch it with the Character Controller . If the sphere just roll there is something wrong in your script.
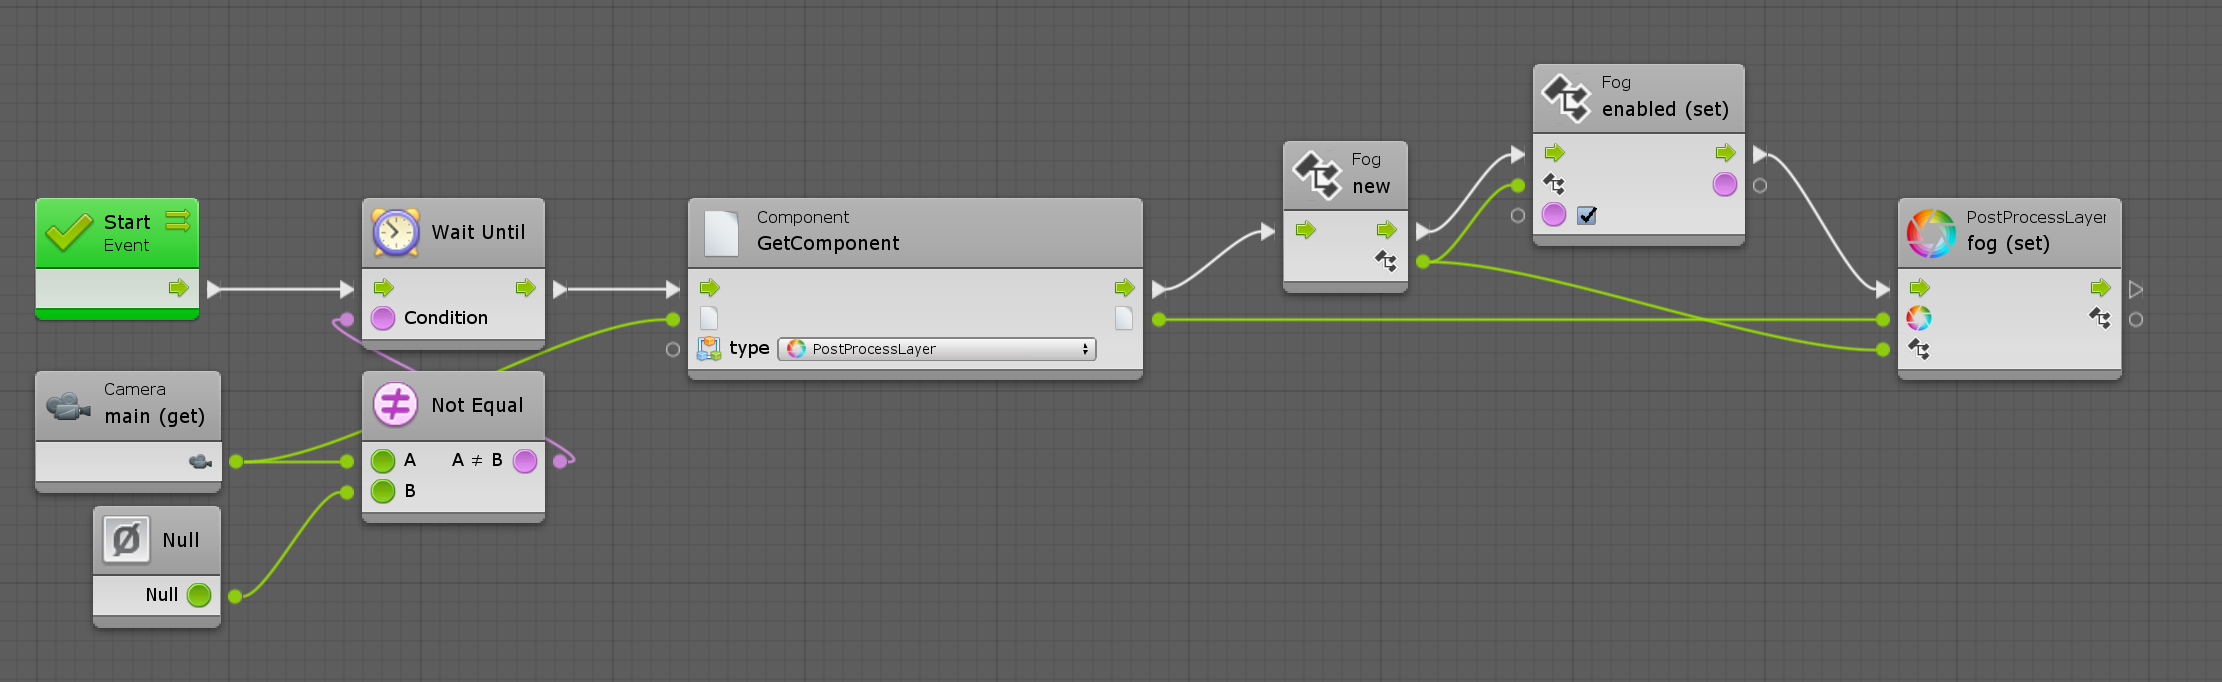
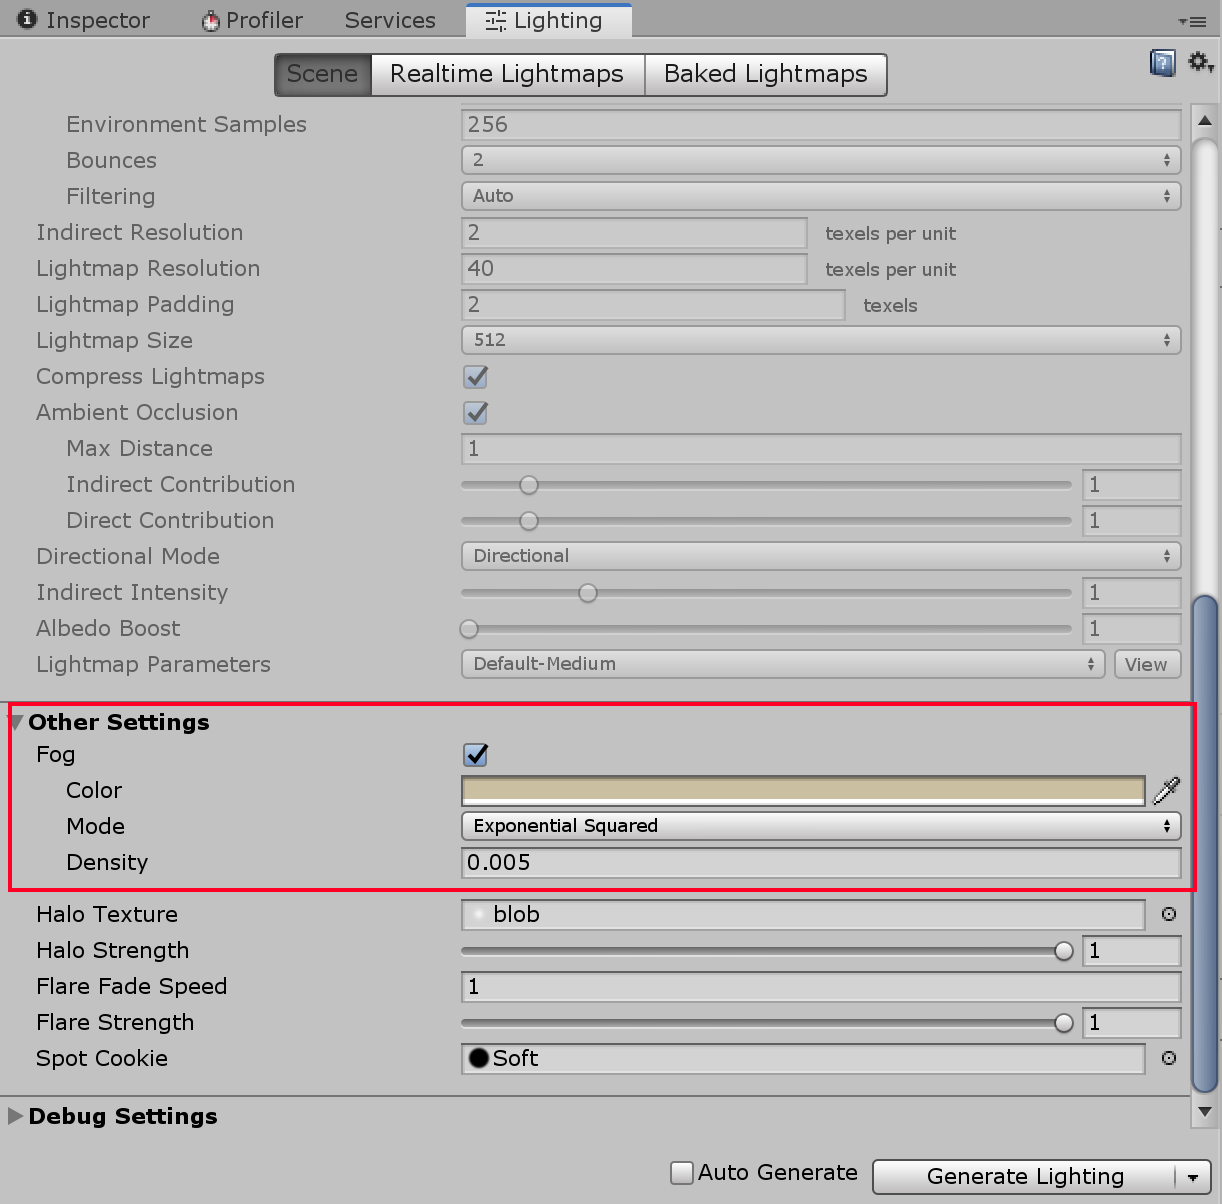
By default fog is disabled in PC mode in world, to enable fog you need to access the main camera then enable the fog on the post processing layer component.
Then the fog will be configured as you do in the lighting settings (Window / Rendering / Lighting Settings)
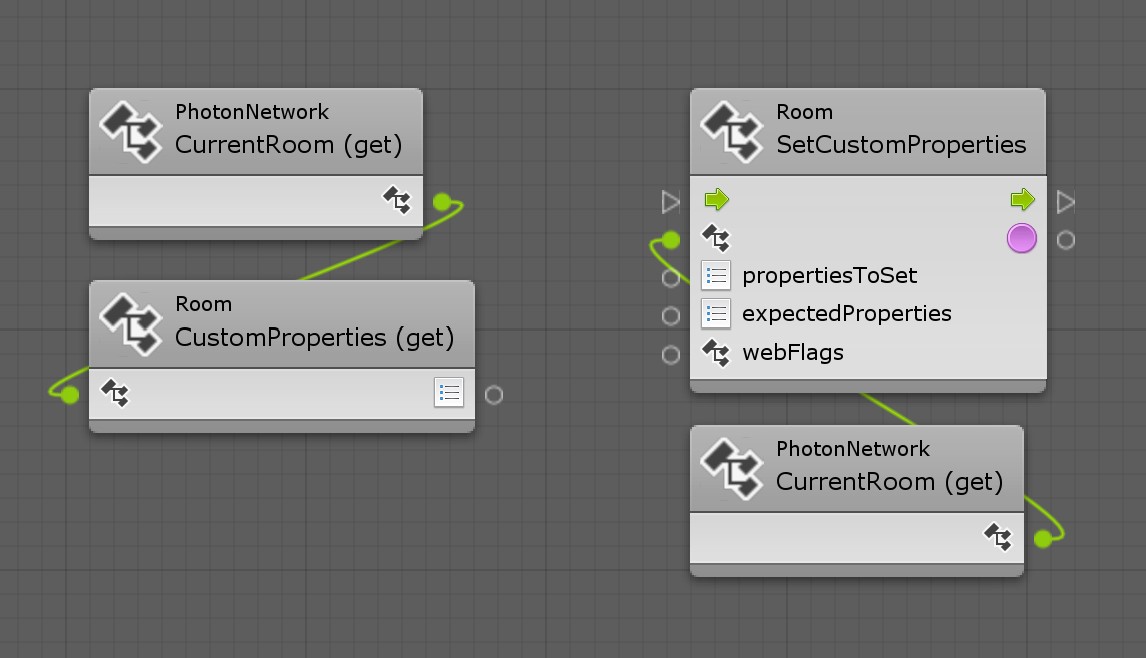
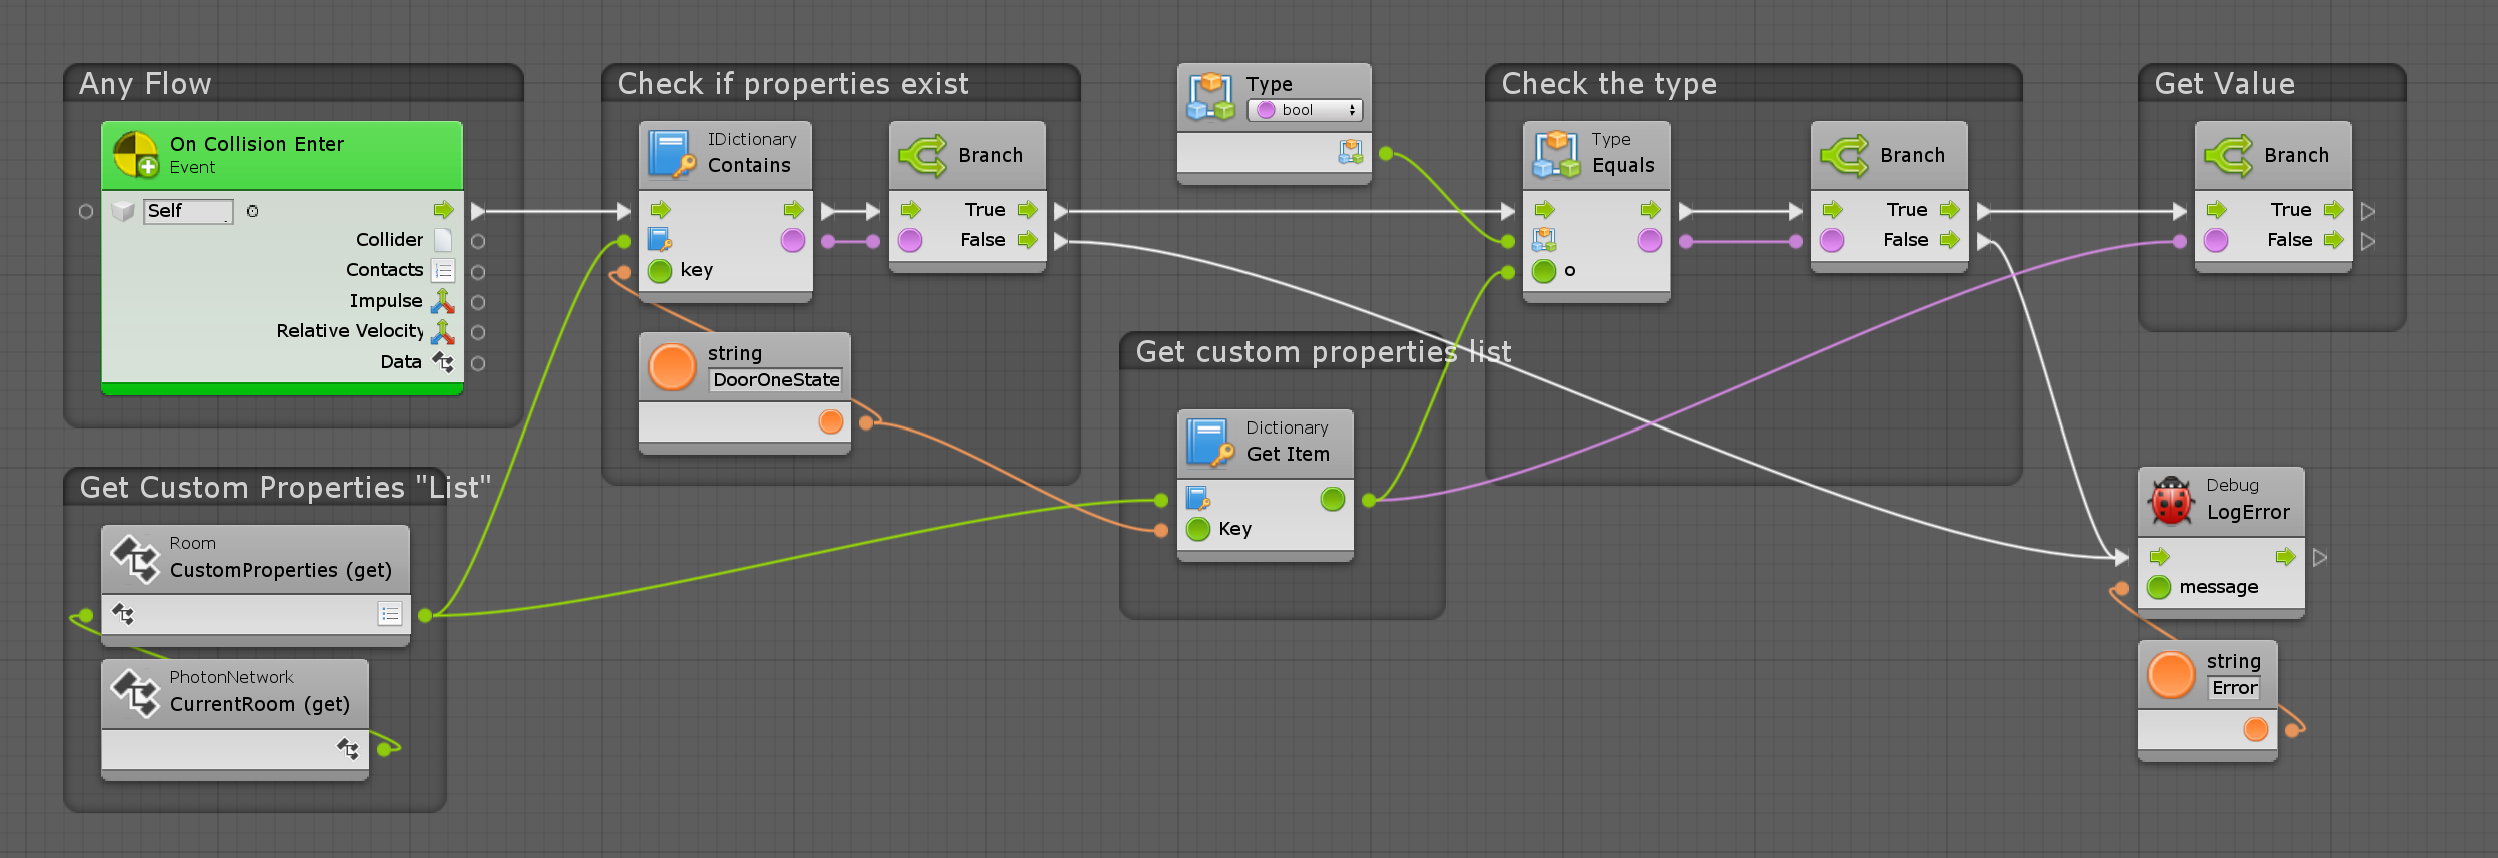
I made tow nodes to Set and Get a custom property. Be careful, you can’t set or get “custom properties” to fast. Try to avoid getting or setting properties faster than twice a second.
This is an other little project I made for you (A gift from my IncrediWorlds project), with this project, you can set and get custom properties without worrying about overloading the network.
A global script will do the synchronization while the “Set” and “Get” nodes only affect local variables.
(Warning) Please do not install with the other project, the 2 packages will interfere. The tow project are not complementary.
This system is made of 3 script:
A “controller” (a script that need to exist once in the world)
A GetCustomProjetries script
A SetCustomProjetries script
The test scene will be located at “Assets/#Local/#Packages/Denevraut Modules”